In the last post we got Nextcloud AIO up and running. Here we are going to cover how to make sure your installation stays up-to-date and has off-site backups.
Thankfully Nextcloud AIO makes all this extremely easy. But we will need to create a few cron jobs in Virtualmin as well. No big deal; this will only take a few minutes.
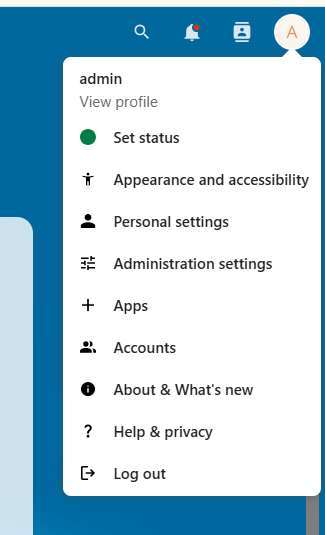
Start by logging in to Nextcloud. Click on the circle at the top right to open up the menu.
From here click on Administration settings. Which will take you here:
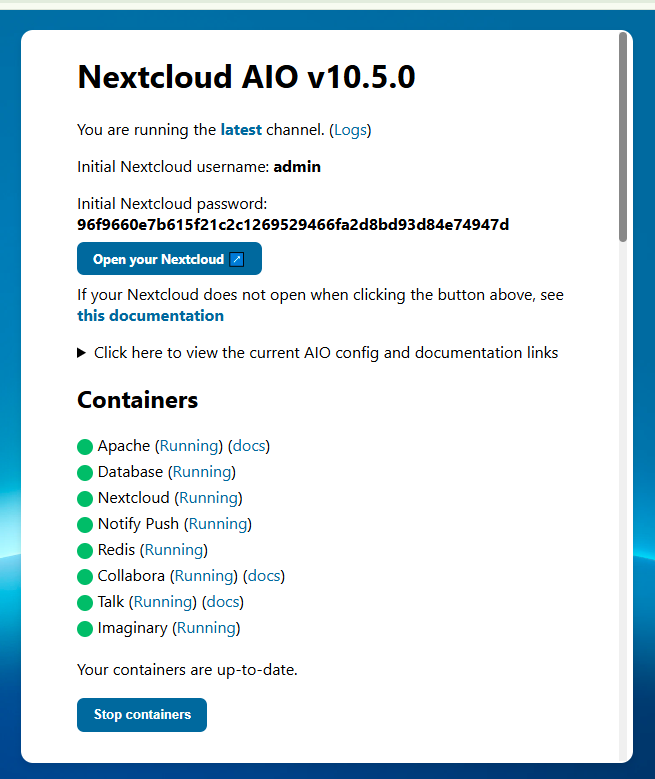
Click on that button. The Open Nextcloud AIO Interface button.
Just like it says, it will open the Nextcloud AIO interface.
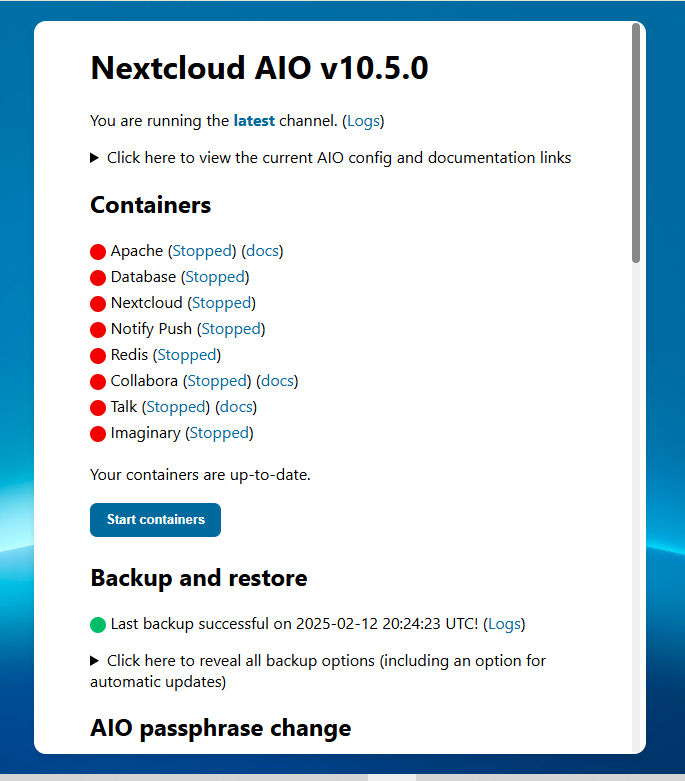
You want to scroll down on that page until you get to the backup section.
Okay – now we need to cover a few things before moving on.
I have been running the backup “my way” since before they added additional options. So today, options exist that did not exist several months ago.
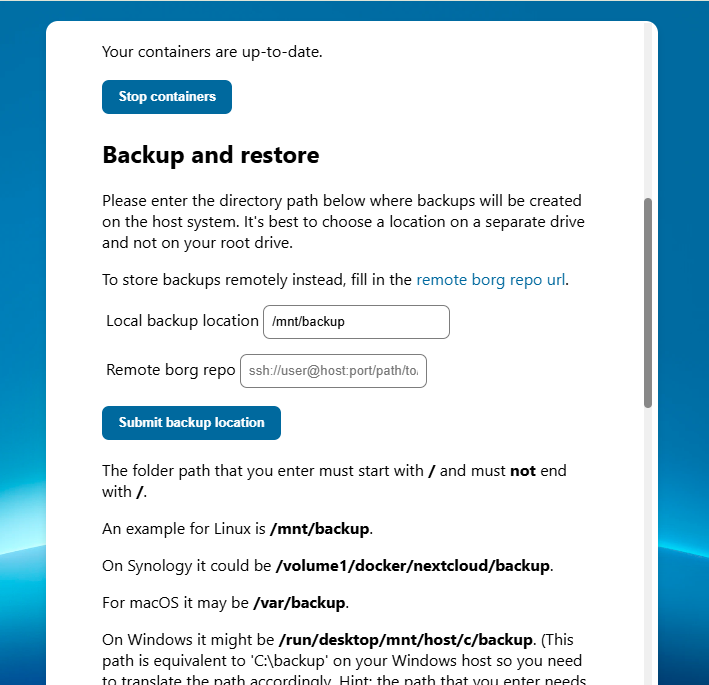
In the olden days, the backup location was /mnt/backup. That was it. You did not get an option. Also (in the olden days) the option to use a remote Borg repo did not exist.
In theory you should be able to change the local location to something like /home/nextuser/backup and Virtualmin would automatically backup the folder. However, you may run into a problem with folder/file permissions as the files created by Nextcloud will be owned by root and not nextuser.
Also in theory, you can use a remote Borg repo as your off-site storage. But “my way” uses S3 object storage which is much cheaper than volume storage.
For these reasons – and because I know that my system works – I’m going to continue to show you how I do it. (Dear experts/pros/gurus: I’m not saying this is the best way. I’m saying this is “a way” that I happen to know works because I have had to restore the system from a backup done this way.)
So in the local backup location field go ahead and enter: /mnt/backup just like in the image above and click the Submit Backup Location button.
The page will reload and if you scroll down you will see your backup encryption key. You don’t need to write that down. It will always be able to get it off of this page.
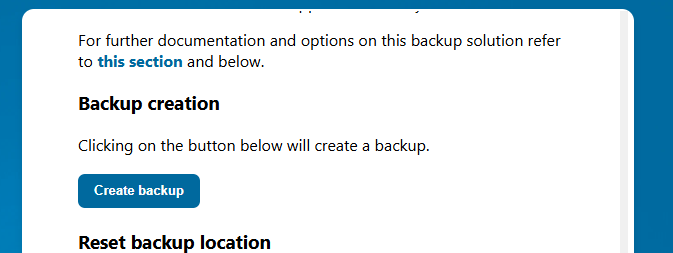
Keep scrolling down until you get to the Create Backup button.
Go ahead and click that.
Let the system do its thing. Nextcloud is going to stop all of the containers and run the backup container. If you want to watch this, you can login to Portainer and see what is running. The first backup always takes a few extra minutes; so be patient.
When finished you should get a screen like this:
The system leaves you with ALL CONTAINERS STOPPED.
Underneath “backup and restore” there is the spot the arrow that says “click here to reveal all backup options”. Go ahead and do that. Click on that sentence to reveal more options. Then scroll down on that page until you get to here:
When you submit a backup time, you need to think a little bit. Whatever time you put in the box will be UTC. When it’s 09:00 UTC that is either 04:00 or 05:00 in New York (depending on DST.) While the backup is running the containers will be stopped and your users unable to access the system. So choose your time wisely for your particular time zone.
Also, the system is running other cron jobs all the time. So I try not to deliberately schedule things at the top or bottom of the hour. I entered 12 minutes after the hour.
One of the beautiful things about Nextcloud AIO is its ability to take care of itself. Make sure that first checkbox is checked and every Saturday the system will update everything in addition to performing the backup.
Once you’ve selected your time go ahead and click the Submit Backup Time button.
And don’t forget to START YOUR CONTAINERS.
We are done in Nextcloud. We know that our server will be backed up every day at either 4 or 5AM New York time.
All that’s left is to make sure the backup files get stored into the cloud. For that we will use Virtualmin.
Go ahead and log into your Virtualmin panel/portal.
Click on “Webmin” at the top left (or press Alt-W.)
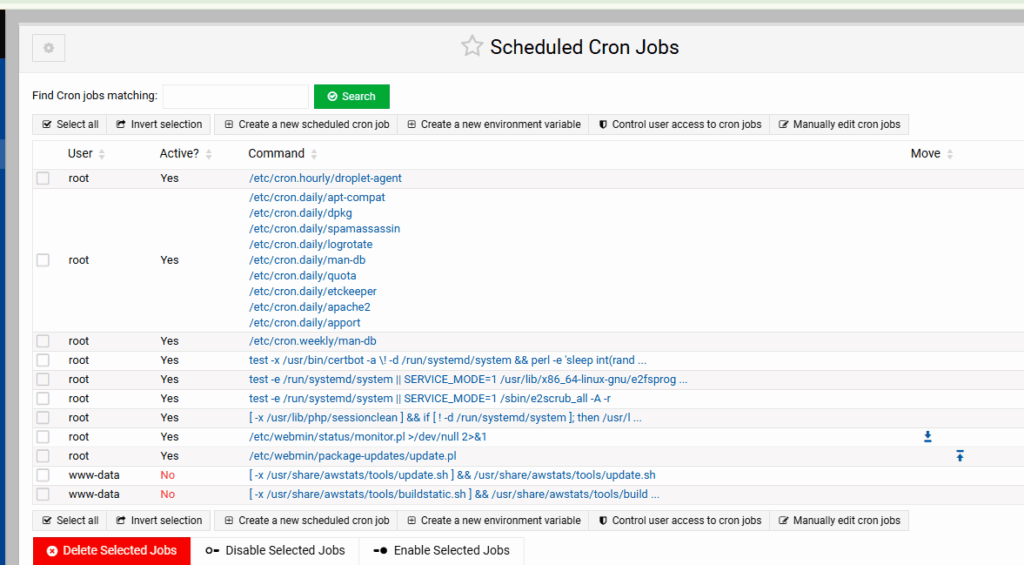
Then click on System. Then click on Scheduled Cron Jobs.
Should get something like this:
Click on either of the buttons that say “Manually edit cron jobs”.
To the bottom of that file we want to add the following lines:
Every day at 5:36 root is going to create a tar archive of the backup directory.
Every day at 5:41 root is going to change the owner of that file to nextuser.
Every day at 5:46 root is going to move the backup file into nextuser’s directory so it can be backed up by Virtualmin.
The next morning… Every day at 5:31 root is going to delete yesterday’s file so the process can start over.
With these lines added, your file might look something like this:
NOTE: I understand the “pros” will tell me that this could be done with a single command and a Perl script. If you want to research doing that be my guest.
Provided you have already scheduled daily backups Virtualmin will now backup that tar archive file to your S3 object storage in the cloud every day.
Of course there are other ways to do this. But this way has been working well for over a year without issue.
This is going to be the easiest complex thing you have ever done.
Nextcloud is kinda like Dropbox meets Zoom and Google Office. You should probably check out the official website.
Nextcloud AIO is now (wasn’t until recently) the official method to install the open-source, free, community version of Nextcloud. Installing Nextcloud AIO has several advantages over installing only Nextcloud. The AIO version includes automated installation, updates, & backups. It also comes with STUN & TURN servers, and the “high-performance backend” for Talk (Nextcloud’s version of Zoom.)
The bottom line is that Virtualmin + Docker + Portainer + Nextcloud AIO = Awesomeness!
So let’s have at it.
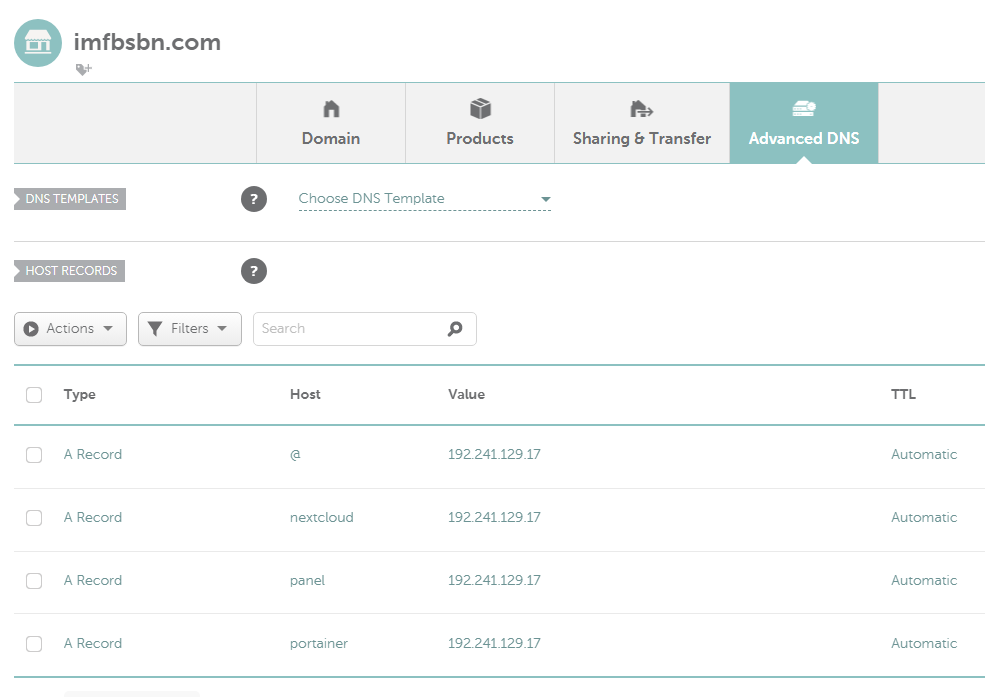
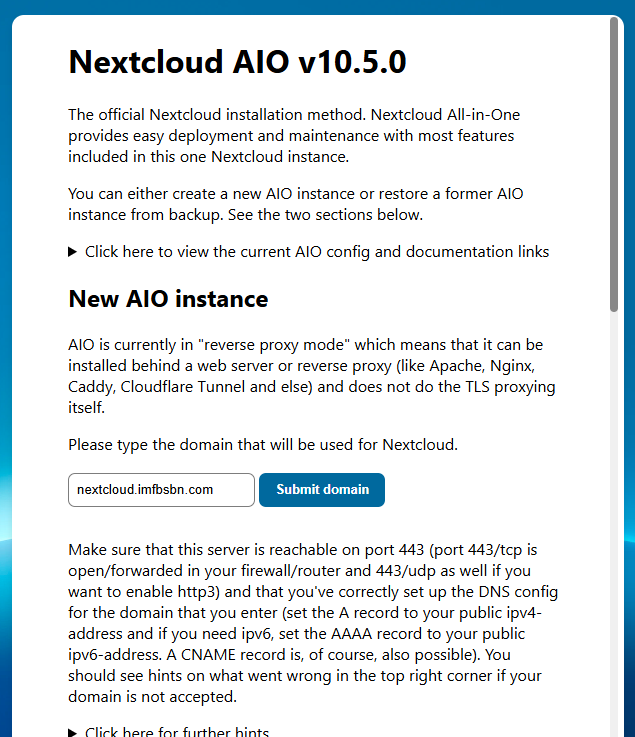
As with all of these examples, the first thing we need is a fully qualified domain name, a URL, where we are going to host Nextcloud. In this example were going to use: nextcloud.imfbsbn.com.
If you read the previous post about how I setup Virtualmin, you will know that I do not use the DNS features within VM. Just so were clear, VM provides DNS services beautifully. My reasons for not using VM’s DNS has nothing to do with VM. My reasoning is that my domain registrar – a multi-multimillion dollar organization – can provide DNS more reliably than the VPS server I rent for $12/mo.
So here you have a choice:
If VM is hosting your DNS – if you followed the official setup instructions – then all you have to do is add the domain to VM.
If you’re like me, and VM is NOT hosting your DNS, then you have to create your DNS record at your domain registrar. This is me. So this is what I’m going to do first.
I’m going to create the Nextcloud DNS record which looks like this:
Again, this is what it looks like at Namecheap. Things at your registrar may appear different. Also, you can see the records I’ve created in previous projects.
Next, we need to add the domain name to Virtualmin and set up the reverse proxy. Virtualmin makes this super easy.
Log into the Virtualmin panel,
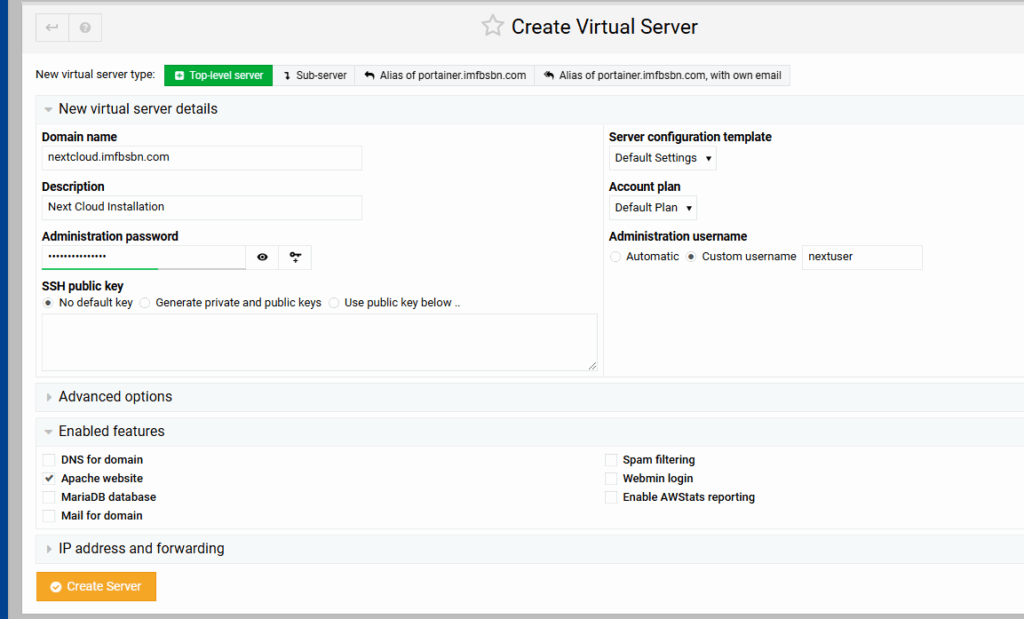
Near the top left of the menu, click on “Create Virtual Server”.
Quick note on “top-Level” & “Sub-Servers”
Top-Level Servers | You can think of these like an account. If you and three friends each own five domains and you wanted to share a server the root account would create four “Top-Level” servers; one for each friend. Each person would be able to login to Virtualmin and be the administrator for their account and whatever “Sub- Servers” (a.k.a. domains) they wish to add.
Because I’m the only “admin” with access to my server, I’m always logging in as root. I want to have access to all of the domains hosted on the server at all times. I don’t want to have to log out, and login as a different user to make changes to any particular domain. Therefore I generally add all domains to my server as “Top-Level Servers.”
Just like we added the domain for portainer, we will add this domain for nextcloud.
For domain name we will enter our fully qualified domain name. Description can be anything you want.
As for the administration password, I just clicked on the little key with the + sign and VM inserted a password for me. I didn’t write it down because I’m the only user of the system and I will always be logging in as root. In fact, I don’t need to write down either the username or the password. We will never use them.
Just like before, a few changes to the default settings:
For the administration username I prefer to use something custom over the automatic feature.
I unchecked the boxes for DNS, MariaDB, Mail, Spam, Webmin, & AWStats because this domain will not use any of those features.
This domain WILL REQUIRE Apache (as a reverse proxy.) So leave that box checked.
When you’re all set click the orange Create Server button.
Virtualmin will work its magic adding the domain to the server. Depending on your hardware the process might take 1-2 minutes.
When it’s done, click on the blue button at the bottom that says Return to Server Details.
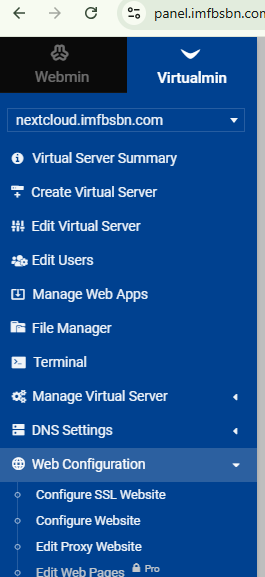
Before we leave the Virtualmin panel, we’re going to set up the proxy forwarding (so we don’t have to come back later.)
Confirm VM is ready to modify the correct domain. It should be listed at the top of the left menubar.
First click on Web Configuration. Then click on Edit Proxy Website.
Click on the “Yes” radio button to enable proxying.
Inside the Proxy to URL box enter: http://127.0.0.1:11100/
Click on Save and Apply. And we have done everything we need to do inside Virtualmin.
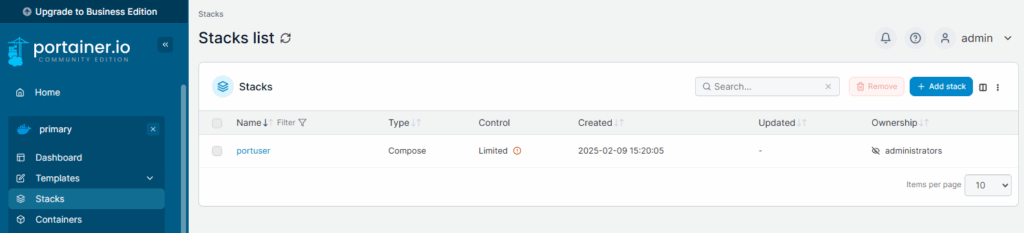
Assuming you have installed Portainer – as shown in the previous post – you don’t even need to access the CLI in order to complete the installation.
Instead, log into Portainer, click on the “primary” installation, and then click on “stacks”.
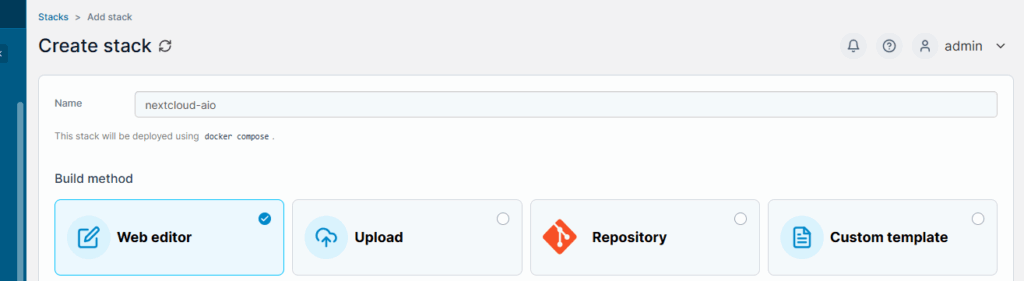
Over near the top right, click on the Add Stack button.
Give your stack a name. Be aware and must meet Linux standards for usernames. The system will bark at you if it’s unhappy.
The “web editor” is selected by default. That’s what were going to use.
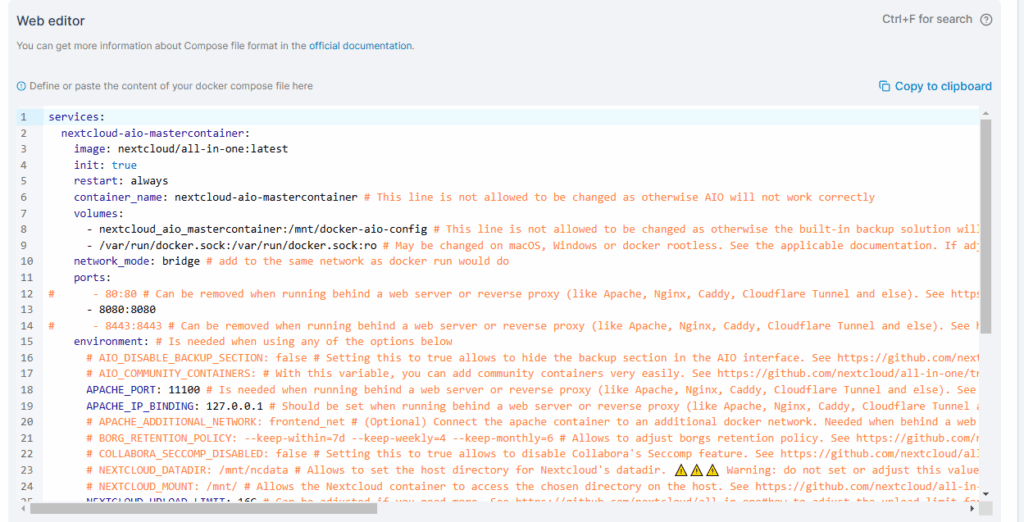
Then you’re going to copy and paste the following code into the window.
services:
nextcloud-aio-mastercontainer:
image: nextcloud/all-in-one:latest
init: true
restart: always
container_name: nextcloud-aio-mastercontainer # This line is not allowed to be changed as otherwise AIO will not work correctly
volumes:
- nextcloud_aio_mastercontainer:/mnt/docker-aio-config # This line is not allowed to be changed as otherwise the built-in backup solution will not work
- /var/run/docker.sock:/var/run/docker.sock:ro # May be changed on macOS, Windows or docker rootless. See the applicable documentation. If adjusting, don't forget to also set 'WATCHTOWER_DOCKER_SOCKET_PATH'!
network_mode: bridge # add to the same network as docker run would do
ports:
# - 80:80 # Can be removed when running behind a web server or reverse proxy (like Apache, Nginx, Caddy, Cloudflare Tunnel and else). See https://github.com/nextcloud/all-in-one/blob/main/reverse-proxy.md
- 8080:8080
# - 8443:8443 # Can be removed when running behind a web server or reverse proxy (like Apache, Nginx, Caddy, Cloudflare Tunnel and else). See https://github.com/nextcloud/all-in-one/blob/main/reverse-proxy.md
environment: # Is needed when using any of the options below
# AIO_DISABLE_BACKUP_SECTION: false # Setting this to true allows to hide the backup section in the AIO interface. See https://github.com/nextcloud/all-in-one#how-to-disable-the-backup-section
# AIO_COMMUNITY_CONTAINERS: # With this variable, you can add community containers very easily. See https://github.com/nextcloud/all-in-one/tree/main/community-containers#community-containers
APACHE_PORT: 11100 # Is needed when running behind a web server or reverse proxy (like Apache, Nginx, Caddy, Cloudflare Tunnel and else). See https://github.com/nextcloud/all-in-one/blob/main/reverse-proxy.md
APACHE_IP_BINDING: 127.0.0.1 # Should be set when running behind a web server or reverse proxy (like Apache, Nginx, Caddy, Cloudflare Tunnel and else) that is running on the same host. See https://github.com/nextcloud/all-in-one/blob/main/reverse-proxy.md
# APACHE_ADDITIONAL_NETWORK: frontend_net # (Optional) Connect the apache container to an additional docker network. Needed when behind a web server or reverse proxy (like Apache, Nginx, Caddy, Cloudflare Tunnel and else) running in a different docker network on same server. See https://github.com/nextcloud/all-in-one/blob/main/reverse-proxy.md
# BORG_RETENTION_POLICY: --keep-within=7d --keep-weekly=4 --keep-monthly=6 # Allows to adjust borgs retention policy. See https://github.com/nextcloud/all-in-one#how-to-adjust-borgs-retention-policy
# COLLABORA_SECCOMP_DISABLED: false # Setting this to true allows to disable Collabora's Seccomp feature. See https://github.com/nextcloud/all-in-one#how-to-disable-collaboras-seccomp-feature
# NEXTCLOUD_DATADIR: /mnt/ncdata # Allows to set the host directory for Nextcloud's datadir. ⚠️⚠️⚠️ Warning: do not set or adjust this value after the initial Nextcloud installation is done! See https://github.com/nextcloud/all-in-one#how-to-change-the-default-location-of-nextclouds-datadir
# NEXTCLOUD_MOUNT: /mnt/ # Allows the Nextcloud container to access the chosen directory on the host. See https://github.com/nextcloud/all-in-one#how-to-allow-the-nextcloud-container-to-access-directories-on-the-host
NEXTCLOUD_UPLOAD_LIMIT: 24G # Can be adjusted if you need more. See https://github.com/nextcloud/all-in-one#how-to-adjust-the-upload-limit-for-nextcloud
# NEXTCLOUD_MAX_TIME: 3600 # Can be adjusted if you need more. See https://github.com/nextcloud/all-in-one#how-to-adjust-the-max-execution-time-for-nextcloud
NEXTCLOUD_MEMORY_LIMIT: 1024M # Can be adjusted if you need more. See https://github.com/nextcloud/all-in-one#how-to-adjust-the-php-memory-limit-for-nextcloud
# NEXTCLOUD_TRUSTED_CACERTS_DIR: /path/to/my/cacerts # CA certificates in this directory will be trusted by the OS of the nextcloud container (Useful e.g. for LDAPS) See https://github.com/nextcloud/all-in-one#how-to-trust-user-defined-certification-authorities-ca
# NEXTCLOUD_STARTUP_APPS: deck twofactor_totp tasks calendar contacts notes # Allows to modify the Nextcloud apps that are installed on starting AIO the first time. See https://github.com/nextcloud/all-in-one#how-to-change-the-nextcloud-apps-that-are-installed-on-the-first-startup
# NEXTCLOUD_ADDITIONAL_APKS: imagemagick # This allows to add additional packages to the Nextcloud container permanently. Default is imagemagick but can be overwritten by modifying this value. See https://github.com/nextcloud/all-in-one#how-to-add-os-packages-permanently-to-the-nextcloud-container
# NEXTCLOUD_ADDITIONAL_PHP_EXTENSIONS: imagick # This allows to add additional php extensions to the Nextcloud container permanently. Default is imagick but can be overwritten by modifying this value. See https://github.com/nextcloud/all-in-one#how-to-add-php-extensions-permanently-to-the-nextcloud-container
# NEXTCLOUD_ENABLE_DRI_DEVICE: true # This allows to enable the /dev/dri device for containers that profit from it. ⚠️⚠️⚠️ Warning: this only works if the '/dev/dri' device is present on the host! If it should not exist on your host, don't set this to true as otherwise the Nextcloud container will fail to start! See https://github.com/nextcloud/all-in-one#how-to-enable-hardware-acceleration-for-nextcloud
# NEXTCLOUD_ENABLE_NVIDIA_GPU: true # This allows to enable the NVIDIA runtime and GPU access for containers that profit from it. ⚠️⚠️⚠️ Warning: this only works if an NVIDIA gpu is installed on the server. See https://github.com/nextcloud/all-in-one#how-to-enable-hardware-acceleration-for-nextcloud.
# NEXTCLOUD_KEEP_DISABLED_APPS: false # Setting this to true will keep Nextcloud apps that are disabled in the AIO interface and not uninstall them if they should be installed. See https://github.com/nextcloud/all-in-one#how-to-keep-disabled-apps
# SKIP_DOMAIN_VALIDATION: false # This should only be set to true if things are correctly configured. See https://github.com/nextcloud/all-in-one?tab=readme-ov-file#how-to-skip-the-domain-validation
# TALK_PORT: 3478 # This allows to adjust the port that the talk container is using which is exposed on the host. See https://github.com/nextcloud/all-in-one#how-to-adjust-the-talk-port
# WATCHTOWER_DOCKER_SOCKET_PATH: /var/run/docker.sock # Needs to be specified if the docker socket on the host is not located in the default '/var/run/docker.sock'. Otherwise mastercontainer updates will fail. For macos it needs to be '/var/run/docker.sock'
# security_opt: ["label:disable"] # Is needed when using SELinux
# # Optional: Caddy reverse proxy. See https://github.com/nextcloud/all-in-one/discussions/575
# # Alternatively, use Tailscale if you don't have a domain yet. See https://github.com/nextcloud/all-in-one/discussions/5439
# # Hint: You need to uncomment APACHE_PORT: 11000 above, adjust cloud.example.com to your domain and uncomment the necessary docker volumes at the bottom of this file in order to make it work
# # You can find further examples here: https://github.com/nextcloud/all-in-one/discussions/588
# caddy:
# image: caddy:alpine
# restart: always
# container_name: caddy
# volumes:
# - caddy_certs:/certs
# - caddy_config:/config
# - caddy_data:/data
# - caddy_sites:/srv
# network_mode: "host"
# configs:
# - source: Caddyfile
# target: /etc/caddy/Caddyfile
# configs:
# Caddyfile:
# content: |
# # Adjust cloud.example.com to your domain below
# https://cloud.example.com:443 {
# reverse_proxy localhost:11000
# }
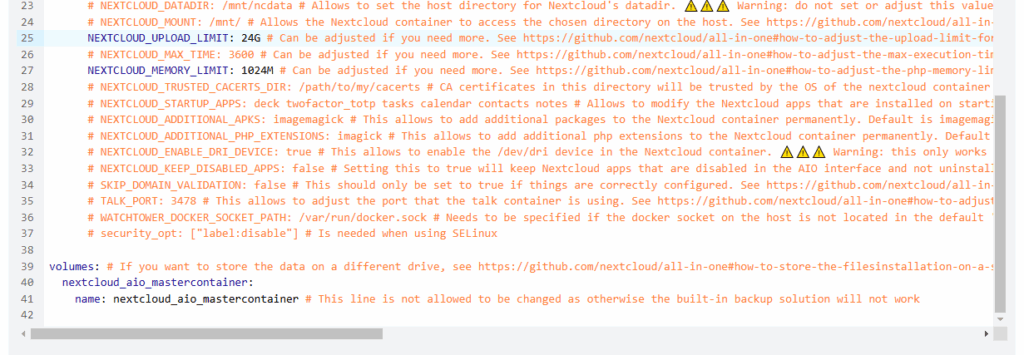
volumes: # If you want to store the data on a different drive, see https://github.com/nextcloud/all-in-one#how-to-store-the-filesinstallation-on-a-separate-drive
nextcloud_aio_mastercontainer:
name: nextcloud_aio_mastercontainer # This line is not allowed to be changed as otherwise the built-in backup solution will not work
# caddy_certs:
# caddy_config:
# caddy_data:
# caddy_sites:
Sorry it looks so terrible in WordPress. In the editor it should look better; something like this:
Comment out the line with port 80. We will be using a reverse proxy.
Comment out the line with port 8443. Again, we will be using the reverse proxy.
In the original file they use Apache_port 11000. That conflicts with Virtualmin’s email spam filter. So change this port to 11100 and things will work better.
Because we will be using Apache as a reverse proxy, we need to set Apache_IP_binding as shown.
Lastly, I upped the upload limit and the memory limit as shown below.
Everything else is left the same. But feel free to make any changes you deem necessary.
Then, scroll down on the page and click on the Deploy the Stack button.
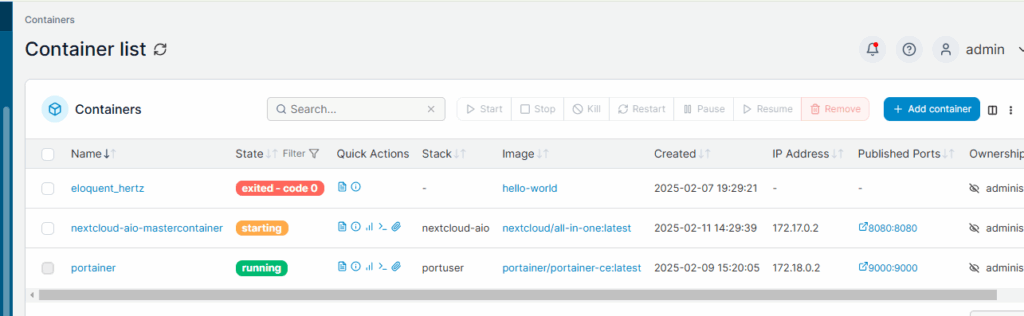
Once deployed, navigate over to the Containers page which will look like this:
When the orange “starting” turns green you will be able to navigate to the IP address of your machine at port 8080.
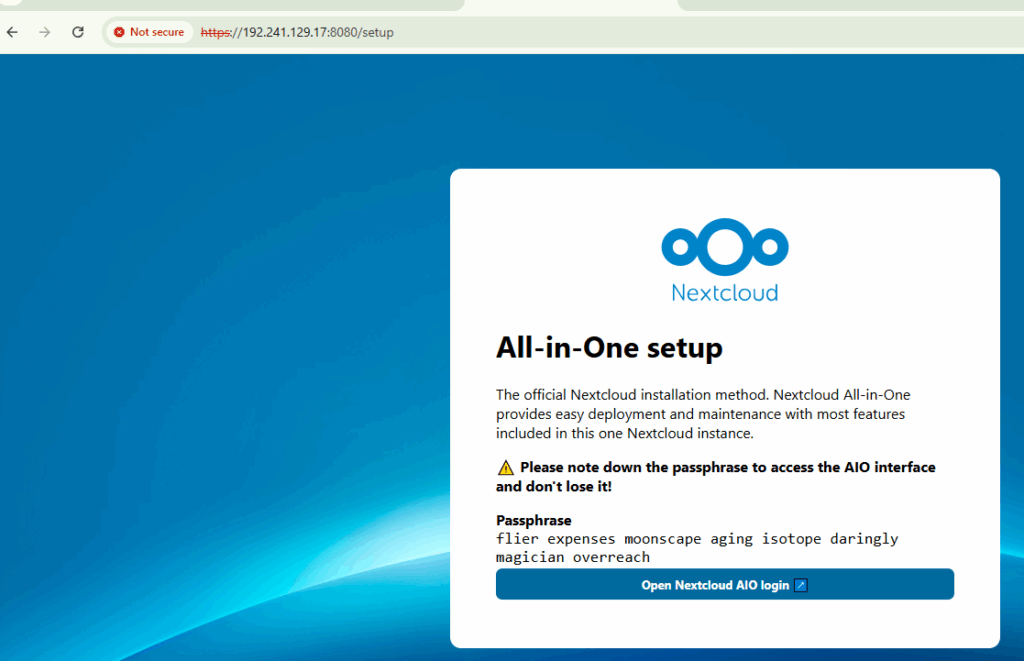
In our case, were going to use the IP address of the server built at Digital Ocean: https://192.241.129.17:8080/
You should get a screen like this:
Make sure you save that passphrase in a safe place, then click on the open button.
Enter the passphrase and login.
Here you want to enter the domain – not the URL – just the fully qualified domain name that you added to Virtualmin.
Go ahead and click on the Submit Domain button.
If everything goes well, the domain will check out. Meaning that the DNS records are correct and the domain is reachable on port 443.
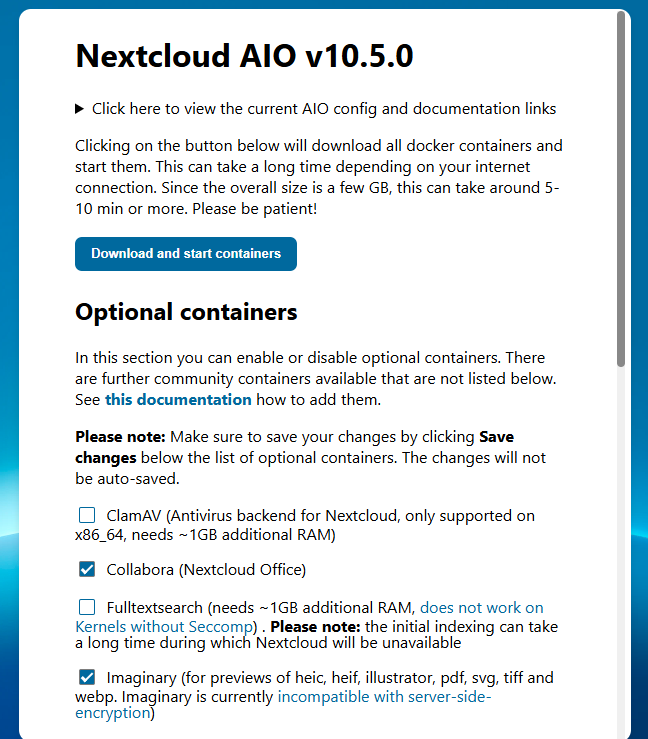
On the next screen you can choose optional containers to install, and also change the time zone.
On this installation I’m electing to go with the default options. So I just click on the Download and start Containers button.
… This is gonna take a little while. Find yourself a refreshing beverage and relax.
When it’s all done you will get a screen like this:
You’re going to want to save that password someplace safe.
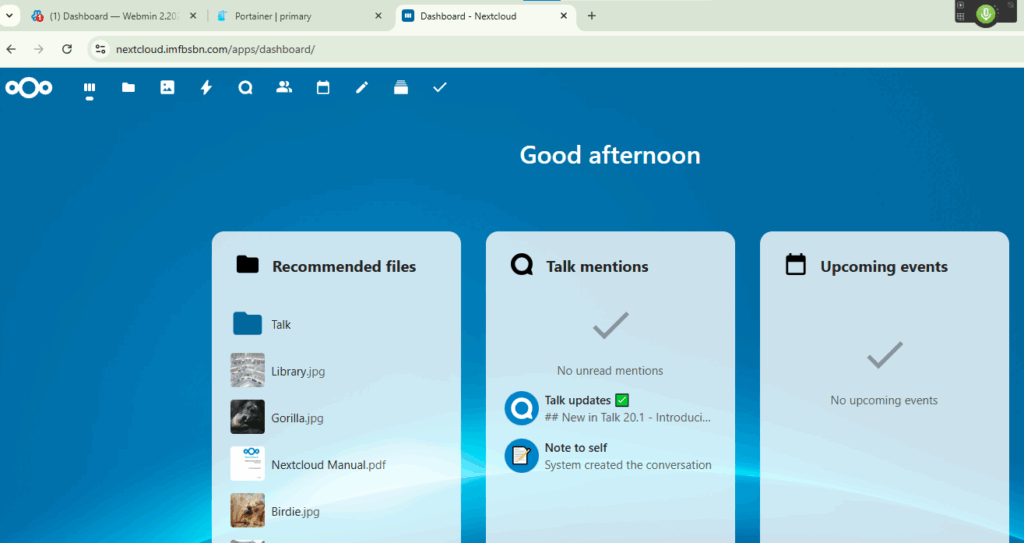
Go ahead and click on the Open your Nextcloud button to login. The default administrative user is “admin” and the password is right there.
You are going to get a couple of splash-screens the first time you login. Once you get past that you will be at the dashboard.
Congratulations!
You have installed Nextcloud AIO.
In the next post will walk through setting up daily backups and arranging for backups to be moved off the server and into the cloud.
Portainer is an application that helps you manage docker containers.
Now, just so were clear, using Portainer is not necessary. Some of the hard-core-experts (a.k.a. more experienced folk) may tell you that it’s not preferred. I get that. I really do. But in my experience it’s been a very helpful tool for keeping track of what containers are running, what ports they’re using, and examining their logs, all without having to remember a whole bunch of commands.
As always, I highly recommend you review the official documentation at the Portainer website. We will be installing the “community” edition.
To get started we need a URL, or a fully qualified domain name, where we are going to use Portainer. In this example were going to use: portainer.imfbsbn.com.
If you read the previous post about how I setup Virtualmin, you will know that I do not use the DNS features within VM. Just so were clear, VM provides DNS services perfectly. My reasons for not using VM’s DNS has nothing to do with VM. My reasoning is that my domain registrar – a multimillion dollar organization – can provide DNS more reliably than the VPS server I rent for $12/mo.
So here you have a choice:
If VM is hosting your DNS – if you followed the official setup instructions – then all you have to do is add the domain to VM.
If you’re like me, and VM is NOT hosting your DNS, then you have to create your DNS records at your domain registrar. This is me. So this is what I’m going to do first.
I’m going to create the portainer DNS record that looks like this:
This is at NameCheap. Your registrar’s set up might look a little different.
Once that’s done we are ready to add the domain to VM.
On the left side at the top of the menu click on “Create Virtual Server”. It will open up a window like this:
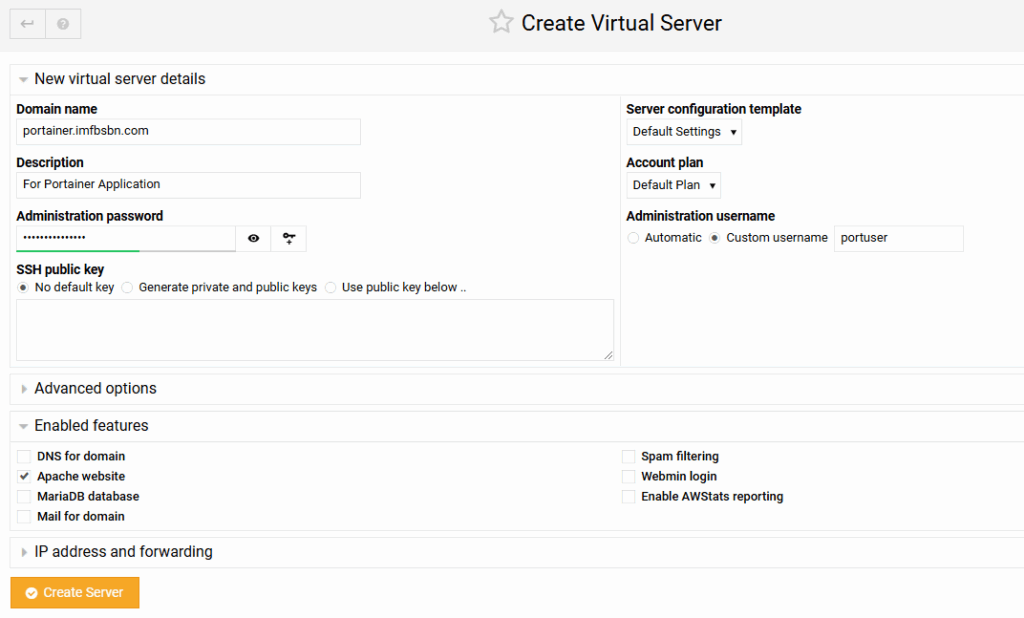
For domain name you want to enter the fully qualified domain name. Description can be anything you want.
As for the administration password, I just clicked on the little key with the + sign and VM inserted a password for me. I didn’t write it down because I’m the only user of the system and I will always be logging in as root. But take note of the username because it’s going to be the name of the directory where you have to create a file in just a minute. So in this case my username is: portuser. We are going to need to know that in a minute or two.
A few changes I did make to the default settings:
For the administration username I prefer to use something custom over the automatic feature.
I unchecked the boxes for DNS, MariaDB, Mail, Spam, Webmin, & AWStats because this domain will not use any of those features.
This domain WILL REQUIRE Apache (as a reverse proxy.) So leave that box checked.
When you’re all set click the orange Create Server button.
Virtualmin will work its magic adding the domain to the server. Depending on your hardware the process might take 1-2 minutes.
When it’s done, click on the blue button at the bottom that says Return to Server Details.
Before we leave the Virtualmin panel, we’re going to set up the proxy forwarding (so we don’t have to come back later.)
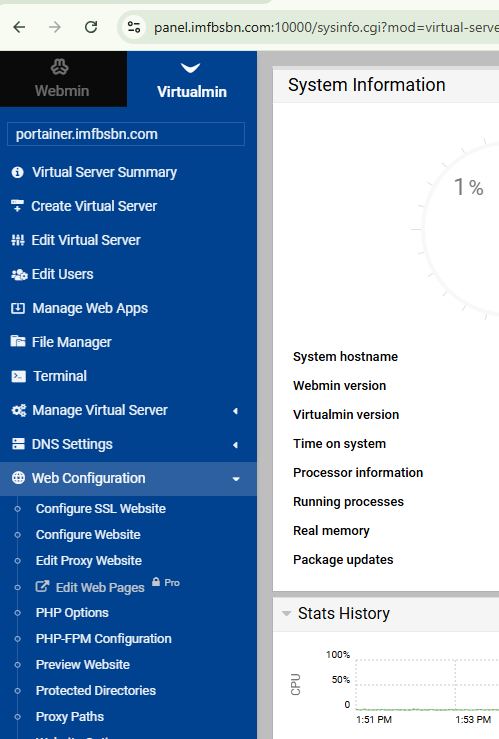
Confirm VM is ready to modify the correct domain. It should be listed at the top of the left menubar.
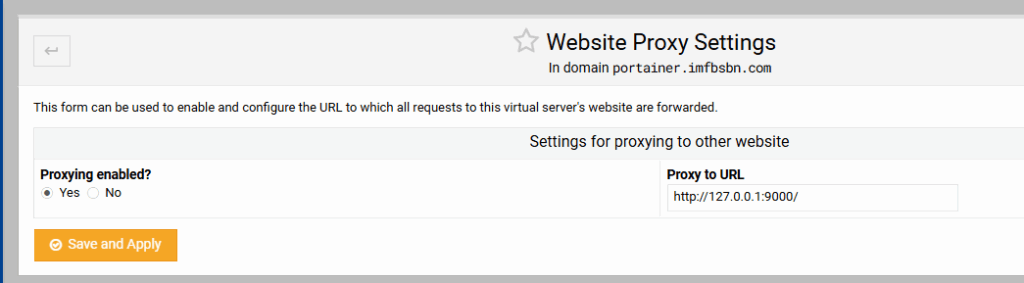
First click on Web Configuration. Then click on Edit Proxy Website.
Click on the “Yes” radio button to enable proxying.
Inside the Proxy to URL box enter: http://127.0.0.1:9000/
Click on Save and Apply. And we have done everything we need to do inside Virtualmin. Seriously, that’s it.
Now you need to login to your server through the CLI.
Before moving on we need to talk about Ubuntu and the sudo command.
– If you have installed Ubuntu on a piece of bare-metal like an old computer you found in the basement or a Raspberry Pi, then during the installation process Ubuntu will have asked you to create an admin user. That means you log into your Ubuntu server with that username & not root. If that’s the case, then you will need to use the sudo statement before your commands.
– If you have installed Ubuntu on a VPS server like the Digital Ocean droplet we created in a previous post, when you are likely logging into your Ubuntu server as root. If that’s the case, then you will NOT need to use the sudo statement. Although, while older versions of Ubuntu used to scream at you, it appears the current version just simply ignores the sudo if it’s not needed.
Going forward, I’m just going to assume you’re logging in as root.
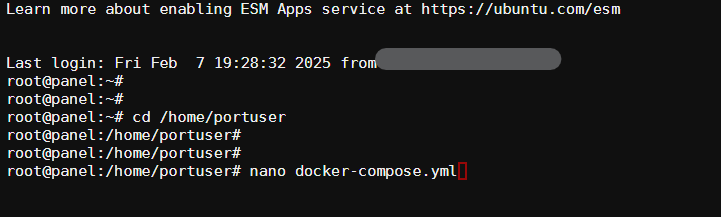
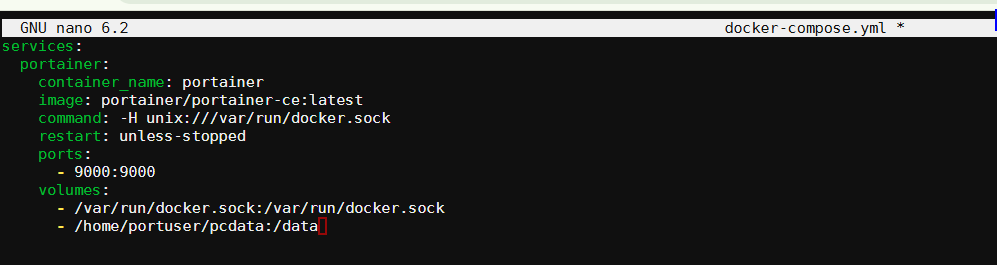
Navigate into the directory of the user you just created which in our case will be: /home/portuser.
cd /home/portuser
In this directory we need to create a docker compose file. Will do that using the nano file editor.
nano docker-compose.yml
Before you press enter (to execute the command and open the nano editor) your screen will look something like this:
Now you want to cut-and-paste the following into the nano editor:
PRO TIP: in most SSH clients Ctrl-V will NOT work to paste. Use a right-mouse-click to paste.
To exit the editor press Control-X. It will ask you if you want to save your work. Press Y. Then it will confirm the file name. You can just go-ahead and press Enter.
Now, let’s go over what each of these lines is doing.
services: | this is essentially telling docker that it will be executing service as opposed to running a command or dealing with the network.
portainer: | this is the name of the service that’s going to be executed within docker.
container_name: | this is going to be the name of the container within docker. A single service may contain several containers.
image: | specifies the code source from Docker Hub.
command: | this is literally a command that is passed to portainer when the application is started. This command connects portainer to docker.
restart: | tells docker if this container should be restarted if docker discovers it has stopped.
ports: | provides docker with the ports used to communicate with this container. The first number is the system port; the second is the docker port.
volumes: | similar to ports, this provides mapping between the raw OS and docker. In our case here we want to map /home/portuser/pcdata – which is a folder we know will get automatically backed-up by VM (see post on automatic backups) to the folder /data which exists inside the container. Doing it this way, if the server ever crashes we have all of our portainer data backed up for easy restore.
One last command to run.
Into the CLI type:
docker compose up -d
Before you press enter – be aware that a timer will start to run where you have about a minute to navigate to: https://portainer.imfbsbn.com/
This is because when portainer first launches you will create the admin user and its password. So be prepared.
NOW, go ahead and hit the enter key and then navigate to the website. Note that you do NOT need to include the port number in the URL.
When you run the command in the CLI, you should get something like this:
When you visit the URL you should get this:
Go-ahead and create your administrative user. You can choose any username and password you want. Then click the Create User button.
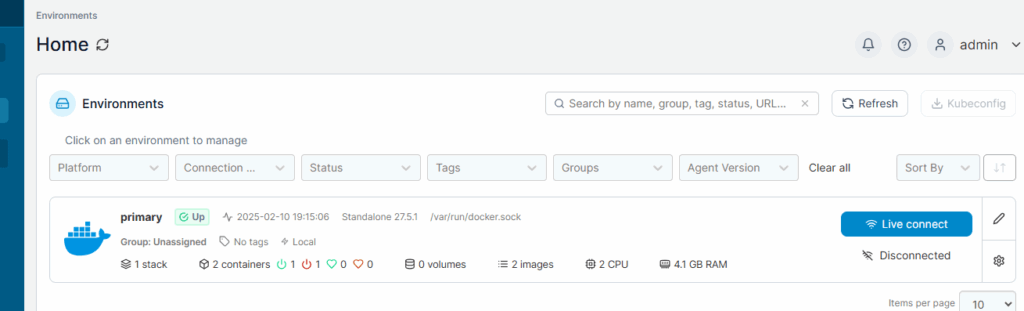
You should get taken to the Home screen. You will see on this machine we have a “primary” installation of Docker. Go ahead and click anywhere in the primary box.
Clicking inside the primary box will take you to the dashboard for that Docker installation. (No screenshot of that!)
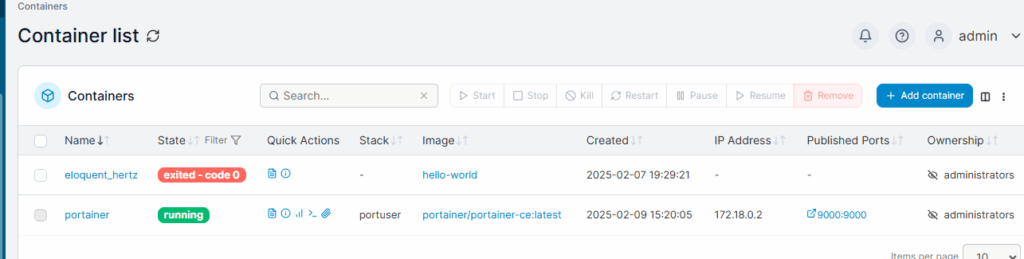
On the dashboard, click on “Containers”.
Here you see a listing of all the Docker containers loaded on the system and their status.
Congratulations! You now have installed portainer.
NOTE: if you’re not using Ubuntu, you CANNOT use the commands below. Your software can keys will be different. Please check the official documentation.
Before moving on we need to talk about Ubuntu and the sudo command.
– If you have installed Ubuntu on a piece of bare-metal like an old computer you found in the basement or a Raspberry Pi, then during the installation process Ubuntu will have asked you to create an admin user. That means you log into your Ubuntu server with that username & not root. If that’s the case, then you will need to use the sudo command.
– If you have installed Ubuntu on a VPS server like the Digital Ocean droplet we created in a previous post, when you are likely logging into your Ubuntu server as root. If that’s the case, then you will NOT need to use the sudo command. Although, while older versions of Ubuntu used to scream at you, it appears the current version just simply ignores the sudo if it’s not needed. (An explanation was needed because I don’t use it in my screenshots.)
For those of you who have logged in as a user with admin rights, your commands are going to look like this.
It’s been a long time since I rock-and-rolled It’s been a long time since I did the Stroll Ooh, let me get it back, let me get it back Let me get it back, baby, where I come from – – “Rock and Roll”, Led Zeppelin (1971)
The guys (Jimmy Page and company,) wrote “Rock and Roll” in response to some ignorant critic who lambasted Led Zeppelin III saying that the album was not real rock and roll. Funny how that works as the song is kind of their eponymous creation.
Anyways…
It has been a long time and I wanted to give a quick update as to what’s been happening.
Before we get into all that, need to give a shout out to Anthony Curran and Brian Shea. Long story short, right about the time we were having all that rain a few weeks ago, our sump pump decided to stop working. Had a few inches of water in the basement. Right after Anthony cleaned up the first mess, we got more rain. Thankfully Brian was able to come over and realize that there was nothing wrong with the pump; only that the electrical cord had been frayed. Some electrical tape and a couple wire nut connectors and we were back in business.
As fate would have it, the water got high enough to get into the furnace filter. That in turn got the furnace’s blower motor control board a little wet. Thankfully Brian keeps a gas powered leaf blower in his vehicle. So by the time he left there was very little water left in the basement and the furnace was running.
Many thanks guys. Please know you are appreciated.
What else is happening?
For those new here, I have a few open wounds. So every Monday Suzie and I tromp-off to wound care. Sometime back in November we’re sitting in the wound care office and the nurse takes my blood pressure. It’s something like 227/142. Naturally, the wound care doctor declines to poke around in the wounds that day and suggests we go over to the emergency room to find out what’s going on.
Ugh.
The plan was simple: because of my condition, I don’t experience pain the same way normal people do. What I do experience is something called autonomic dysreflexia which is a fancy term meaning that my body knows something is wrong and so it reacts. Usually by raising the blood pressure. In order to (try and) figure out what was going on, we needed a chest x-ray and an abdominal CT. Just to recap, I still have a kidney stone and we needed to see what it was up to.
We knew that my primary care physician could order these tests and I could go to radiology later in the week. But that would’ve taken days. The plan was to go through the emergency room and get this done in a few hours.
The Good
Resurrection has a brand-new emergency department. Nice reception area. Spacious triage rooms. Lots of soft lighting (it’s very calming.) And the waiting area is quite spacious with, naturally, all brand-new furniture.
The Bad
Actually, it wasn’t that bad. Yes, it took longer than “a few hours.”
And yes, there was an “incident” where some belligerent fellow accosted the staff members. Security was called. I actually don’t have many details. As part of the expansion, they have more rooms – so no one is in the hallway – and the acoustics don’t carry like in the old place. Nevertheless, I always find such events bittersweet. I feel bad for the staff; no nurse deserves to get punched in the face. But it is entertaining.
The Silly
After about an hour hanging out in the lobby, some friendly staff member came out to show us back. I’m checking out the new space as we roll on. Not really paying attention to where we are going – as I was thinking about how the department was set up in “pods” which appears to be the preferred medical architecture nowadays – we roll into a nice size room with a glass sliding door and all of the equipment one might expect in such a place. Suzie backs the wheelchair into the room next to the bed at which point the technician very politely says, “Okay, you just need to hop up in bed here.”
Every. Damn. Time.
In the end they ran their tests, came up with nothing, and sent me home.
I’m now on a low dose of blood pressure meds but no one really knows why.
I guess that’s it for now.
Enjoy the football and be well.
Standing chitchat, Sundays at 3:30 Central. No login or special software required. Here’s the link: https://jb.jb03.com/call/e35vvpp9. All are welcome.
If you’re not already subscribed, and wish to receive updates, please enter your email below.
Moving on from our previous post where we set up an objective storage, S3, bucket at Linode/Akamai…
Now we are ready to schedule backups of our Virtualmin server into the bucket.
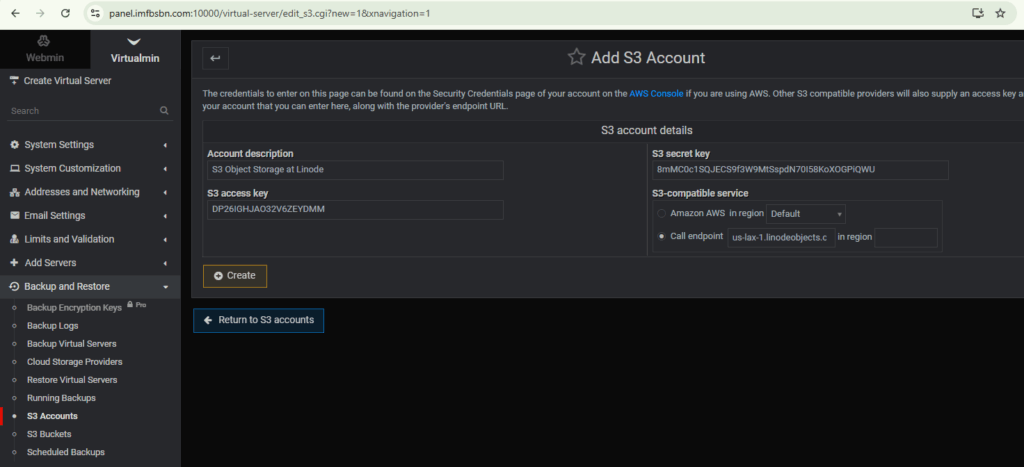
The first thing we need to do is to add the S3 account to Virtualmin.
From the left menu select Backup and Restore –> S3 Accounts. Go ahead and click the button to add a new S3 account.
On this page you will enter the API key information you saved while setting up the S3 bucket.
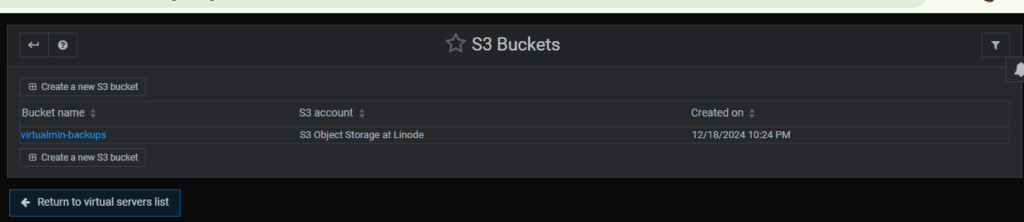
After you click the Create button, in the menu, click on S3 Buckets.
If everything is working properly, you should now see the bucket that was created in the previous step.
Beware that you do NOT need to click on the bucket name. You only need to observe that Virtualmin has located the bucket.
Now we are ready to set up our schedule the backups.
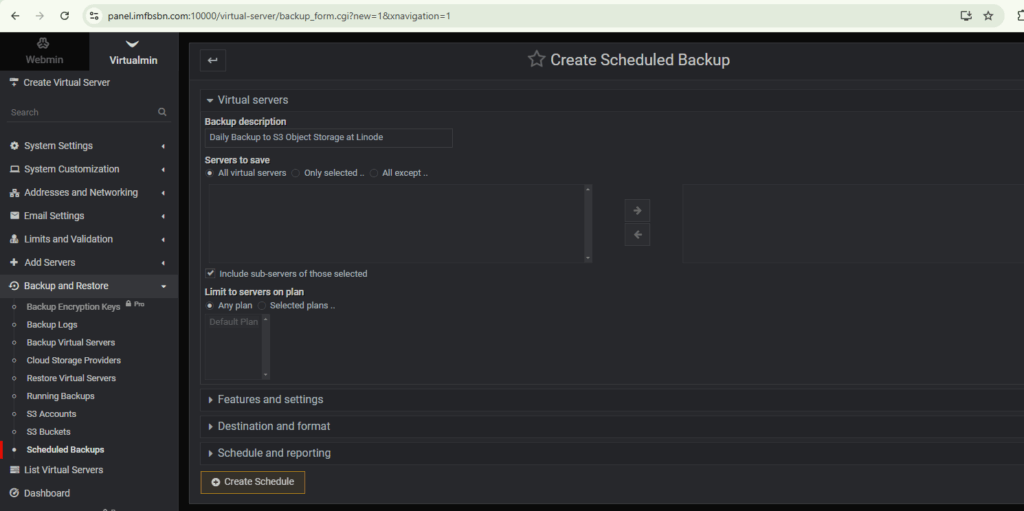
In the menu click on Scheduled Backups. Then go ahead and click on the “Add a new backup schedule” button.
Enter a backup description. Beyond that, the default options will serve you well.
Click on features and settings to expand that area.
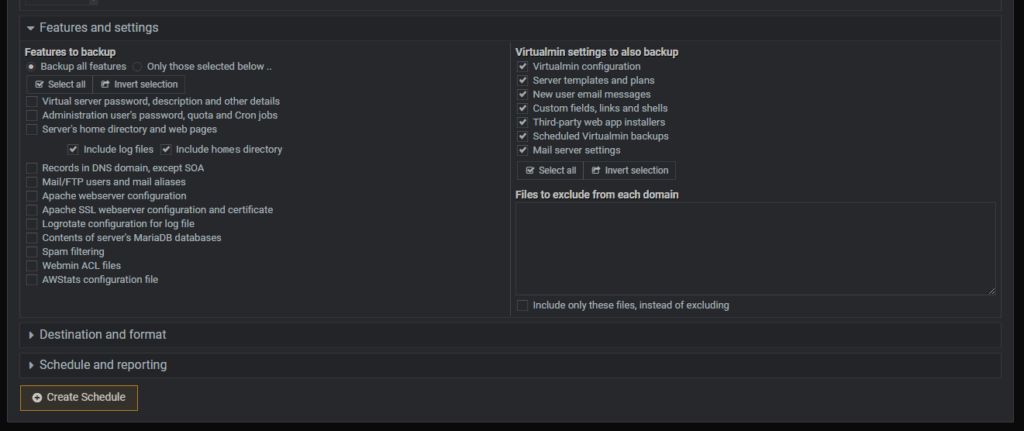
In addition to backing up all of the websites hosted on your server, you probably want to backup all of the Virtualmin settings as well. So select them.
Now click on destination and format to expand that area.
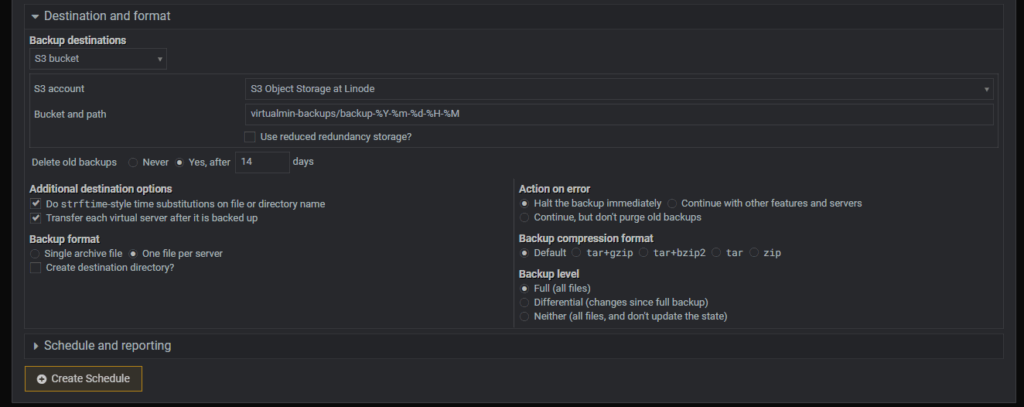
From the backup destinations drop-down box select S3 bucket.
The S3 account should be populated for you. If you have multiple S3 accounts choose the correct one.
The bucket and path field should start with the name of the bucket you created earlier followed by a “/”, then a directory which will be created by Virtualmin.
You will note in the example below, the path will accept all standard Linux time escaped values.
Probably a good idea to select the radio button “Yes” and then enter a number of days after which Virtualmin should automatically delete old backups.
Last stop. Click on schedule and reporting to expand that section.
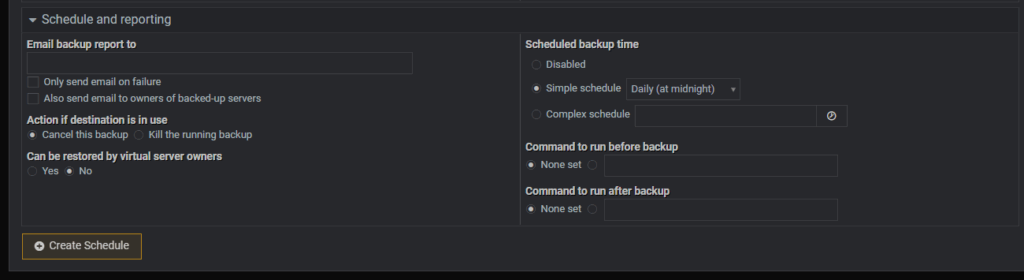
Under “Scheduled backup time” choose the appropriate radio button. “Disabled” essentially means “manual”. You can run the backup with the same settings whenever you wish. But you have to do it manually. I’ve selected to have the backup run daily at midnight. So I clicked the “Simple schedule” radio button and selected Daily from the drop-down box. You should select whatever options best meet your needs.
I didn’t enter an email in this example, but in production I always want Virtualmin to send me an email in the event of failure. So I would also click the appropriate checkbox.
I think were ready to go and then click the Create Schedule button.
Nice work. Now you should be looking at a list of all the scheduled backups. Probably looks like this:
Virtualmin will automatically run this backup every day at midnight.
But you can run anytime by clicking the backup button in the row, under Actions, on the right-hand side.
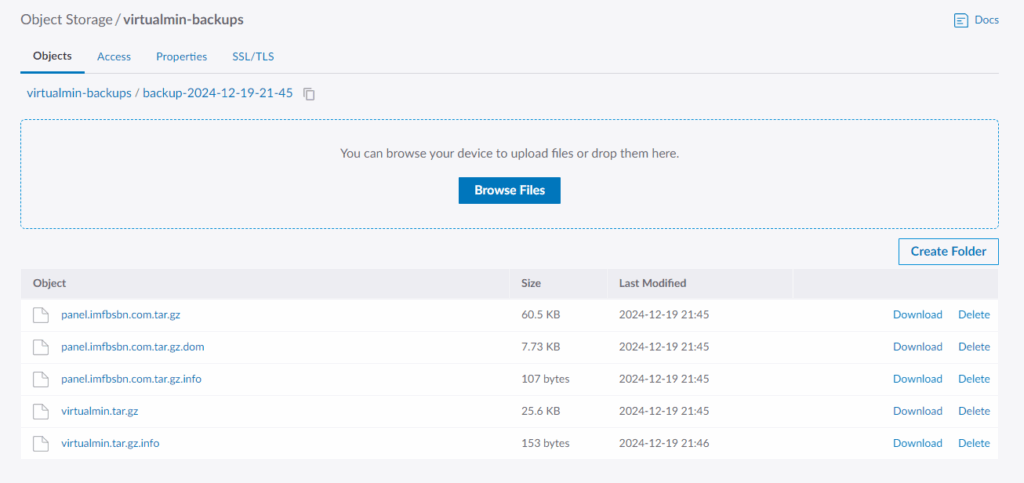
After you run a backup, you should be able to see the files Virtualmin uploaded inside the bucket.
That’s it.
Your Virtualmin will now automatically backed up all of your domains every day at midnight.
Whatever you do with your Virtualmin server, you’re gonna want to make sure it gets backed-up regularly.
One of the safest, and most cost-effective ways to do that is to use S3 or object storage “buckets” at an off-site provider.
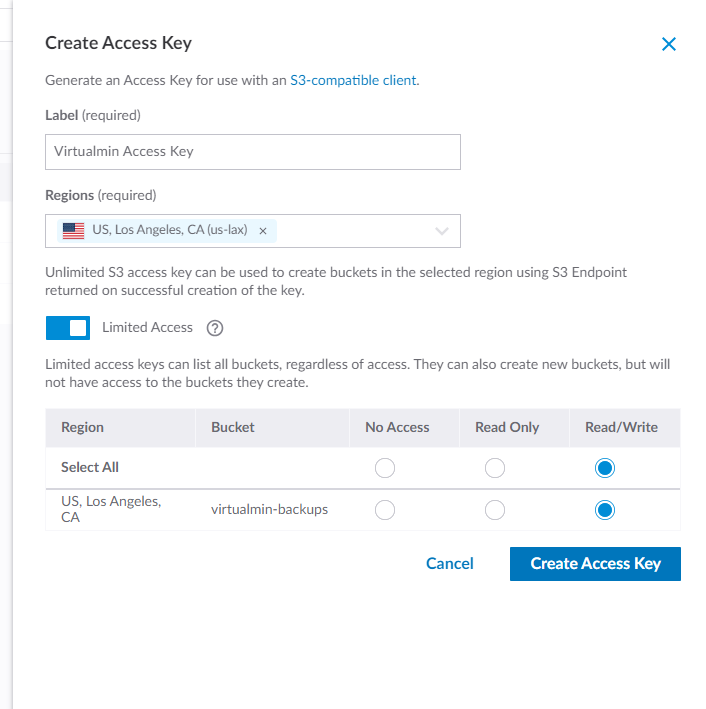
Here I’m going to show you how to set up a bucket and download your API keys so that you can integrate cloud storage backup into your Virtualmin server.
I’m just going to assume you already have an account at Linode/Akamai and that you are logged in.
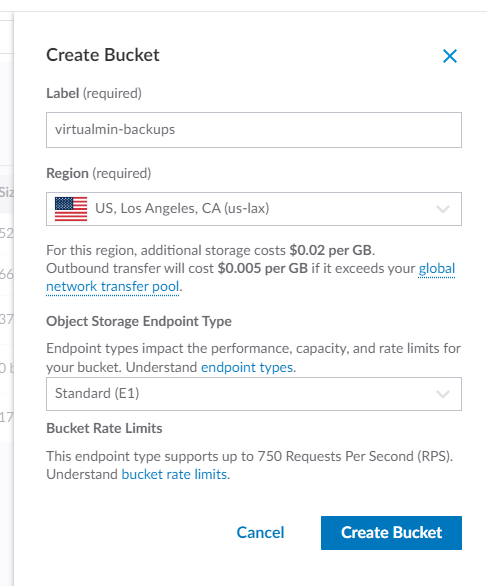
Over on the left-hand side of their portal click on “Object Storage”. Then click on “Create Bucket”.
Enter a label/bucket name. Then select the data warehouse you wish to use. The “Object Storage Endpoint Type” field will automatically select whatever service is available in your region. As of this writing the options are Legacy (E0) or Standard (E1). You don’t need to worry too much about it; either option will work with Virtualmin.
Go ahead and click the “Create Bucket” button.
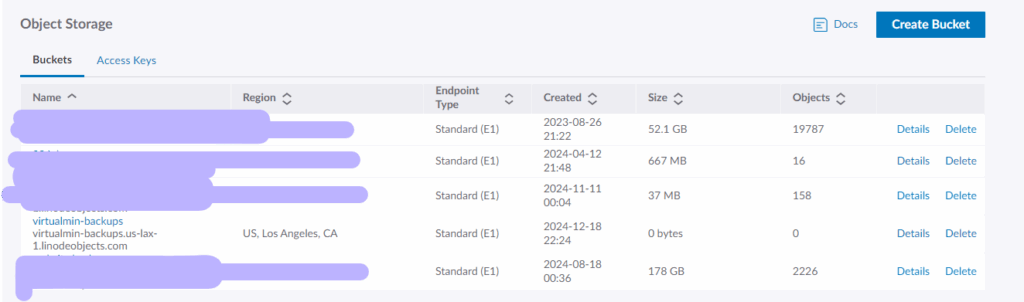
Now you should be looking at something like this:
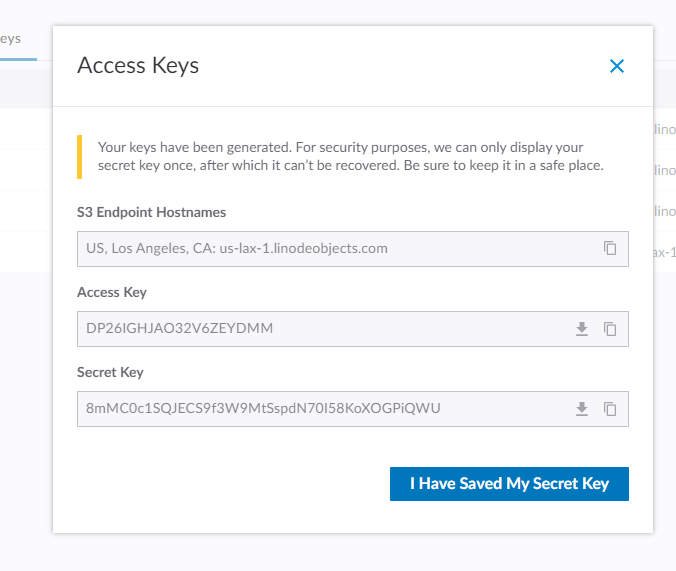
Now we need to set up the API keys. Go ahead and click on “Access Keys”.
Your access keys will be given to you like this. Make sure you store this info in a safe place. While you will be able to view the “Access Key” again, this will be the last time you will be able to see the “Secret Key”.
That’s it!
If for whatever reason you misplace the Secret Key don’t worry; you can always create a new key pair for your S3 bucket.
In the next post I’ll show you how to plug this information into Virtualmin and schedule automatic backups.
So now that you have Virtualmin installed and up and running, here’s a few things you may want to do to tweak the system just a little.
I’m not offering any opinion on whether these changes are advised or ill-advised. But they are things that I generally do, for better or for worse.
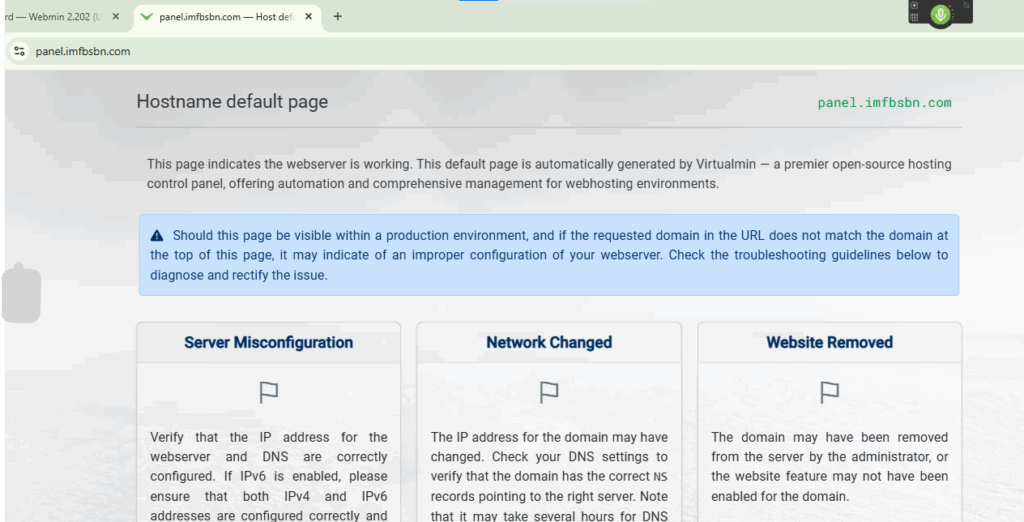
Remove Apache on Hostname
If you forgot to enter the port number when entering your hostname, and trying to login to Virtualmin for the first time, you may have discovered a page like this:
This is unnecessary. I don’t believe it poses any real risk (security or otherwise.) But I would like it to go away. No sense in advertising anything about your server you don’t need to. So what we need to do is remove Apache from the hostname. We do it like this:
In the left-hand menu click on System Settings -> Features and Plugins. You should get a screen like this:
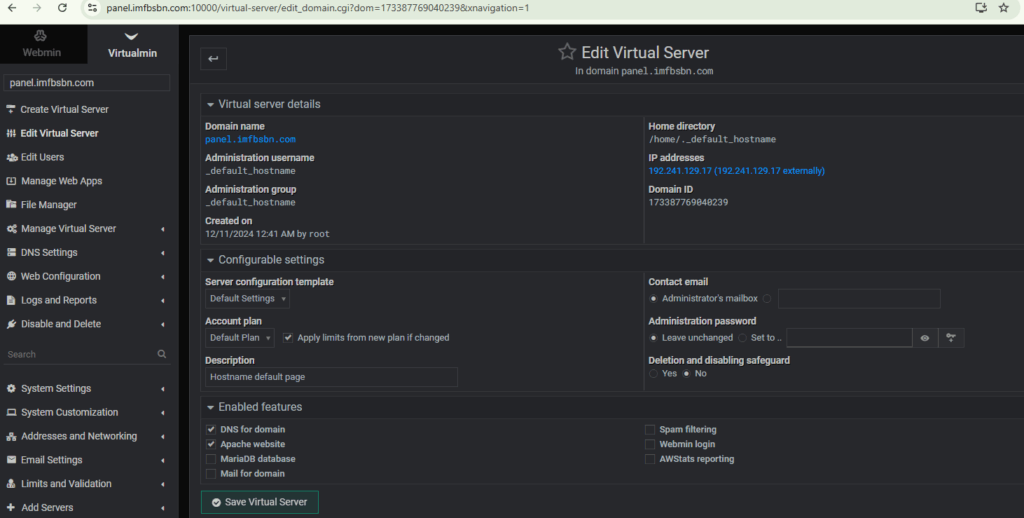
Now go ahead and click on any one of the “Show domains” buttons in the right-hand column. Well, be sure to click on one that has a domain associated with it.
That will take you to a page like this:
Next you want to click on that link with the hostname.
This is the only way – that I have figured out – how to edit the hostname server’s account.
You should note that the domain selection box at the top left now contains “panel.imfbsbn.com”.
On this screen you want to uncheck the box in front of Apache website. Then go ahead and click the Save Virtual Server button.
Virtualmin may give you a warning screen, suggesting you might be doing something stupid, go and click through that as well.
Once that’s done you can reload the panel website and see that no longer exists. Virtualmin will still continue to function on port 10,000.
Disabling DNS For the Server
Virtualmin has the ability to run DNS for all the domains set up on the server. And it works really well actually. So why would anyone not want to use it?
Well, the nameservers operated by your registrar (the place where you buy your domain names) are redundant and fault-tolerant. It would be extremely rare for any of the nameservers run by any reputable registrar to be down for more than a couple of seconds a month (if that.) A lowly VPS server or even a piece of bare-metal hardware are far more likely to experience downtime. If only to update the kernel twice a year… It’s still downtime. So it is just seems silly to ask your Virtualmin server to do something that other servers – that you are already paying for anyway – can do better.
Naturally, this does not apply to people using Virtualmin in a redundant and fault-tolerant manner (a.k.a. people who know what they’re doing.)
Thankfully disabling DNS is extremely easy.
Just follow the same steps as you did above. When you get to the “Edit Virtual Server” page, simply uncheck the “DNS for domain” checkbox and click save.
Setup Automatic Updates
One of the most important security items that you can do for your server is to enable automatic updates. This will ensure that your server always has up-to-date security patches not only for the operating system but for most of the applications running on. Thankfully Virtualmin makes it super easy.
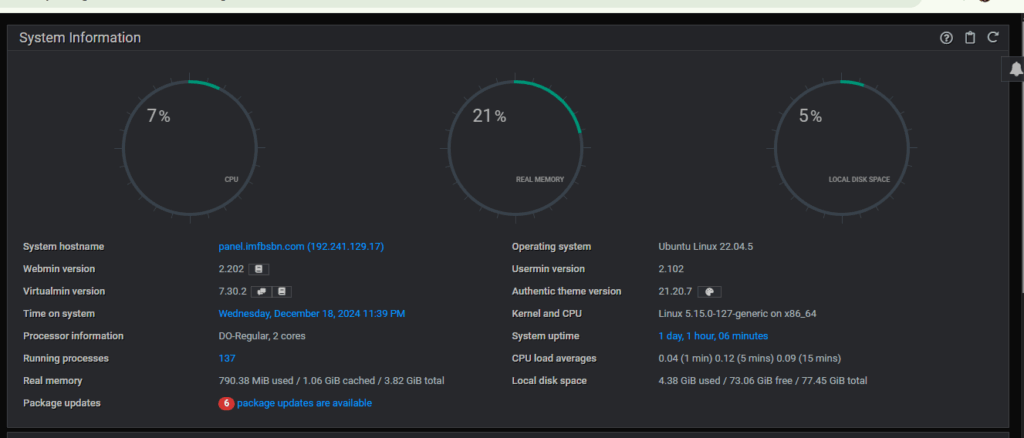
On the dashboard you may get used to seeing that updates are available.
Go ahead and click on “package updates are available”.
That will take you to the Software Package Updates page.
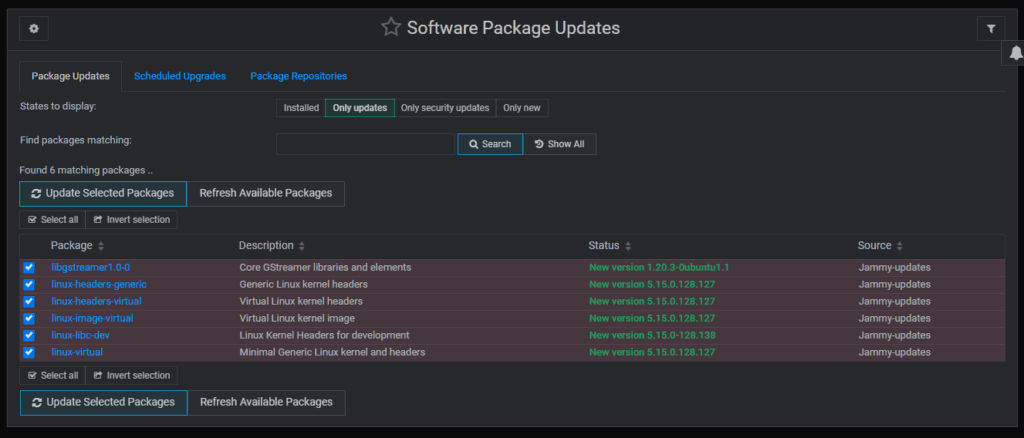
In this page you can see what software packages from your Linux distribution are available to update.
You can go ahead and click on either “Update Selected Packages” button, or…
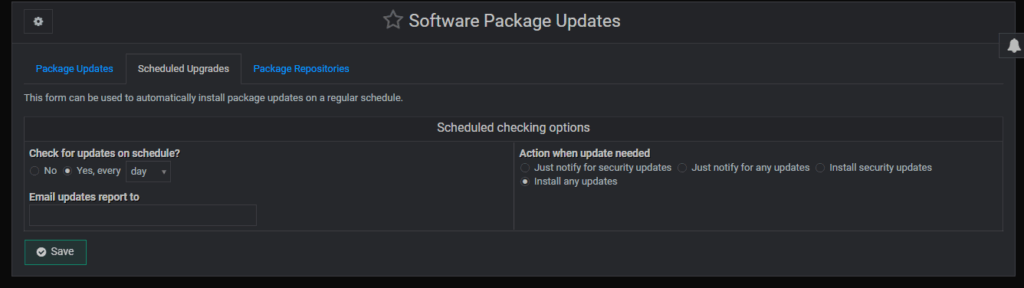
You can click on “Scheduled Upgrades” tab and set it up so that Virtualmin takes care of this for you.
Go ahead and click on the “Yes” radio button and select your desired update frequency from the drop-down box.
Similarly, select the radio button which describes what you want Virtualmin to do when it finds updates available.
If you enter email address, Virtualmin will send you an email letting you know what’s happening.
– –
That’s it for now. In the next post I will show you how to create off-site backups.
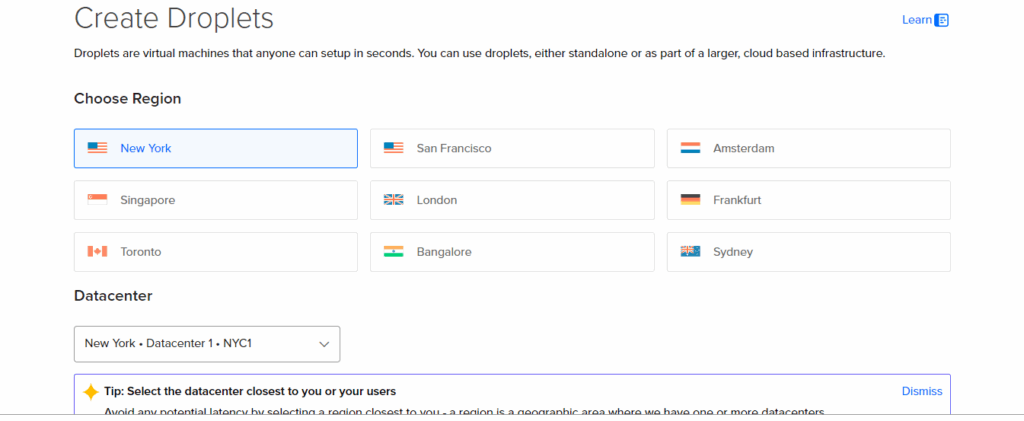
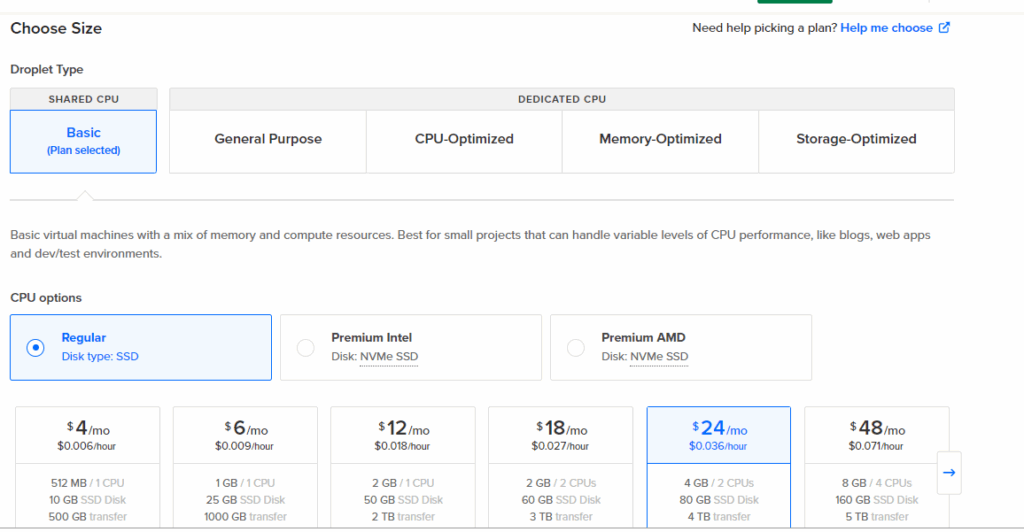
Next, choose your server’s specifications. I have a $200 credit that I want to take for a test drive. So I’m selecting a set up beyond my needs.
Scroll down on the page and enter a robust password.
Now you can go ahead and click on the “Create Droplet” button on the bottom right.
DigitalOcean is going to create your server. Will probably take several seconds. When complete, you will see something like this:
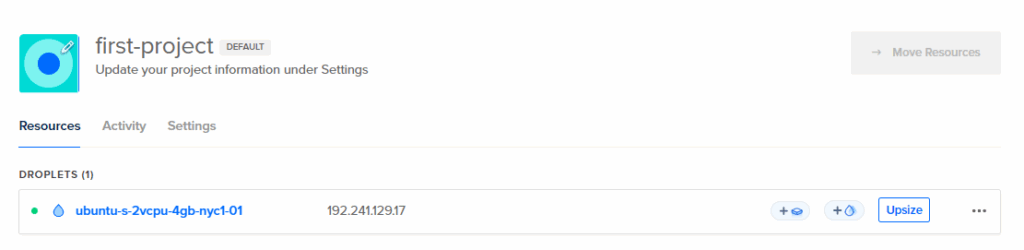
Now you have the IP address of the server. So we are ready to create the DNS records.
If your system does not have a fully qualified domain name (FQDN), the installer will stop and ask you to choose one. This is mandatory because many services rely on having a fully qualified domain name in order to function. Mail, in particular, but some Apache configurations and many of the Virtualmin-created configuration files, also require a valid fully qualified domain name to function correctly. A fully qualified domain name is one of the form host.example.com, or simply example.com (but do not use a name you’ll be hosting in Virtualmin). – Virtualmin Documentation: https://www.virtualmin.com/docs/installation/automated/#questions-virtualmin-installsh-might-ask-you
Go back and read that last part again: but do not use a name you’ll be hosting in Virtualmin.
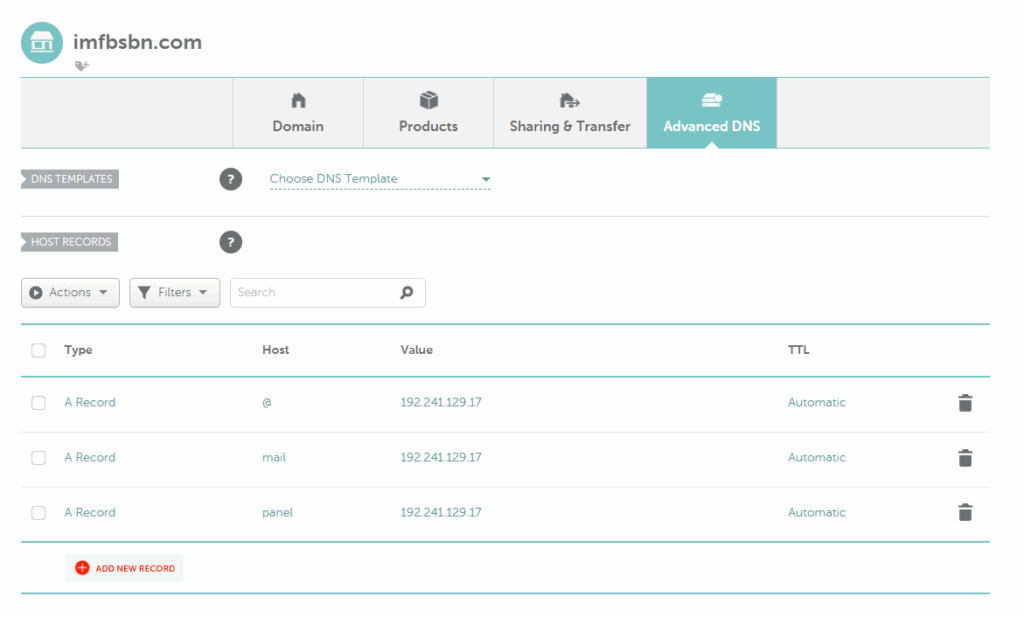
My test domains happened to be hosted at Namecheap. So I will add the following DNS records there.
On our new server, Virtualmin is going to use the FQDN panel.imfbsbn.com.
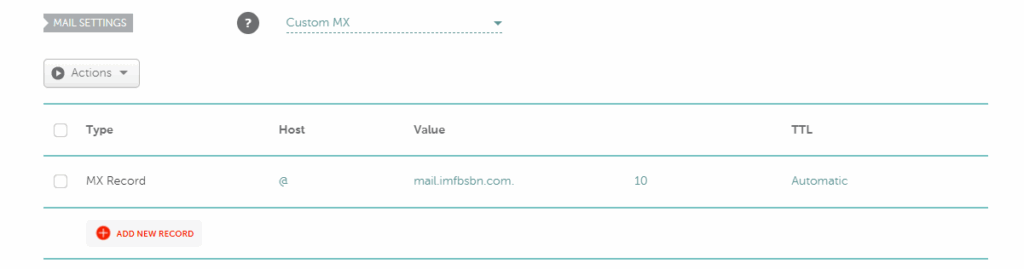
A little further down on the page (if NameCheap is your registrar) you can enter the MX record.
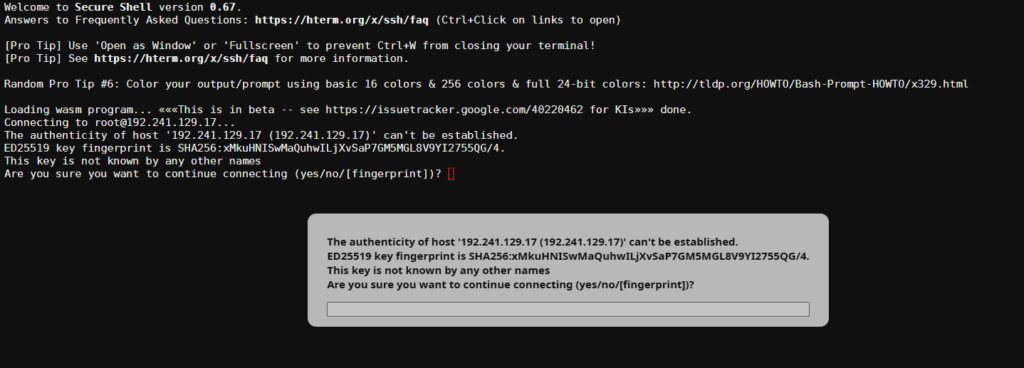
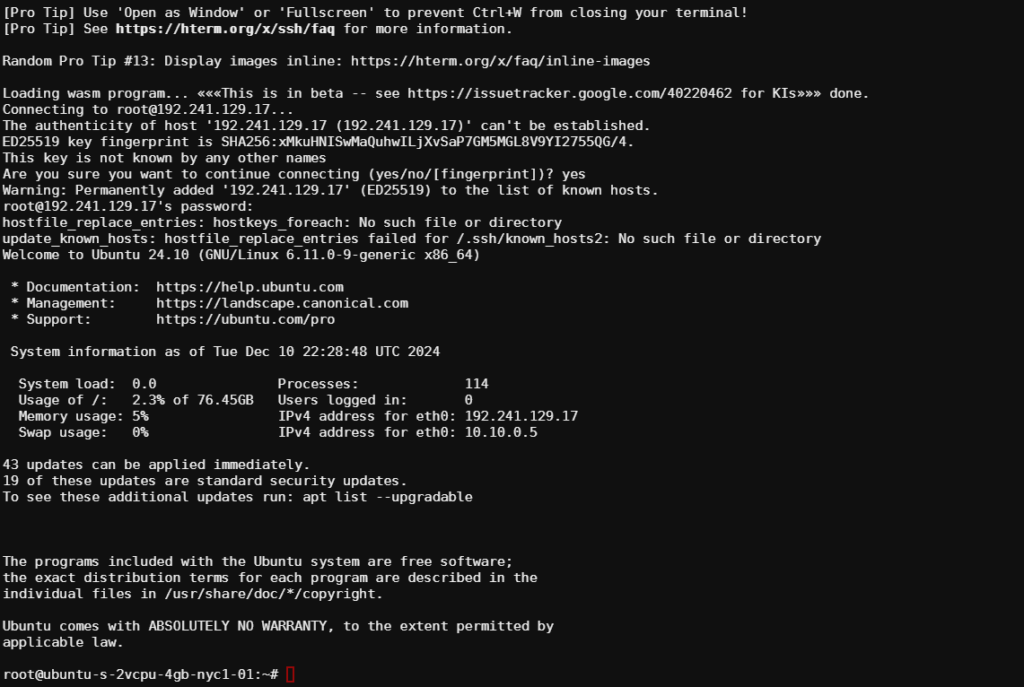
We are now ready to log into the server. Using your favorite SSH client, navigate to the server and login with user root and the robust password you previously entered.
The very first time you log into the server the SSH client will not recognize the server’s digital fingerprint/key. So you will have to enter “yes” in order to continue.
After that, you will be prompted for your password. Enter it & press enter.
On our initial login, we see the OS is telling us that updates are available:
The first thing we want to do here is run the update command. Type in the following:
apt update
Like this:
Press enter to run the command.
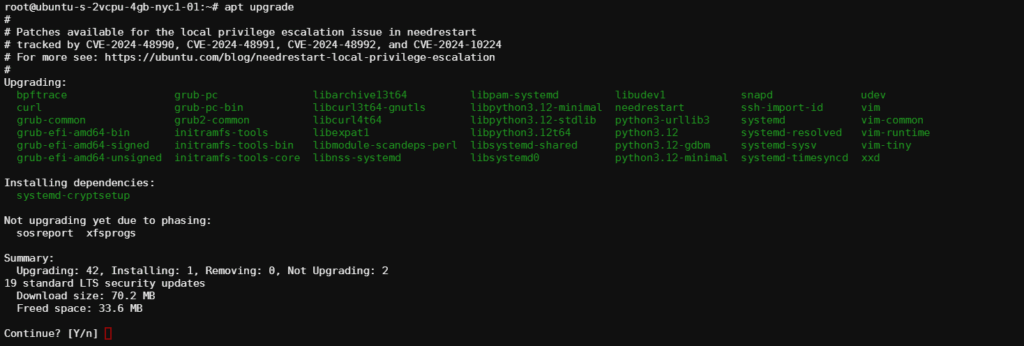
Then we want to run the upgrade command. Type in the following:
apt upgrade
Like this:
As usual, you have to press enter to run the command.
The system will show you a list of all the packages that will upgrade. When prompted, the “Y” is the default. So you can just press enter.
Just in case one of the packages updated the kernel is always a good idea to restart the machine. Type in:
reboot
After you hit enter the machine will automatically restart. Should take about a minute.
Go ahead and log back in via SSH.
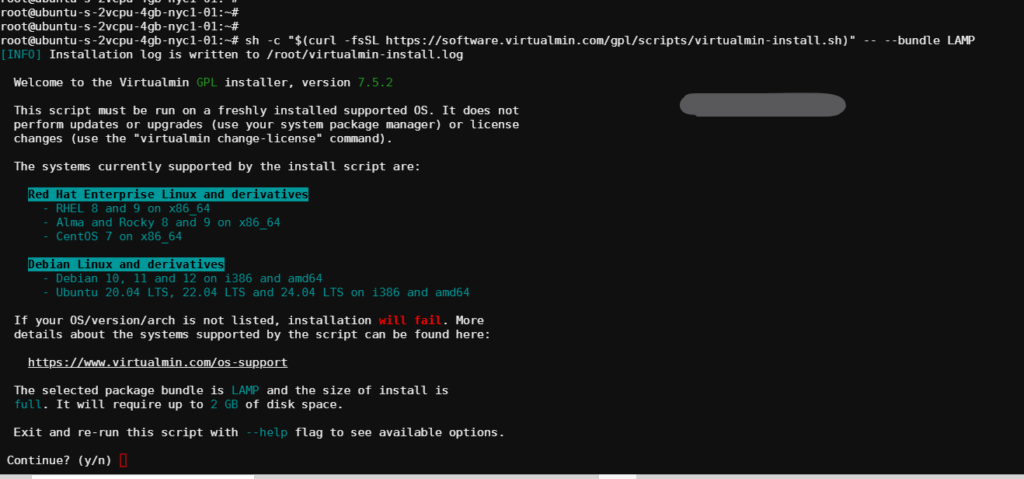
Now it’s time to install Virtualmin itself.
Copy and paste the following line into your SSH client:
sh -c "$(curl -fsSL https://software.virtualmin.com/gpl/scripts/virtualmin-install.sh)" -- --bundle LAMP
Your server will download the installation script and begin to run it.
If everything appears to be in order, and you’re ready to go, press “y” and then press enter.
This script will download and begin the loading process.
At some point the installation is going to ask you about a fully qualified domain name. This is where you are going to enter:
panel.imfbsbn.com
Like this:
The installer will continue. Be patient. On small underpowered systems it may take 10-15 minutes. Even on medium horsepower servers it will take several minutes.
When it’s done you’ll get something like this:
Congratulations! You have successfully installed Virtualmin.
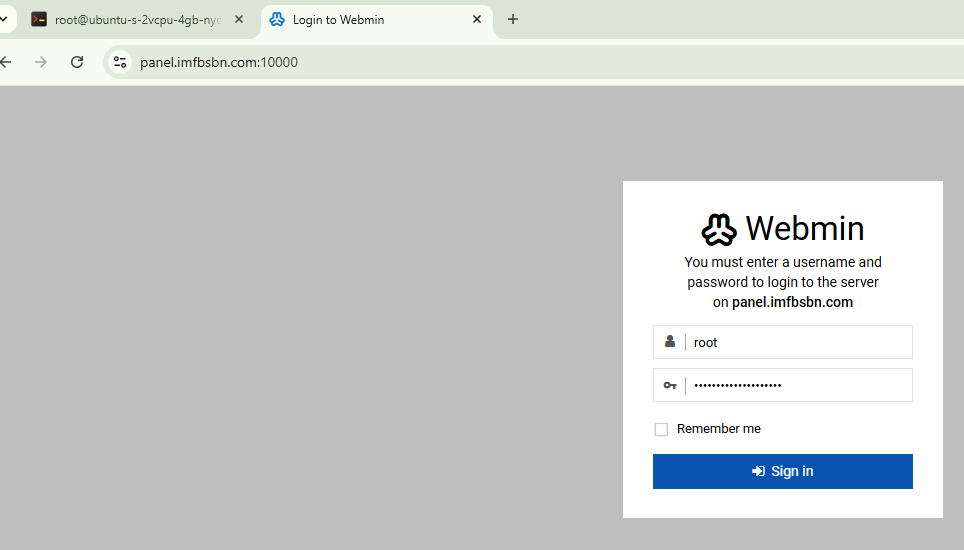
Direct your favorite browser to the FQDN at port 10000 just as instructed at the bottom of the image above.
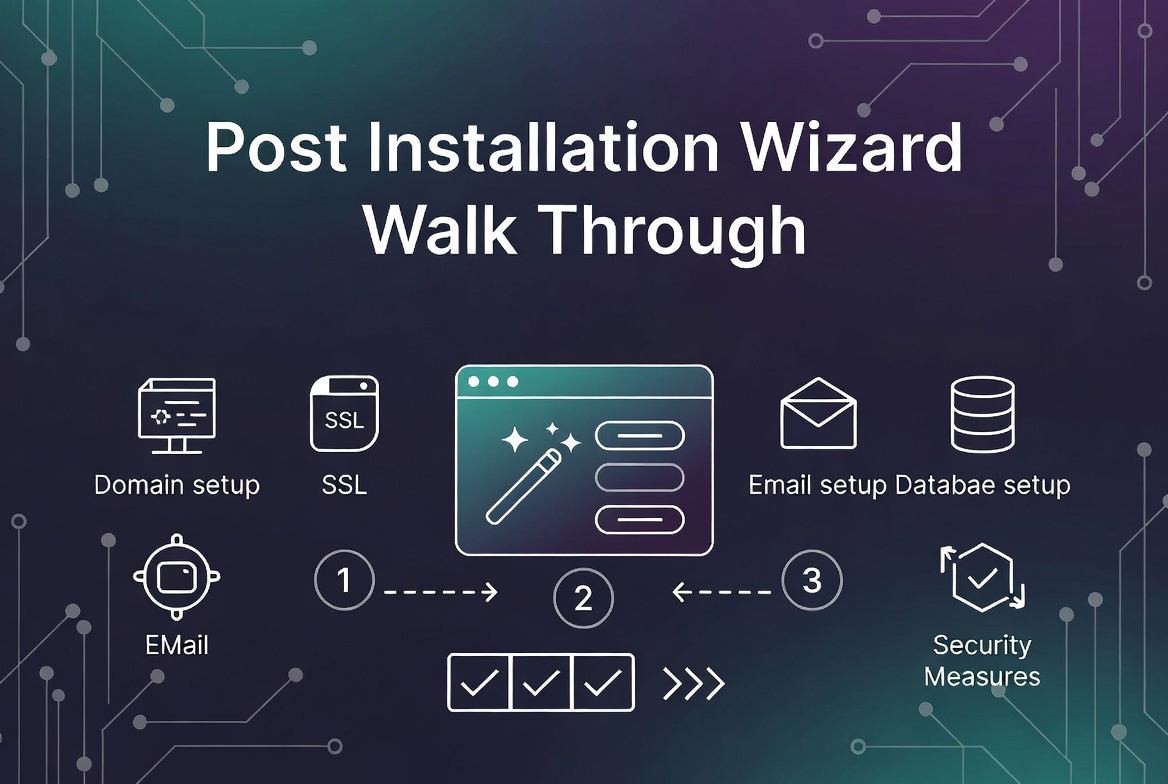
Once you sign in you will be taken to the Post-Installation Wizard.
The first time you login to Virtualmin you’re going to be greeted with the post-installation wizard. It looks something like this:
Go ahead and click next.
The first question asks if Virtualmin should run an email domain lookup server. If your server is going to be handling a lot of email then choose yes. This server here is not going to be processing a lot of email. So I chose no.
Choose your option and click next.
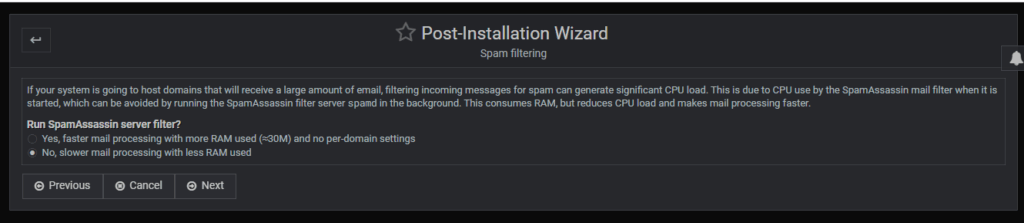
The next question deals with SpamAssassin. Again, if you choose to run it email will be processed faster but at the expense of memory. Like before, my server is not processing a lot of email so I choose no.
Choose your option and click next.
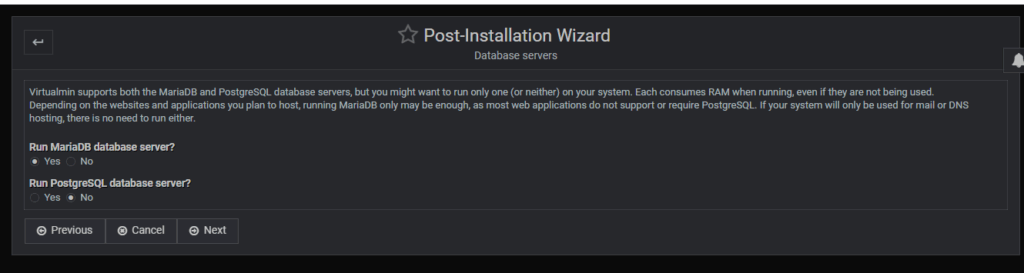
This next one is kind of odd. It asks what databases you want to run, however be aware that if you did not install a database during the initial installation you cannot install it here. That is, if you installed the LAMP stack, PostgreSQL will not be installed. You can click “Yes” here but you will only generate an error message telling you that it’s not installed. So don’t over think it. Just go ahead and click next.
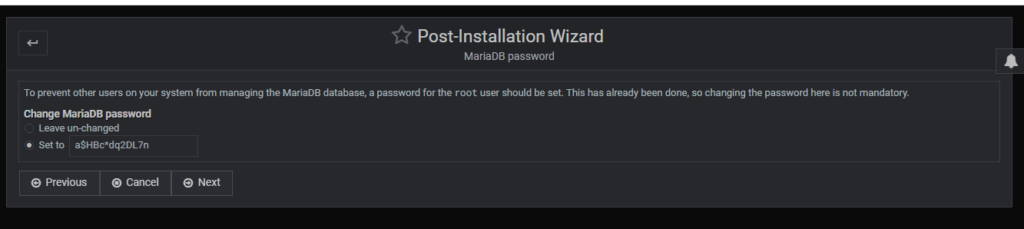
Now you’re going to set the MariaDB password for the root user. You can accept whatever is in the box. But make sure you save the password someplace safe.
And now you should be mostly finished.
Let’s go ahead and configure the “optional features.”
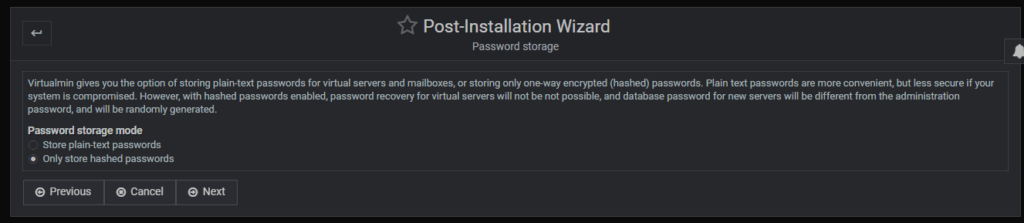
In regards to password storage, were only interested in storing hashed passwords. Just go ahead and click next.
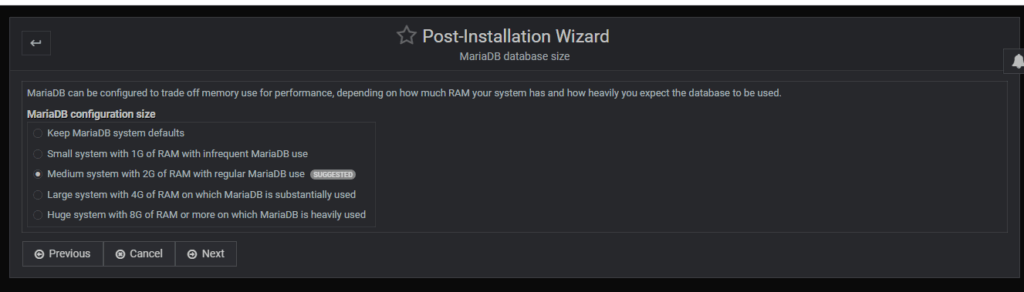
Here the system is asking about the MariaDB should be configured to use memory. If your servers handling a lot of email and won’t have any (or much) database usage then select a small or medium system. If your server is going to handle nothing but WordPress sites, e-commerce, or other applications which involve heavy database usage and select a system that the limit of the memory installed.
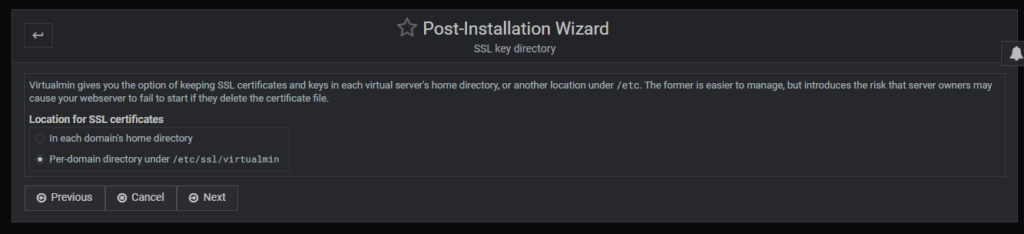
Next it asks about the location for SSL certificates. Make your life easy and go with the default.
Nice job! Looks like we finished.
If you ever wish to run the wizard again, the option can be found under System Settings.