Market Research Survey Template
Author: JAB
-
Norwood Crossing
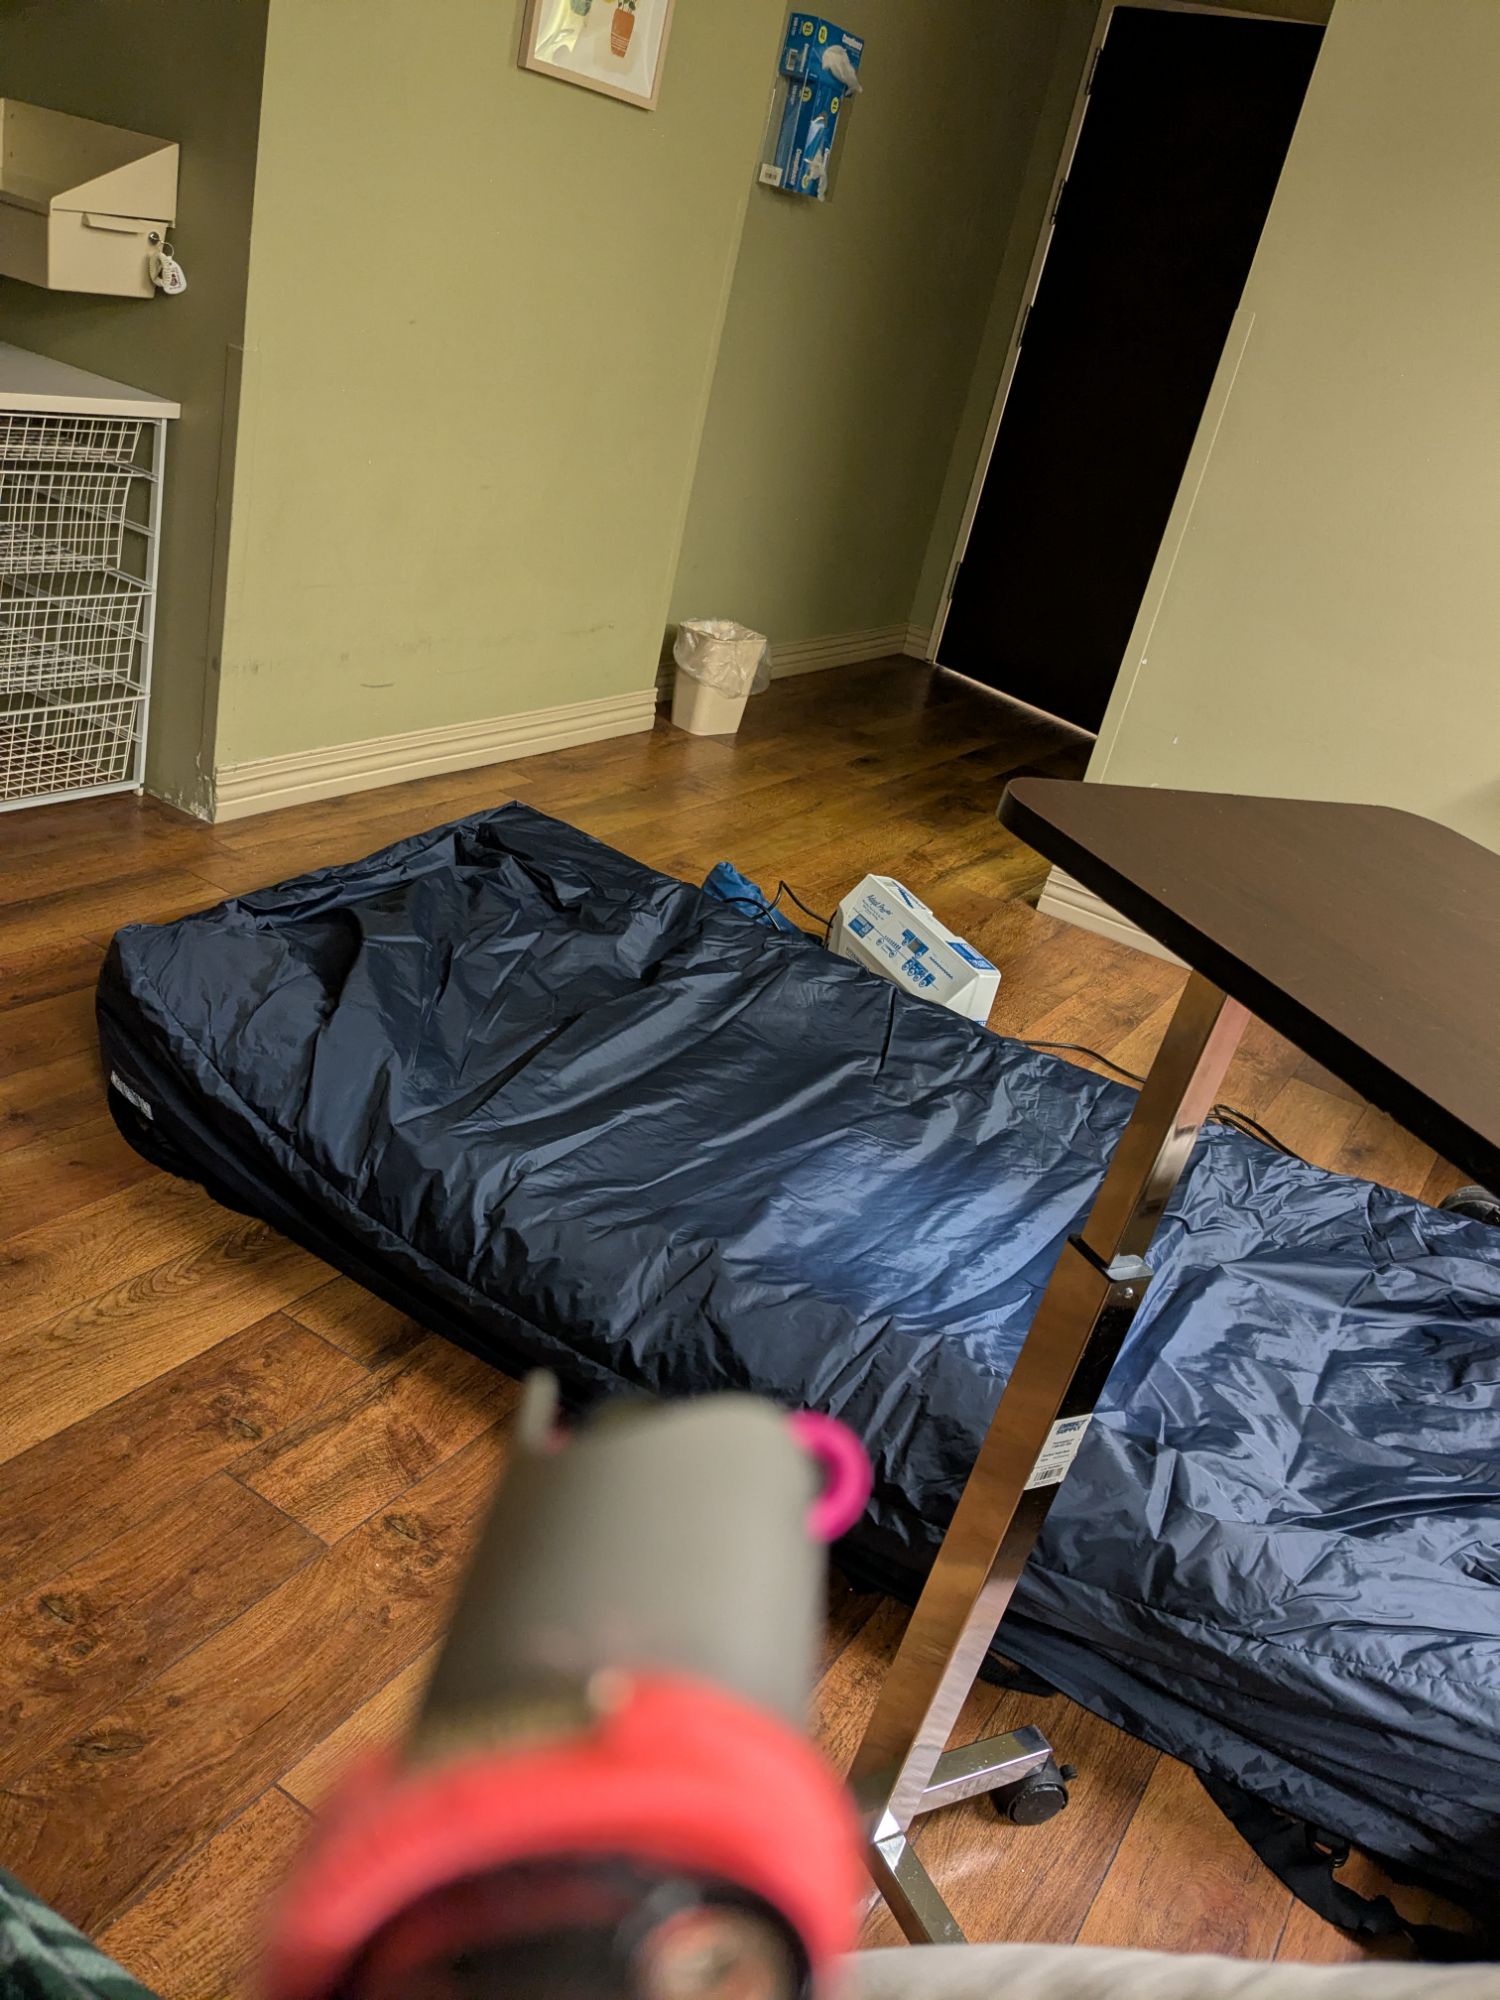
So I find myself in this retirement community. The girls needed to get away for a few days and so I moved in here. I suppose it’s kind of like a hospital. If a hospital was run by people unqualified to work in an actual hospital.
See that thing on the floor? That is my limited air loss mattress. I need that thing because I have stage three pressure sores on my legs wear my legs meet my butt. That mattress alternates the pressure between different tubes inside. Make sure that the pressure points change over time. I’m not exactly sure why but it’s been setting on the floor for like five hours.
Also have a battle with a nurse over pain meds. Having recently been in the hospital I have an order that says I can have Tylenol every 6 hours. But some human wrote 8 on the form. Battle ensues. They actually called my doctor to confirm the order.
We are not managed by the best in the brightest.
TUESDAY MORNING UPDATE
Yesterday I sent a text around to a few people In which I mentioned some funky stains and a woman down the hall who simply kept repeatedly screaming “Help Me!”This morning she modified the routine somewhat. Yes, there was the standard “help me” but now it was intermixed with “I’m ready.” The way I figure it she was in bed and was ready to move into her wheelchair. Although a few hours later she was throwing everyone for a loop by occasionally mixing in a “Kill Me!” Thankfully I think she was just being dramatic.
Low air loss mattress still on the floor.
Administration was in here this morning suggesting that I should extend my stay. With medicare footing the bill shouldn’t be any rush to get out of here right?
Tuesday Afternoon Update
Low air loss mattress moved to the bed.Occupational therapy was here to do some moving.
Social services was here to get up all in my business.
-

Birthday thoughts 2025
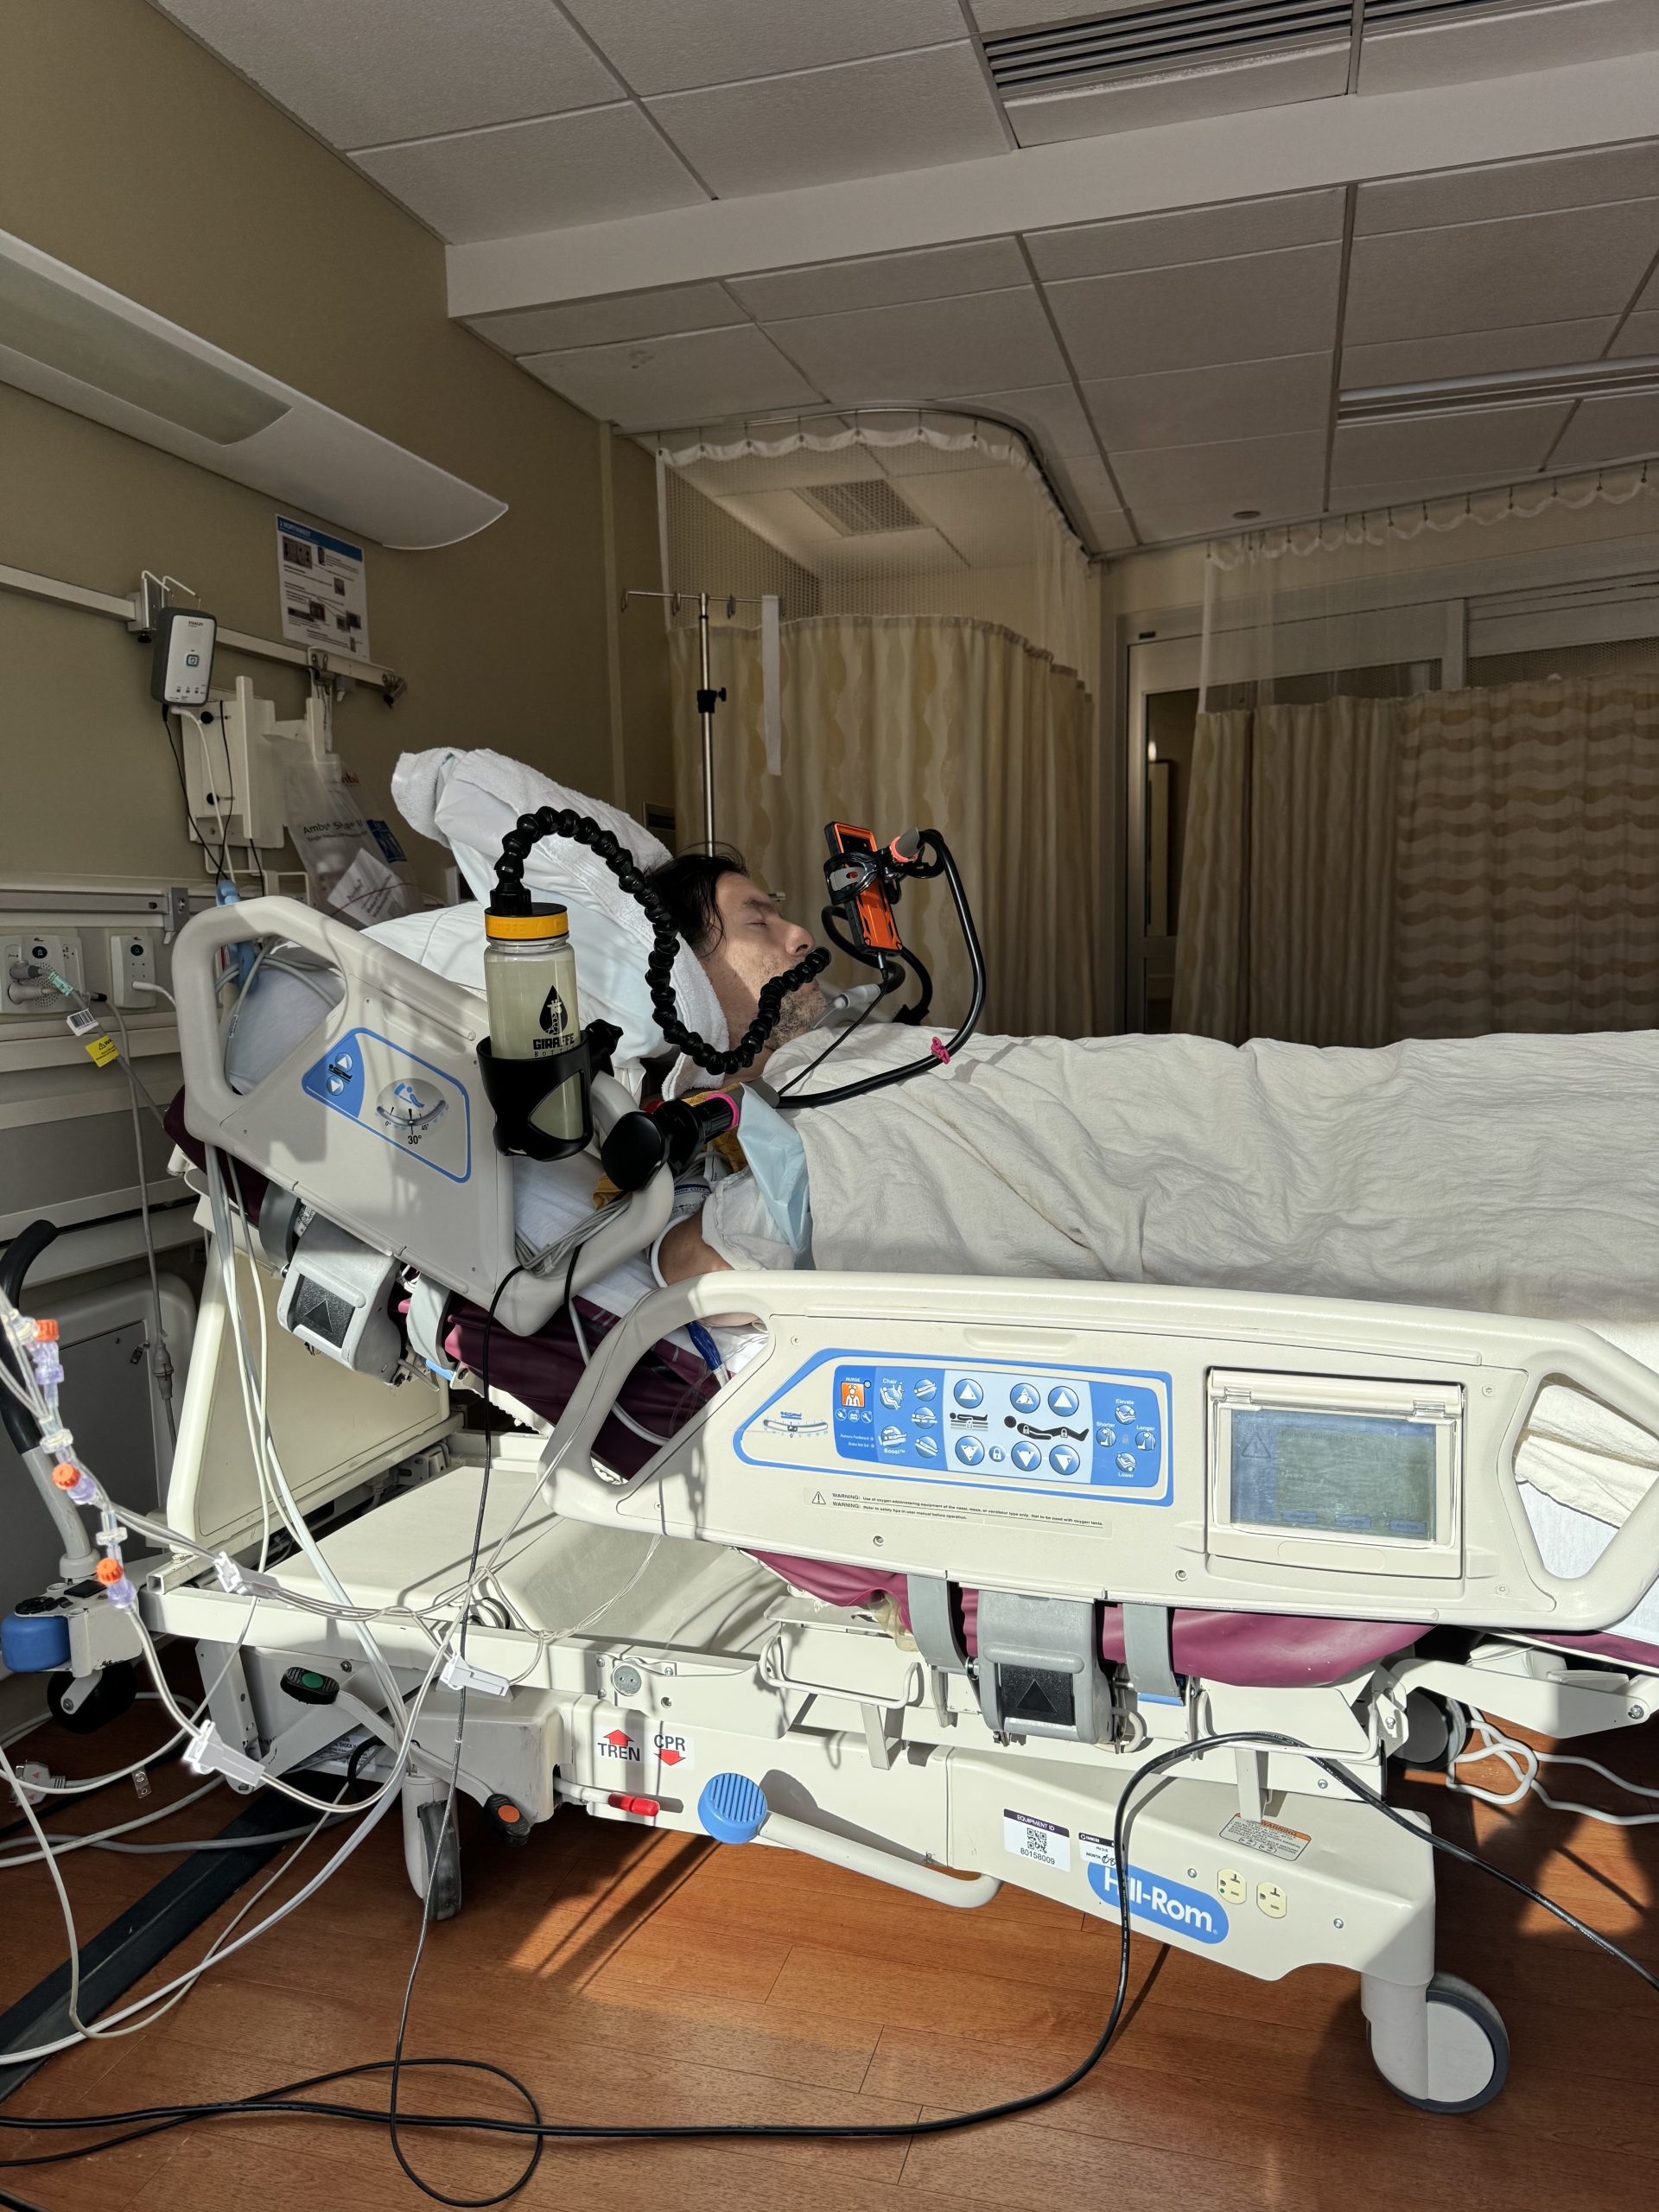
Clara and Susie did a real nice job For my birthday in hospital.
I don’t believe I have ever had a McDonald’s Quarter Pounder with cheese. I know that I have never had a Double Quarter Pounder with cheese. So today was the first Time I ever had a Double qpc with bacon. Was actually quite tasty.
We washed that down with some pie.
Got this see new hat from my brother.
My dad was here, we should have put him in the picture as well. I guess we weren’t thinking of that. We must do better in the future.
Beyond that the day was quite humble. I didn’t sleep last night. I was feeling pretty sick in the morning but slowly got better as the day wore on. Had all kinds of trouble with the staff. Got moved from the 4th floor to the 5th floor. Either the staff up here sucks or they’re retaliating against something. I aim to find out.
-
New drug is a bitch
I got put on this new antibiotic and it is the wildest thing I’ve ever experienced. It’s neither painful nor Hallucinogenic But It’s like you can feel every part of your body From your fingernails to the hairs inside your belly I keep thinking about spies And how truth serum is used in movies. This is the kind of stuff That would get you to spell secrets you didn’t even know you had.
-
Firefly III | Virtualmin | MariaDB
Firefly III is a very cool personal finance manager application. What really makes the application exceptional is its ability to be multi-user (where multiple users access the same set of bank accounts) and also multi-accounts (whereas you can run several different personal finances/businesses on the same installation.)
These instructions are based on the official documentation with edits so everything works with Virtualmin.
Let’s get started.
Preinstallation checklist:
- I’m using Debian 12, but you’re free to use a different flavor.
- Virtualmin should be installed as per the previous posts (going to assume you have installed the LAMP stack.)
- Docker & Portainer should also be installed.
If you don’t have all of these items completed go look at my previous posts.
First things first. Firefly is going to need 2 sub-domain names. The first is for the application itself. The second will be for the file/transaction importer.
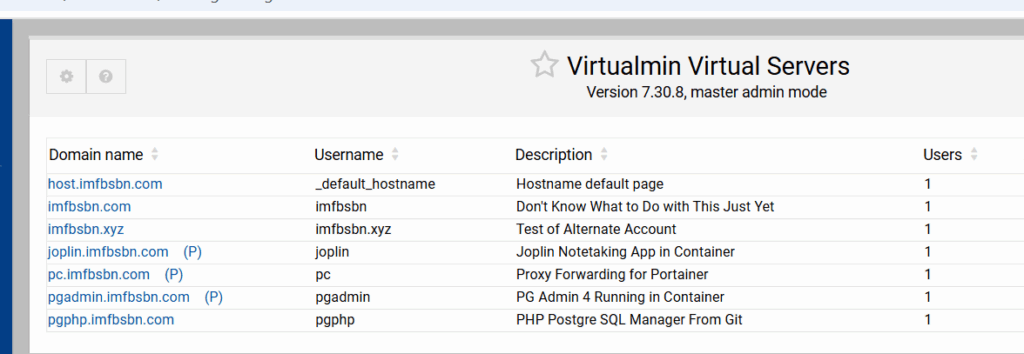
I’m going to continue to use the server from previous posts hosted by Server Cheap. This time we are going to create 2 sub-servers of an existing virtual server. Here’s the list of servers I currently have on this installation:
In order to create a sub-server we need to first select the server we want as the primary.
In this case I’m choosing the imfbsbn.xyz domain name. So I’m going to click on that.
From there were going to click on the Create Virtual Server link in the menu.
Then in the main window click on Sub-server as the new virtual server type.
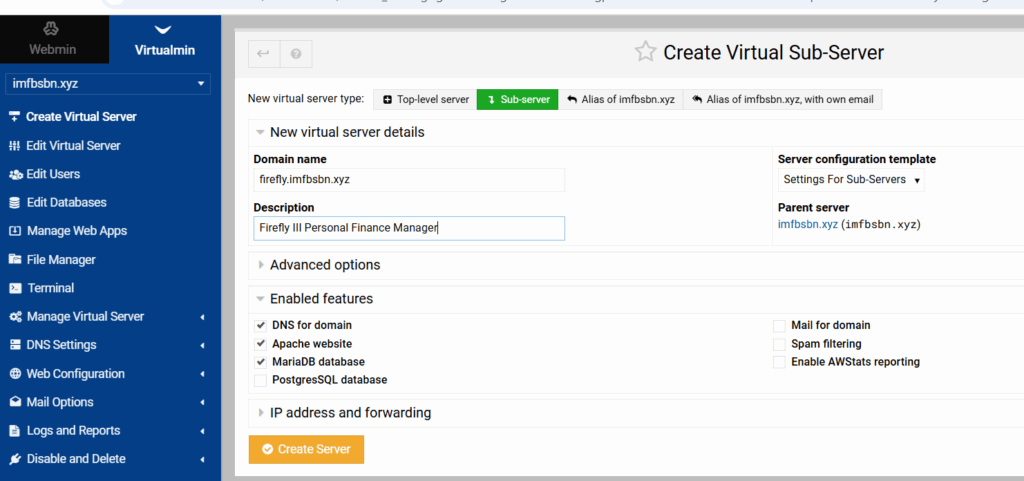
Enter the sub-domain name. And we won’t need all the features available. So uncheck the boxes for Postgres, mail, spam, & AWS.
Then go ahead and click the Create Server button.
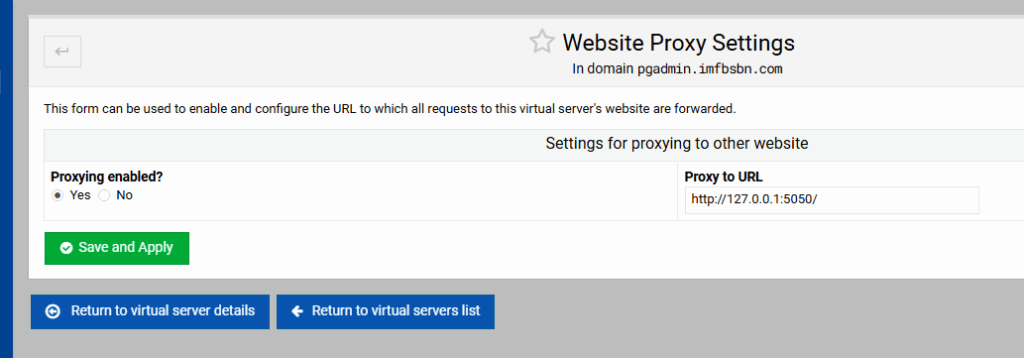
While we are here – dealing with this domain – let’s go ahead and add the proxy.
In the left-hand menu click on “Web Configuration” then click on “Edit Proxy Website”.
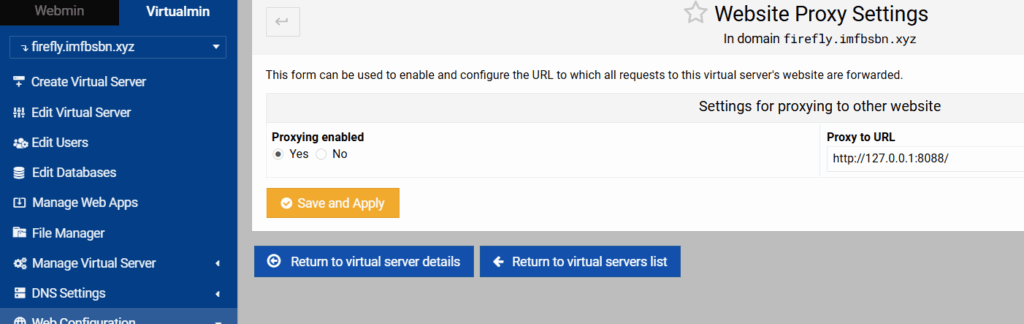
Enable proxying by clicking the appropriate radio button. Enter the proxy to URL as shown above. Then click on save and apply.
Next are going to create virtual server for the file importer.

For this domain we will not be needing a MariaDB. So we can uncheck that box as well. Then create the server.
Again, we need to set up the reverse proxy for this domain.
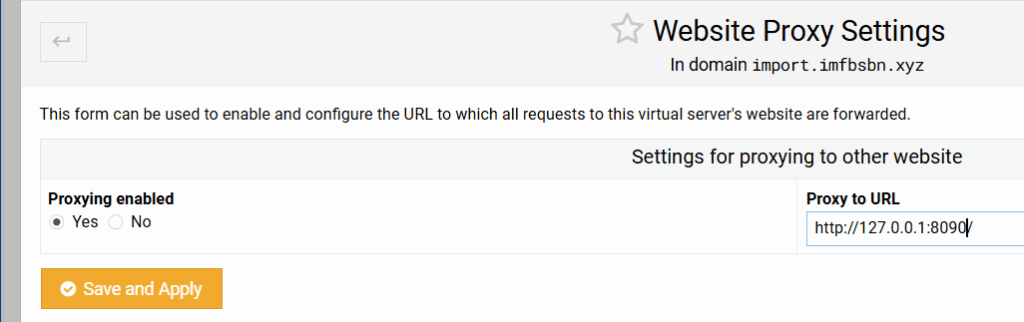
Note that the port number is different for this domain.
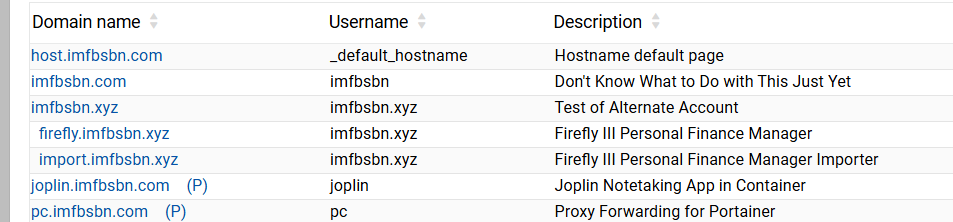
Now when we look at our domain list, we will see the two domains we added as sub-domains.
A few more things to do within Virtualmin before moving on.
When we created the firefly.imfbsbn.xyz domain, Virtualmin automatically created a new Maria database called firefly.
Now we need to create a new MariaDB user and give that user permissions on the firefly database.
First click on the “Webmin” tab of the left side menu.
Then click to expand “Servers” & then MariaDB Database Server.
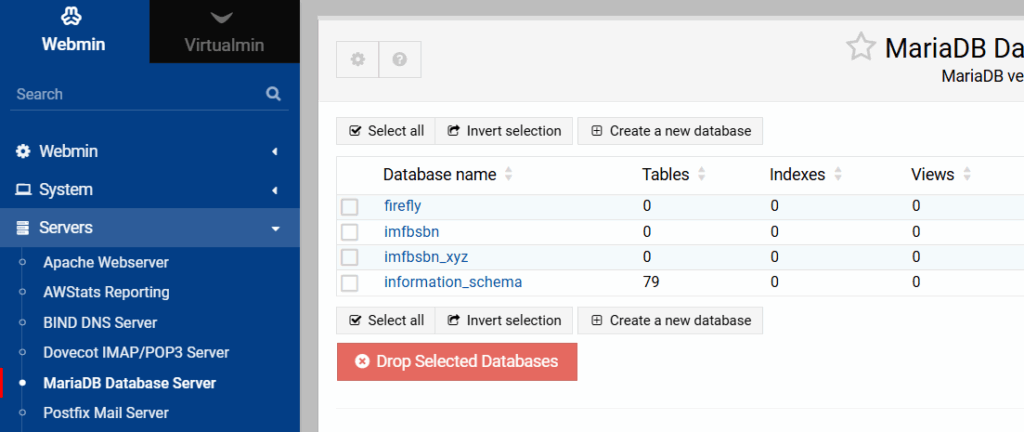
Here we can see the firefly database already exists.
On that page click the button labeled “User Permissions”.
Then click one of the “Create New User” buttons.
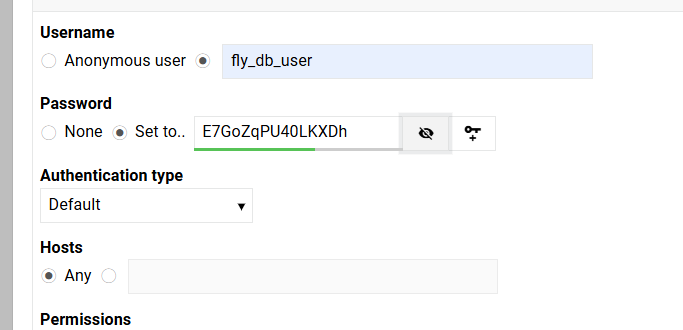
Create your own username. Be sure to set a robust password. And make sure that Hosts is set to “Any”.
Go-ahead and create the user.
Now we have to give that user permissions on the firefly database.
Within the MariaDB Database module, navigate to “Database Permissions”.
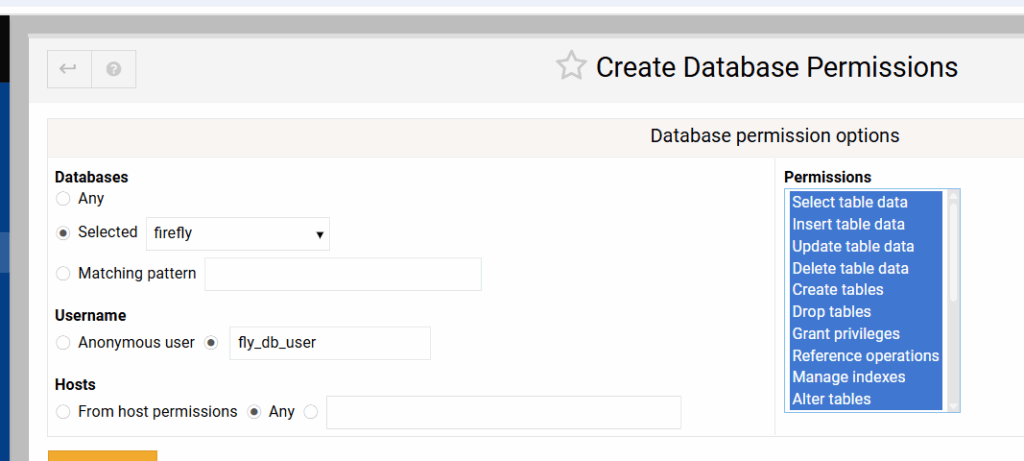
Choose the correct database. Enter the correct username. Make sure Hosts are Any. And go ahead and select everything in the permissions table.
Just one more thing to do within the MariaDB Virtualmin module. Click on the button labeled “MariaDB Server Configuration”.
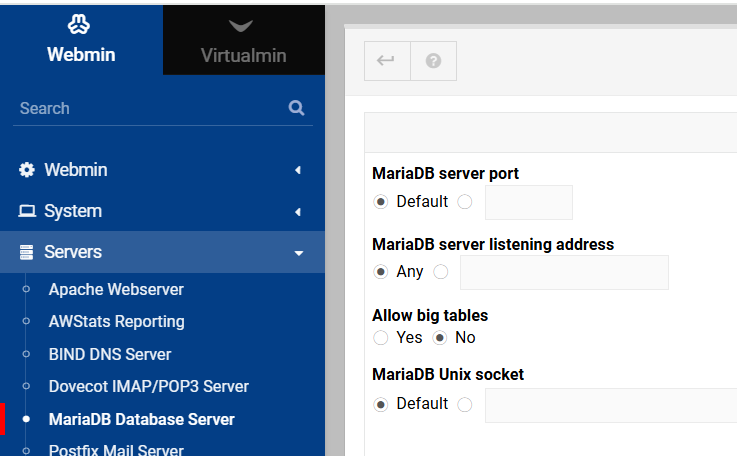
Make sure the MariaDB server listening address is sent to Any.
That’s enough within Virtualmin for right now. We will have to come back later and make a few more adjustments, but for now were going to move on.
Next we’re going to login to our Portainer installation and we are going to create a new stack.
I started with the docker compose and stack.env files provided in the official documentation. But I did have to make several changes.
- The official docker compose file calls for running the MariaDB inside the container. This is not an ideal situation while running Virtualmin. Virtualmin is already running MariaDB and will automatically backup the databases tied to virtual servers.
- The official docker compose file calls for running cron jobs from inside the container. We are going to set up cron jobs from within Virtualmin.
- As a result of connecting to the native OS database, we have to make some other changes as well.
Within Portainer click on your installation, then stacks, then the button to create new stack. Give your stack a name.
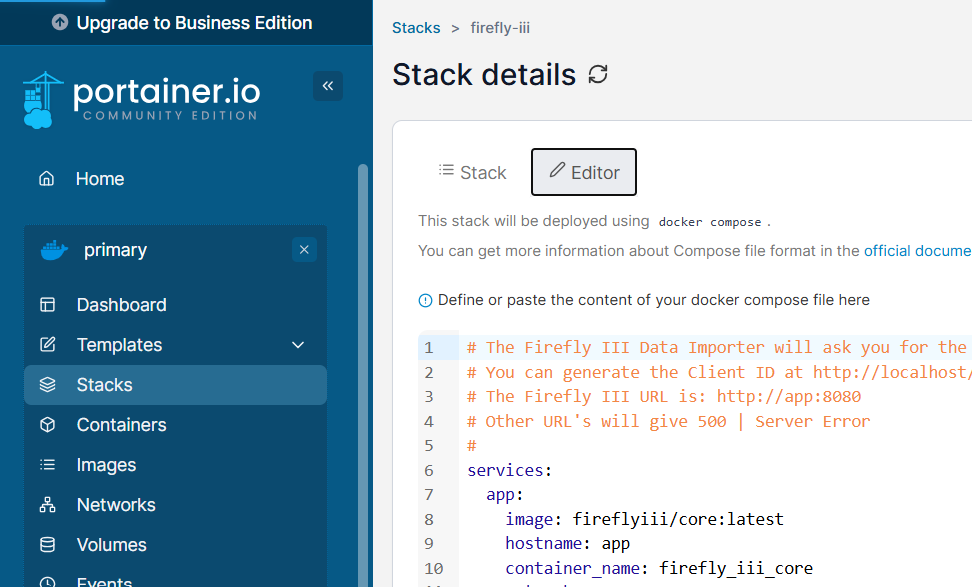
Here is the modified docker compose file:
#
# The Firefly III Data Importer will ask you for the Firefly III URL and a "Client ID".
# You can generate the Client ID at http://localhost/profile (after registering)
# The Firefly III URL is: http://app:8080
#
# Other URL's will give 500 | Server Error
#
services:
  app:
    image: fireflyiii/core:latest
    hostname: app
    container_name: firefly_iii_core
    networks:
      - firefly_iii
    restart: unless-stopped
    volumes:
      - /home/imfbsbn.xyz/domains/firefly.imfbsbn.xyz/upload:/var/www/html/storage/upload
###   you will want to modify the line above to match your domain's file location
###   the reason to do this is to make sure the firefly uploads get backed up by Virtualmin
    env_file: stack.env
    ports:
      - 8088:8080
  importer:
    image: fireflyiii/data-importer:latest
    hostname: importer
    restart: unless-stopped
    container_name: firefly_iii_importer
    networks:
      - firefly_iii
    ports:
      - 8090:8080
    depends_on:
      - app
    env_file: stack.env
networks:
  firefly_iii:
    driver: bridge
Don’t worry about environmental variables yet. Just go-ahead and deploy the container.
I don’t know why, but I was unable to get Firefly working using any environmental variables without first deploying the container with none.
Portainer will download the images, create the containers, and start the applications. You should get something like this:
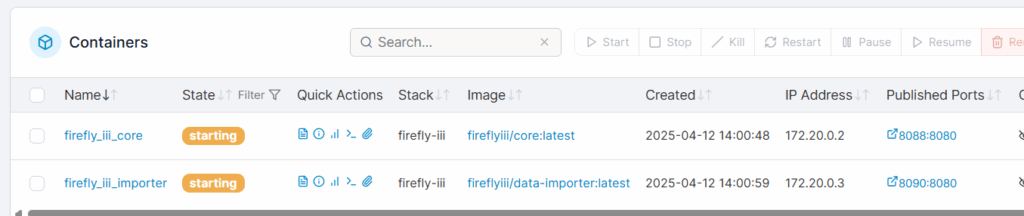
Take note of the IP address! Within docker the gateways for IP addresses (unless you have made some changes) will always be 0.1. So the gateway for our Firefly stack/containers is going to be 172.20.0.1. You are going to need to know that in just a minute.
At this point we should be able to check if the domains are correctly forwarding to the right containers.
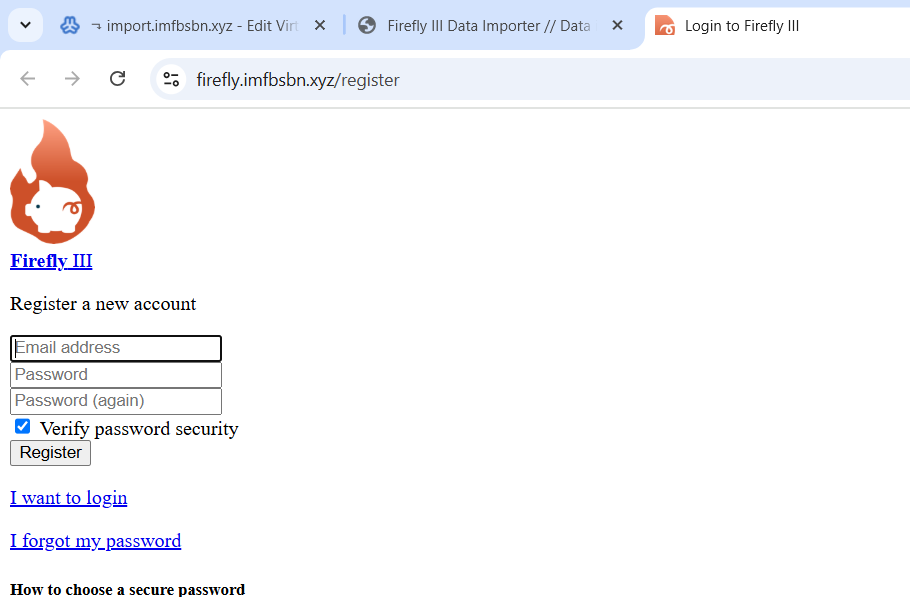
And…
Now, that’s not what these pages are actually supposed to look like. We will have to make some changes later to the Apache directives. But for right now if you get pages like this everything is working so far.
Now go back to Portainer, and into the Firefly stack. Click on editor and scroll down to “Environmental Variables.”
This here is your stack.env file (if you switch the environmental variables into “advanced mode” you can cut-and-paste all of these at once.)
APP_ENV=production
APP_DEBUG=false
SITE_OWNER=mail@example.com
APP_KEY=sUHKRxr3g8BpTW2hkP6X4bMFDGeVZcav  ##you should change this to your own unique 32 character key
DEFAULT_LANGUAGE=en_US
DEFAULT_LOCALE=equal
TZ=America/Chicago  ## modify this as necessary
TRUSTED_PROXIES=**  ## this does not appear in the official documentation file but it is necessary
LOG_CHANNEL=stack
APP_LOG_LEVEL=notice
AUDIT_LOG_LEVEL=emergency
DB_CONNECTION=mysql
DB_HOST=172.23.0.1  ##make sure you enter the GATEWAY IP address of the containers/stack
DB_PORT=3306
DB_DATABASE=firefly  ## make sure this line, and the next two lines, match what you did in Virtualmin
DB_USERNAME=fly_db_user
DB_PASSWORD=E7GoZqPU40LKXDh
MYSQL_USE_SSL=false
MYSQL_SSL_VERIFY_SERVER_CERT=true
MYSQL_SSL_CAPATH=/etc/ssl/certs/
CACHE_DRIVER=file
SESSION_DRIVER=file
COOKIE_PATH="/"
COOKIE_DOMAIN=
COOKIE_SECURE=false
COOKIE_SAMESITE=lax
MAIL_MAILER=log
MAIL_HOST=null
MAIL_PORT=2525
MAIL_FROM=changeme@example.com
MAIL_USERNAME=null
MAIL_PASSWORD=null
MAIL_ENCRYPTION=null
MAIL_SENDMAIL_COMMAND=
SEND_ERROR_MESSAGE=true
SEND_REPORT_JOURNALS=true
ENABLE_EXTERNAL_MAP=false
ENABLE_EXCHANGE_RATES=false
ENABLE_EXTERNAL_RATES=false
MAP_DEFAULT_LAT=51.983333
MAP_DEFAULT_LONG=5.916667
MAP_DEFAULT_ZOOM=6
AUTHENTICATION_GUARD=web
AUTHENTICATION_GUARD_HEADER=REMOTE_USER
AUTHENTICATION_GUARD_EMAIL=
CUSTOM_LOGOUT_URL=
DISABLE_FRAME_HEADER=false
DISABLE_CSP_HEADER=false
ALLOW_WEBHOOKS=false
STATIC_CRON_TOKEN=
DKR_BUILD_LOCALE=false
DKR_CHECK_SQLITE=true
APP_NAME=FireflyIII
BROADCAST_DRIVER=log
QUEUE_DRIVER=sync
CACHE_PREFIX=firefly
USE_RUNNING_BALANCE=false
FIREFLY_III_LAYOUT=v1
QUERY_PARSER_IMPLEMENTATION=legacy
APP_URL=https://firefly.imfbsbn.xyz  ## change this to reflect your domain, note the https protocol
FIREFLY_III_URL=http://app:8080
VANITY_URL=https://firefly.imfbsbn.xyz  ## again
FIREFLY_III_ACCESS_TOKEN=
FIREFLY_III_CLIENT_ID=
USE_CACHE=true
IGNORE_DUPLICATE_ERRORS=false
IGNORE_NOT_FOUND_TRANSACTIONS=false
CAN_POST_AUTOIMPORT=false
CAN_POST_FILES=false
IMPORT_DIR_ALLOWLIST=
FALLBACK_IN_DIR=false
VERIFY_TLS_SECURITY=true
JSON_CONFIGURATION_DIR=
CONNECTION_TIMEOUT=31.41
LOG_RETURN_JSON=false
LOG_LEVEL=debug
ENABLE_MAIL_REPORT=false
EXPECT_SECURE_URL=false
MAIL_DESTINATION=noreply@example.com
MAIL_FROM_ADDRESS=noreply@example.com
POSTMARK_TOKEN=
QUEUE_CONNECTION=sync
SESSION_LIFETIME=120
IS_EXTERNAL=false
ASSET_URL=
MYSQL_RANDOM_ROOT_PASSWORD=yes
MYSQL_USER=fly_db_user  ## again – make sure these lines match what you have in Virtualmin
MYSQL_PASSWORD=E7GoZqPU40LKXDh
MYSQL_DATABASE=firefly
USE_PROXIES=127.0.0.1  ## this too is not included in the official documentation but needs to be added
Notice that the database credentials appear twice.
In order for our Firefly container to connect to our MariaDB running natively on the server, we need to point the application to the network gateway for these containers. In case you missed it above, within Portainer you can click on Networks and it will show you the IPv4 Gateway. In this case it is 172.20.0.1.
Delete everything after the ##’s and re-deploy the stack.
This would be a good time to check the container logs and look for errors. If everything went well we’re almost done.
Head back over into Virtualmin.
We need to edit the Apache directives for the sub-domains we created. There are (at least) two different ways to do this within Virtualmin.
The first is to select the appropriate domain within Virtualmin, then go to “Web Configuration”, and click on “Configure SSL Website”.
The other way is to start with Webmin, then click to expand “Servers”, click on “Apache Webserver”, and click on the appropriate virtual server.
However you get there, click on the “Edit Directives” block.
Change whatever you have within that window so that it looks more like below.
SuexecUserGroup #1007 #1007
ServerName firefly.imfbsbn.xyz
DocumentRoot /home/imfbsbn.xyz/domains/firefly.imfbsbn.xyz/public_html
ErrorLog /var/log/virtualmin/firefly.imfbsbn.xyz_error_log
CustomLog /var/log/virtualmin/firefly.imfbsbn.xyz_access_log combined
SSLEngine on
SSLCertificateFile /etc/ssl/virtualmin/17444589333674742/ssl.cert
SSLCertificateKeyFile /etc/ssl/virtualmin/17444589333674742/ssl.key
SSLProtocol all -SSLv2 -SSLv3 -TLSv1 -TLSv1.1
SSLCACertificateFile /etc/ssl/virtualmin/17444589333674742/ssl.ca
### the lines above should all be in there already – KEEP THEM!
### Actually proxy the traffic and really the only important part ###
AllowEncodedSlashes On
RewriteEngine On
SetEnvIf Cookie "(^|;\ *)csrftoken=([^;\ ]+)" csrftoken=$2
RequestHeader set  X-CSRFToken "%{csrftoken}e"
### Proxy Websockets Section 1 (works for me) ###
RewriteCond %{HTTP:UPGRADE} ^WebSocket$ [NC]
RewriteCond %{HTTP:CONNECTION} Upgrade$ [NC]
RewriteRule ^/?(.*) "ws://127.0.0.1:8088/$1" [P,L]
### Proxy everything else ###
ProxyPass / http://127.0.0.1:8088/ connectiontimeout=6 timeout=60
ProxyPassReverse / http://127.0.0.1:8088/
ProxyPreserveHost On
ProxyRequests Off
RequestHeader set X-Forwarded-Proto expr=%{REQUEST_SCHEME}
RequestHeader set X-Forwarded-SSL expr=%{HTTPS}
After you’ve made your changes, click on Save and Close.
When Virtualmin tries to apply the changes you may get an error like this.
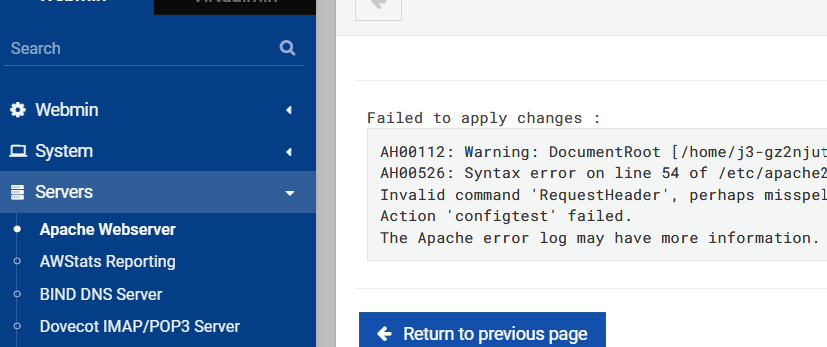
To correct this, from the Webmin menu select Servers then Apache Webserver.
Click on Global Configuration tab. Then click the button marked “Configure Apache Modules”.
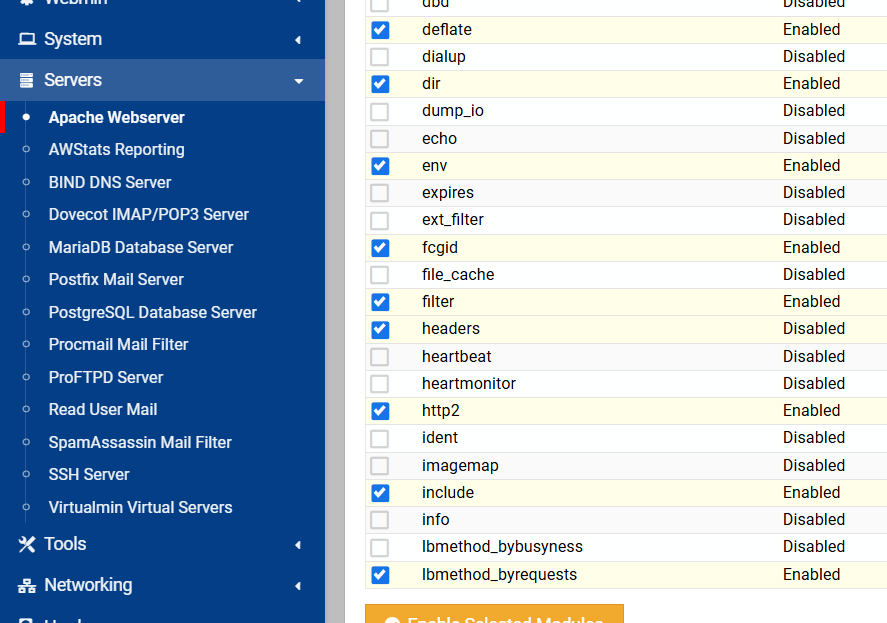
Select the headers checkbox and click the Enable Selected Modules button.
*** On the next page that loads, you have to click on Apply Changes. ***
Now you have to make the same changes to the Apache directives for the “import” domain name. You will do that exactly the same way as you did above. Just pay special attention to the fact that the domain name is a little different and that the port number is now 8090.
Once you have made those changes, visit the URLs, and the pages should load correctly (they will look different than they did before, more professional.)
That’s it! You have successfully installed Firefly III. And if you have Virtualmin backing up your system on a schedule, Firefly will get back-up automatically.
– – – – –
Last thing to do is to set up the cron job.
Head into Portainer, Stacks, Firefly stack, & editor. Pop open Environmental Variables and enter a 32 (exactly 32) character key in the STATIC_CRON_TOKEN field.

Now you have to add that token to the end of this URL like so:
https://firefly.imfbsbn.xyz/api/v1/cron/z7xGE4y5SsM8jPWkYgZFQ62vBRnCUTtrWithin Virtualmin, switch over to Webmin. Then click on Servers and then Scheduled Cron Jobs.
Now you want to click on Manually Edit Cron Jobs.
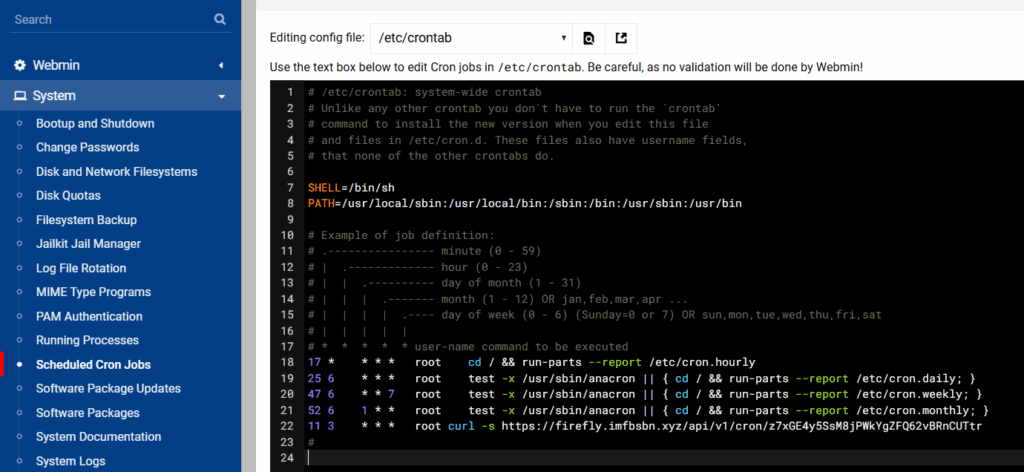
Add the line below so that the URL will be loaded every day at 3:11.
11 3 * * * root curl -s https://firefly.imfbsbn.xyz/api/v1/cron/z7xGE4y5SsM8jPWkYgZFQ62vBRnCUTtrSave and close. And you’re done.
– – – – –
One more thing before you go. Connecting the import module to the core is not well described in the official documentation. So let’s walk through that really quick.
Visit the main page and go through the registration process. Go ahead and create an account, and go through the tips.
When that’s all done go to the address bar and visit the /profile page.
On that page click on the OAuth tab, and then create a new OAuth client.
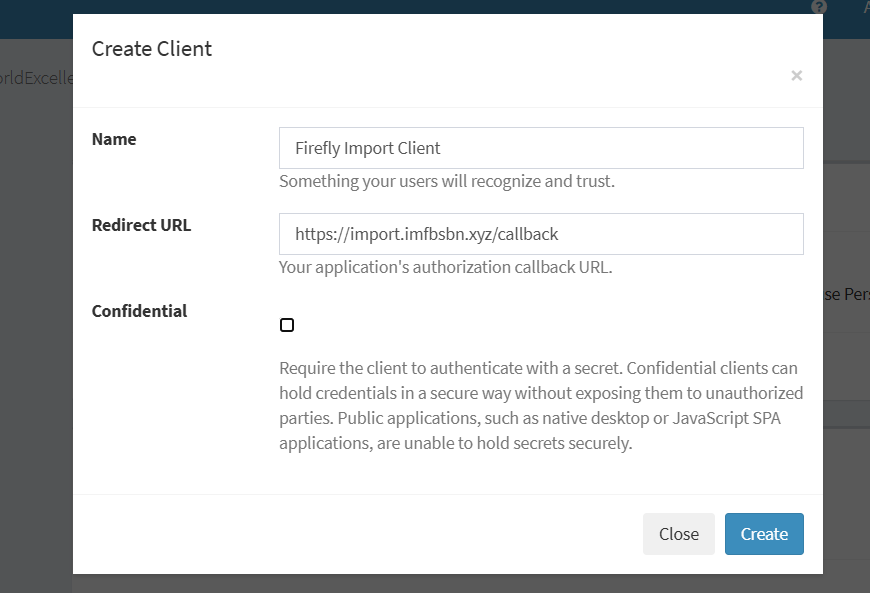
Go-ahead and click on the create button.
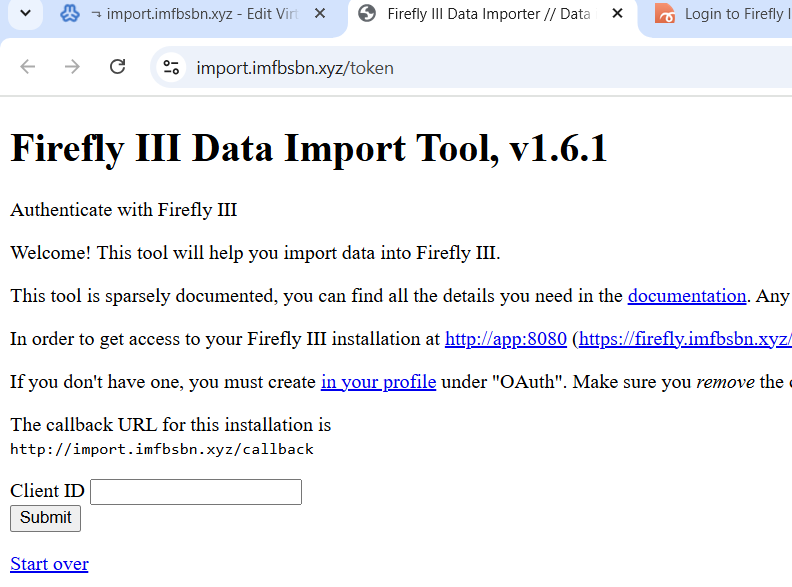
The system will then give you a page where there is a list of clients. You need the number under Client ID.
Now go to the URL for the file importer. Enter the number for the Client ID you just located.
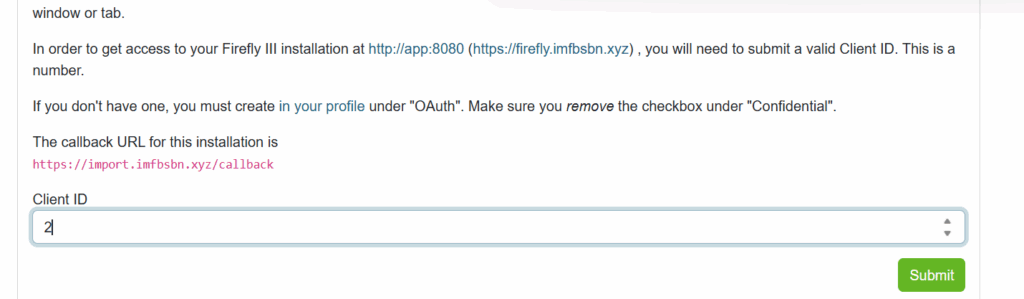
First are going to click the submit button.
And on the next page you want to click on the authorize button.
Congratulations! Now you can upload files into your Firefly III installation.
[/et_pb_text][/et_pb_column][/et_pb_row][/et_pb_section]
-
The Prime Directive
Who wants a story?
Many years ago (in a former life) I was the lawyer for a woman who sued her daughter. The details of the case, although interesting, are not important. What matters is that, shortly after filing the lawsuit the daughter’s attorney suggested mediation and we agreed.
For those of you who have never been involved in a lawsuit, well bless your little hearts. They’re horrible and there are no winners. Anyways, mediation is when the parties sit down with someone (a mediator) who’s usually a semi-retired lawyer or a retired judge who will try and drive the parties to settlement. The mediator usually tells the parties to block off two or three hours, but once started it’s not unusual for these things to take all day, and sometimes run into the night. I once had a federal judge keep us until around 11:00 at night. It worked; we settled.
Extraneous details: this case was actually extraordinary. We started the mediation at nine or ten in the morning. According to the judge, we were getting close around noon. So lunch had to be delayed. We did finally take a break around three or four in the afternoon. Mind you, if my recollection is correct, this was a $4 million case; so the stakes were considerable. Anyways, the point of the matter is that everyone was abused to the point of exhaustion. The judge made fun of the lawyers and accused the parties of behaving like children. It was probably just after seven in the evening when he announced “I don’t care if we have to sit here all night. No one is leaving until this case is settled.” And he meant it. This was in Detroit and I had flown. Missed dinner. Missed my flight. Had to find a hotel at midnight and fly home standby in the morning. Good times.
The mediation process – generally – is that the parties sit together with the mediator and each side gives a short rendition of their position/story. Then the parties relocate into separate rooms and the mediator moves from room to room dealing with each side one-on-one. The job the mediator is to break down and convince each side that they have no case and should settle. The process is mentally taxing and a well skilled mediator can make it absolutely grueling (see above.) Pro tip: bring snacks.
This particular mediation (with the mother and the daughter) wasn’t so bad. Long story short, after a couple hours the daughter simply caved. So we all got back together in the same room and it took maybe half an hour to draft a settlement agreement.
As everyone was packing up their things, the mediator looked at me and said, “Mr. Bosco, I noticed you have a very interesting way of speaking. You don’t use many words. You are a master of the succinct.”
The mediation was over, so I had already switched my brain to “off”. Not thinking clearly, and as I wasn’t really sure what he meant, I humbly mumbled, ” T h a n k y o u ? “
He laughed and said, “No, no. I assure you I meant it as a compliment.”I don’t know why but that story has always stuck with me. Master of the succinct.
I’m not even exactly sure what it means; but I like it.
On the Medical Front
Couple of things.
First of, it’s been two years without the trach. So that’s kinda cool. For those that don’t recall, my doctor told me if I made it two years that I would probably be okay without it. So here we are. Woo hoo!
I still do a fair bit of daily coughing and wheezing. I suppose because I’m not constantly twisting and turning, shifting my weight and moving side to side, things tend to settle in my lungs. After a few hours they build up and have to be coughed up. C’est la vie.
The other problem in this regard is that I tend to sleep on my back with my mouth open (which is horrible and nobody should do.) So that dries out everything on the insides and makes it harder to cough up. Thankfully, we have a nebulizer so I take a “breathing treatment” as necessary. That helps.
On the other end… Well. Is the other end.
Again, because I don’t do a lot of turning and shifting, things tend to settle in the bowel on their way out. For a while – as in for a few months – we really didn’t realize what was going on. Then for a little while, we realized there was an issue but we did not take it too seriously. Then we had a problem.
I will spare you the gory details. (You’re welcome.)
It’s been about 10 weeks and it finally appears we might just have this under control. Don’t know if you guys are familiar with Senokot, it’s fairly common. On the side of the box it will tell you the standard adult dose is one tablet per day for the “gentle overnight relief of occasional constipation.” Now I’m not saying that I’m special, but I take two tablets twice a day.
Things you gotta do to keep things running.
That’s it. Don’t want to jinx anything, but I was just thinking the other day that I haven’t been admitted to the hospital in over a year. Kind of a weird milestone to celebrate but I will take it as a win.
Anyways…
Back in September we talked about how most people default to truth; even to their own detriment (or when things ain’t true.)
Then in October we talked about some truisms in ancient writings. These are principles that have proven to be correct over tens-of-thousands of generations spanning hundreds-of-thousands of years. We’re talking about a timeframe that makes ancient Egypt modern history.
Seriously, these teachings are the fundamental building blocks of society. Well, at least a civilized society.
And as I was contemplating some of these teachings, I had a thought – a succinct expression – that simply expressed the summation of order in a society. I call it The Prime Directive:
It’s in everyone’s best interest that everyone make good decisions.
Master of the succinct indeed.
Oh sure, now that you’ve read it you think it’s nothing but common sense; at least it should strike you that way. (If you disagree be sure to let me know.)
Seriously, can you think of any situation where you could point to a member of society and say, “I hope that guy makes a truly horrible decision”? Of course not. We hope family members make good decisions. We hope strangers, other drivers, pilots, fast food order takers, etc. make good decisions. And we certainly hope that politicians make good decisions.
Now this shouldn’t need to be said, but I’ll say it anyways; this isn’t political. I know my readers. Some of you are slightly-left and others slightly-right. Some of you are wacko-left and some of you are wacko-right. I have a few Zionists readers and a few “from the river to the sea” readers. I know that some of you are environmental Nazis and others are drill baby drill. But that’s not the point.
Regardless of your political persuasion, you should be able to agree that
it’s in everyone’s best interest that everyone make good decisions.
The rub comes when we try to define “good decisions.”
Naturally, a lot of people believe “good decisions” is synonymous with “in my best interests.” And sometimes that’s the case. But often not.
Anyways, that’s enough for now. Next time we’ll get into a little bit more about “good decisions” and how they are made.
So until then, thanks for reading and go make some good decisions.
Standing chitchat, Sundays at 3:30 Central.
No login or special software required.
Here’s the link: https://jb.jb03.com/call/e35vvpp9.
All are welcome.
If you’re not already subscribed, and wish to receive updates, please enter your email below.
[newsletter_form type=”minimal” lists=”1″]
-
Virtualmin, PostgreSQL & Containers
Let’s start with the why.
The reason you want to use databases (either MySQL or PostgreSQL) which are part of a Virtualmin domain is so they will automatically be included in any VM backups of that domain. That is, when a new domain is added to Virtualmin and either (or both) of the database boxes are checked, VM will automatically create the necessary database(s) and include include them in any backups (assuming the settings are correct.)
Consider it this way… You want to run Application_A and Application_B inside docker containers. However, each requires MySQL. So you have the option of:
- Having the server run 3 instances of MySQL: one native to the OS, one within the Application_A container, and one within the Application_B container, or
- Having the server run 1 instance of MySQL. Only the one native to the OS is required and Application_A & Application_B connect to it.
Running multiple instances of the same application is not very efficient. Further, backing up databases inside containers is… Well… Complicated.
Backing up databases tied to Virtualmin domains is incredibly simple and straightforward.
So let’s have at it.
Before going any further this tutorial assumes:
- Virtualmin has been correctly loaded on your system,
- Docker has been installed on your system,
- Portainer has been installed on your system, and
- PostgreSQL and its Virtualmin module have been properly installed.
If anyone is curious I’m working on the server hosted at Server Cheap (that’s not an endorsement, I have zero relationship with those people.)
First – We Add the Domain to Virtualmin
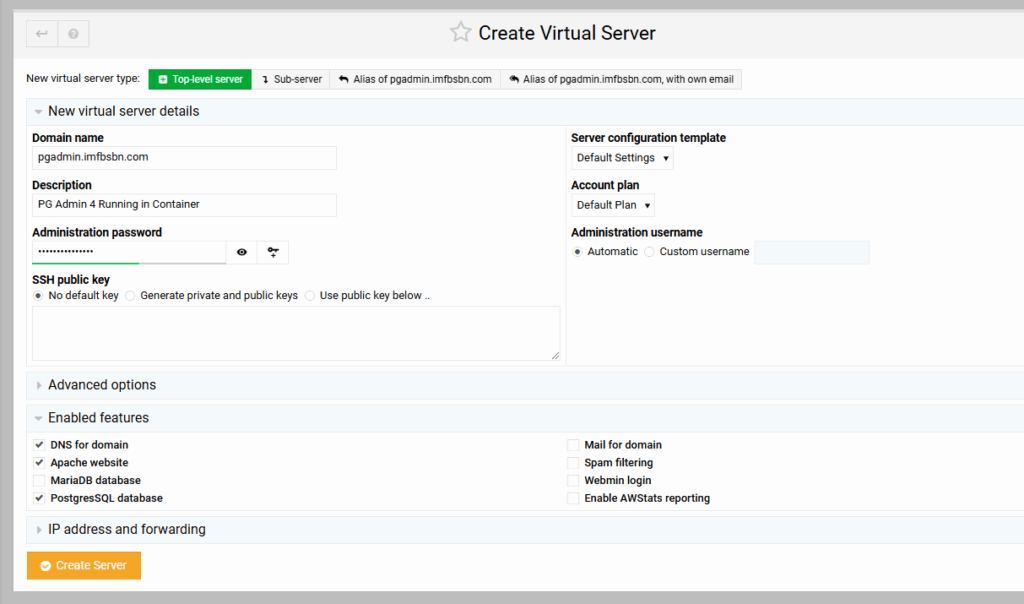
Here we are adding the domain name “pgadmin.imfbsbn.com”.
Because the administration username is going to be set automatically it’s going to be “pgadmin”.
In terms of features, we only need DNS, Apache, and PostgresSQL. Those are the only boxes that need to be checked.
Go ahead and create the server.
Second – We Create the Reverse Proxy To the Container
Now go to Website Configuration – – Edit Proxy Website and make the changes necessary to set up the reverse proxy to the container.
Third – We get Our Application Running in the Container
Next were going to log into Portainer and create a new stack.

Here’s the code you need to enter in the stack:
services:
  pgadmin:
    image: dpage/pgadmin4:latest
    restart: unless-stopped
    environment:
      PGADMIN_DEFAULT_EMAIL: pgadmin@bblaze.xyz
      PGADMIN_DEFAULT_PASSWORD: fshbhhj3fUFZbUIV
    ports:
      - "5050:80"
    extra_hosts:
      - "host.docker.internal:host-gateway"
Then go ahead and deploy the stack.
Once the container has loaded and is running you should be able to visit the domain name and see the login page for PG Admin 4:
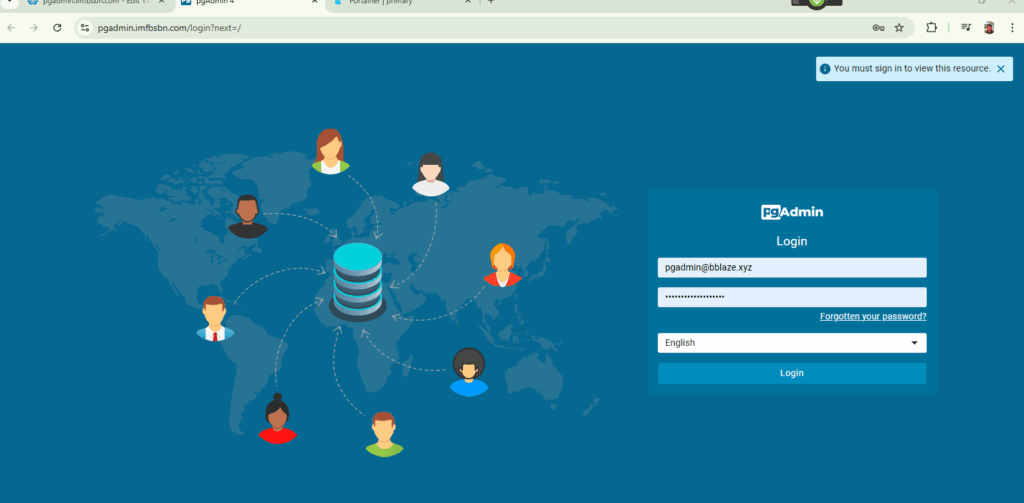
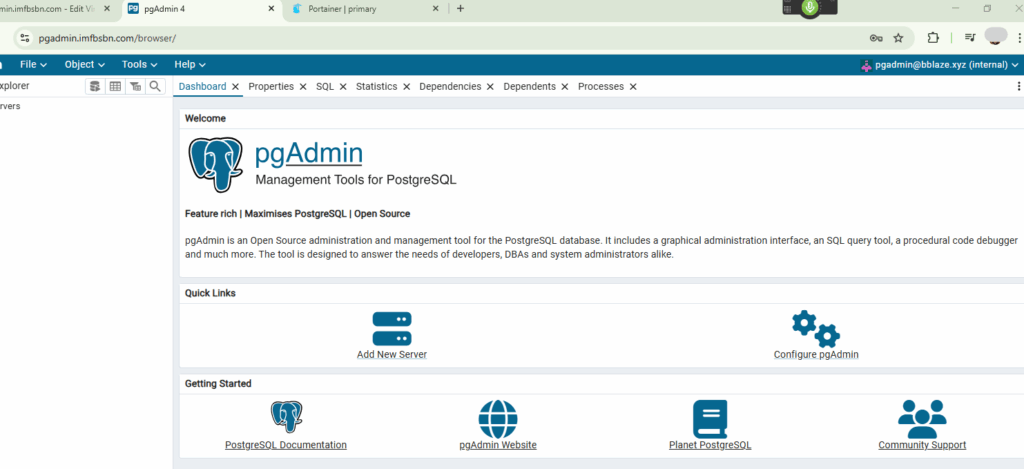
And if you enter the credentials from the stack you should be allowed to login:
Fourth – Configure PostgresSQL To Allow Host Connections
We have to make a few changes to a couple of files before the PostgresSQL server will allow our docker container to connect.
Let’s do the easiest first.
On our Debian system, we can use the Virtualmin file manager to navigate to /etc/postgresql/15/main…
NOTE: Because our domain is set up as a proxy, Virtualmin might not show us the file manager has a menu option. To use the file manager you may have to select an alternate domain hosted on the system or use Webmin.
Now you can right-click on the file postgresql.conf and then click edit from the pop-up window.
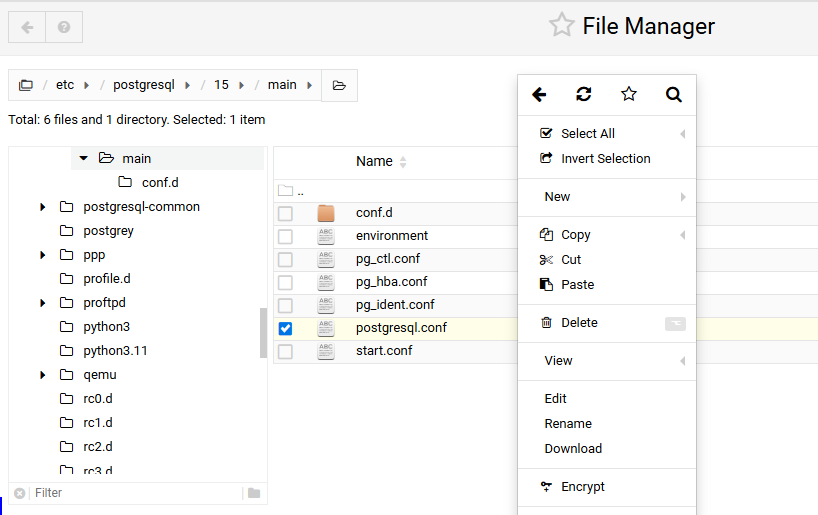
Virtualmin will pop open a window where you can edit this file.
Scroll down a couple of screens until you get to CONNECTIONS AND AUTHENTICATION.
In that section you will need to remove the # in front of listen_addresses.
You also need to delete ‘localhost’ and put in ‘*’ as shown below.
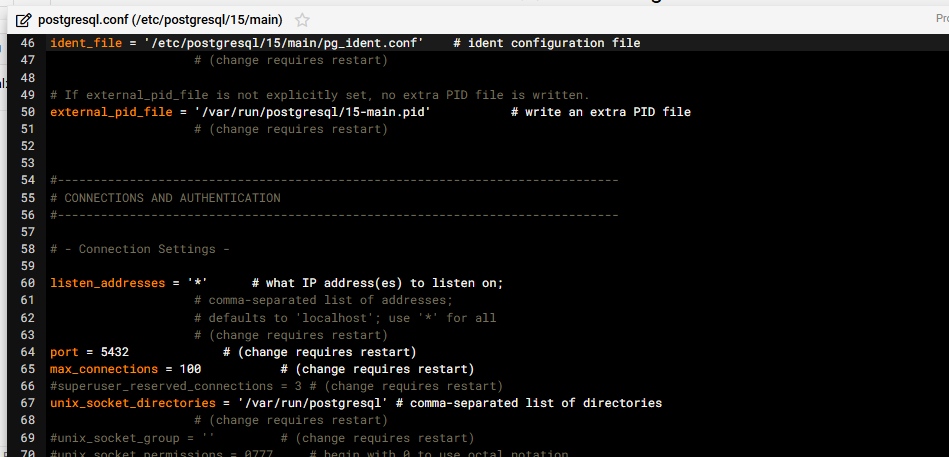
Save the file by clicking on the diskette at the top right of the pop-up window.
Now comes the tricky part.
Before continuing, we need to gather and confirm a little bit of information.
First we need to find out the IP address of our docker container running PGAdmin4. Thankfully, no commands are necessary. Portainer will simply show us the IP on the container page.
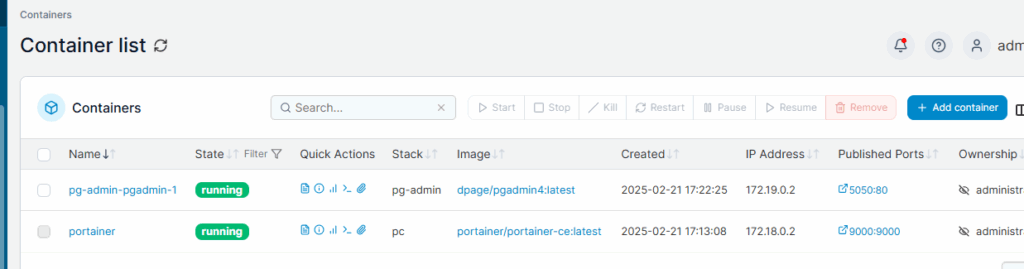
We can see that our PGAdmin container has an IP address of 172.19.0.2. We’re gonna need to know that in just a little bit.
Next we are going to confirm – in Virtualmin – our username and database name for Postgres.
For this we need to navigate over to the “Webmin” side of Virtualmin. To do that either press Alt-W or click on the Webmin tab on the top left side of the menu.
From there navigate to Servers – – Postgres Database Server:
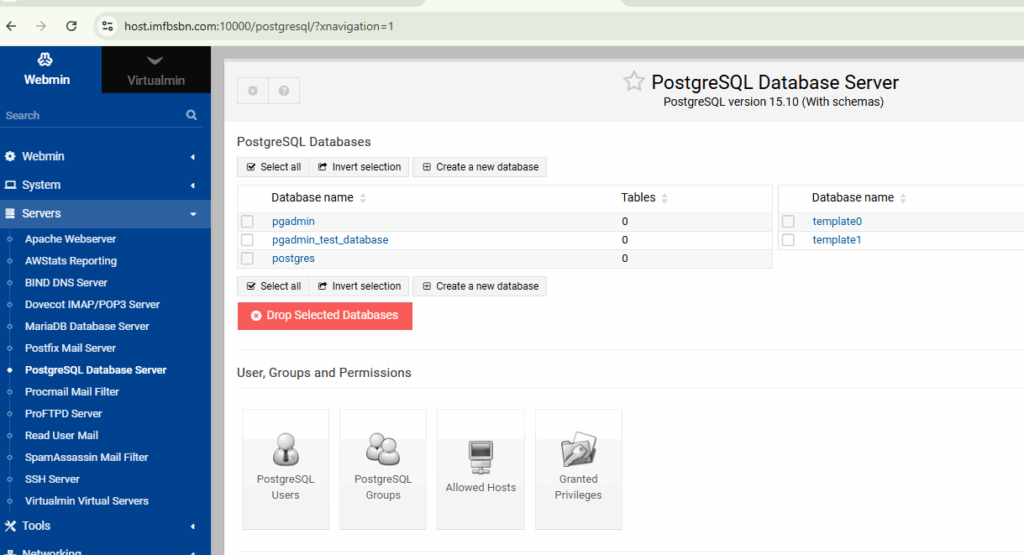
On this screen (shown above) we need to confirm that Virtualmin has created a database called “pgadmin”.
Now we are ready to click on the PostgreSQL Users button.
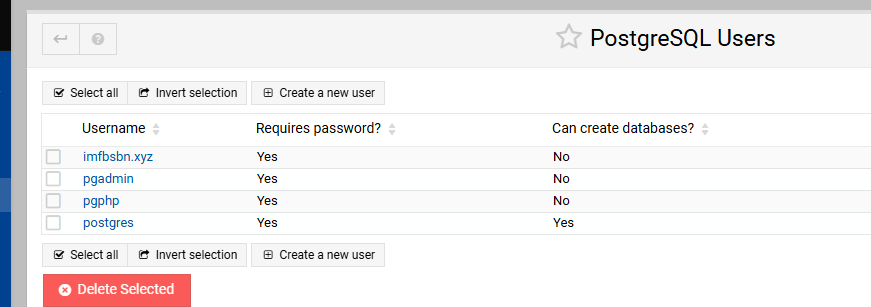
On the users page we want to confirm that Virtualmin has created a user called “pgadmin”.
Go ahead and click on the user pgadmin.
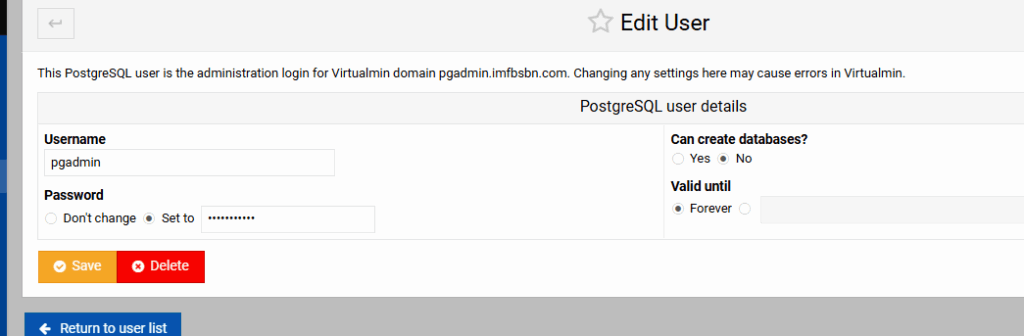
Here you want to ABSOLUTELY CHANGE THE PASSWORD and write it down. I’m not exactly sure what is going on here behind-the-scenes. But it appears that Postgres users are not initially assigned a password when created. So setting a password here is absolutely essential for continuing.
Now that we have confirmed our IP address, database name, username, and password, we are ready to proceed to the next step.
Click the blue button that says Return to Database List.
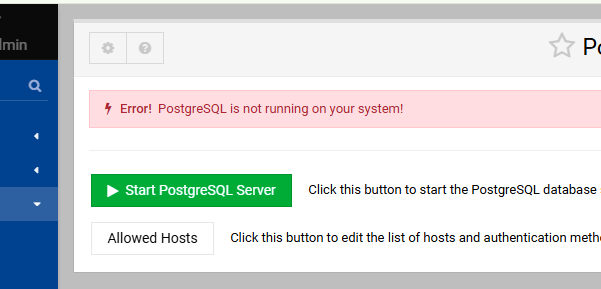
Click the Virtualmin button “Allowed Hosts”.
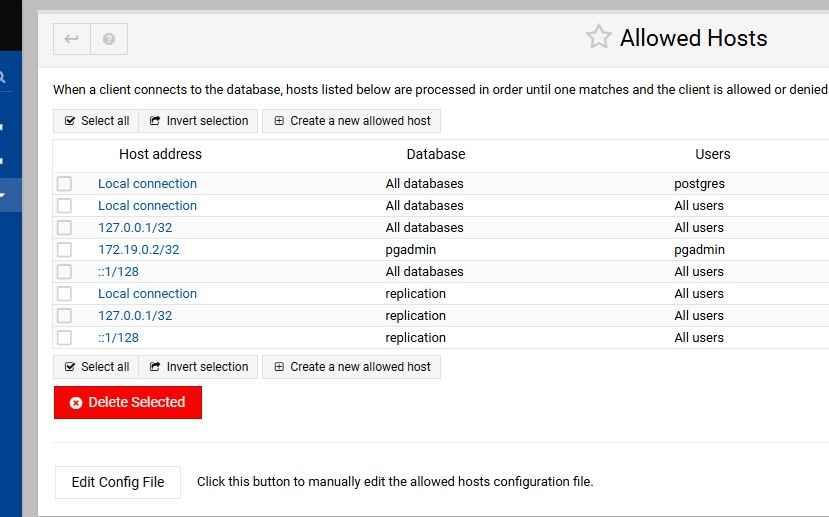
At the bottom left, click on that white button that reads Edit Config File.
Scroll down to the end of that file. You want to make it look something like this:
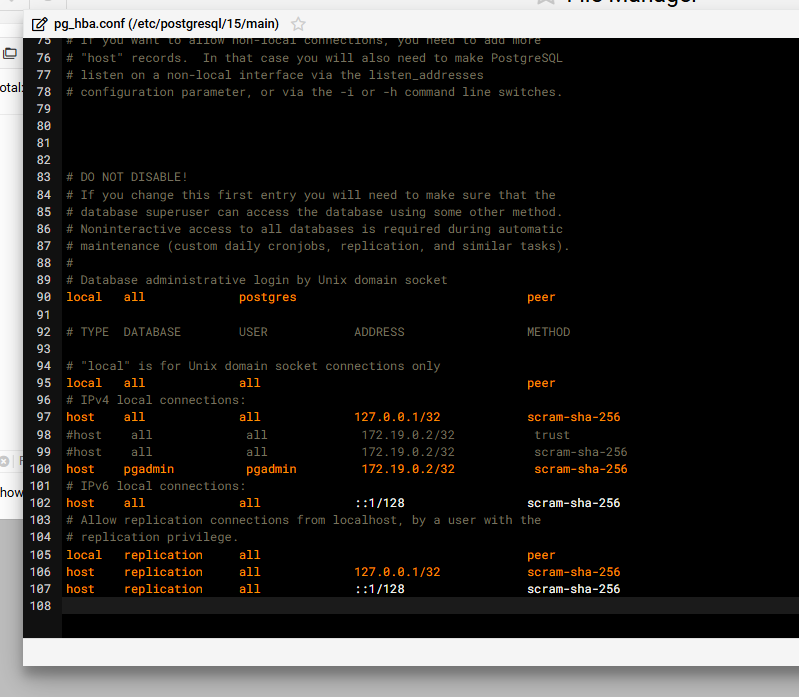
The line you want to add the look like this:
host pgadmin pgadmin 172.19.0.2/32 scram-sha-256This is telling PostgeSQL to allow access to the pgadmin database by the pgadmin user from IP 172.19.0.2 using sha-256 password encryption.
NOTE: if you get stuck you may want to test with lines #98/99 which I have commented out above.
After you have made the changes, save the file.
Again, click the blue “Return to Database List” button.
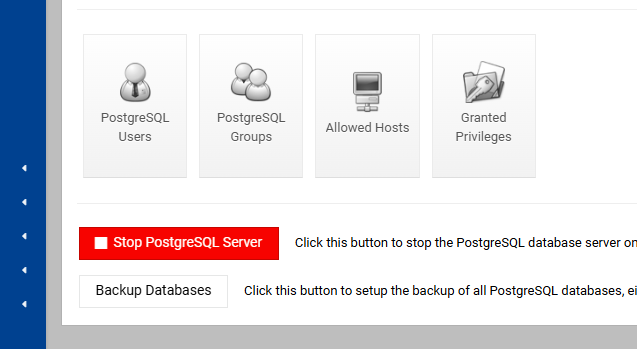
Restart the PostgreSQL server by using the “Stop” and “Start” buttons within Virtualmin.
Then…
Return to the browser tab where you have PG Admin 4 open.
Click on the button that says “Add New Server”
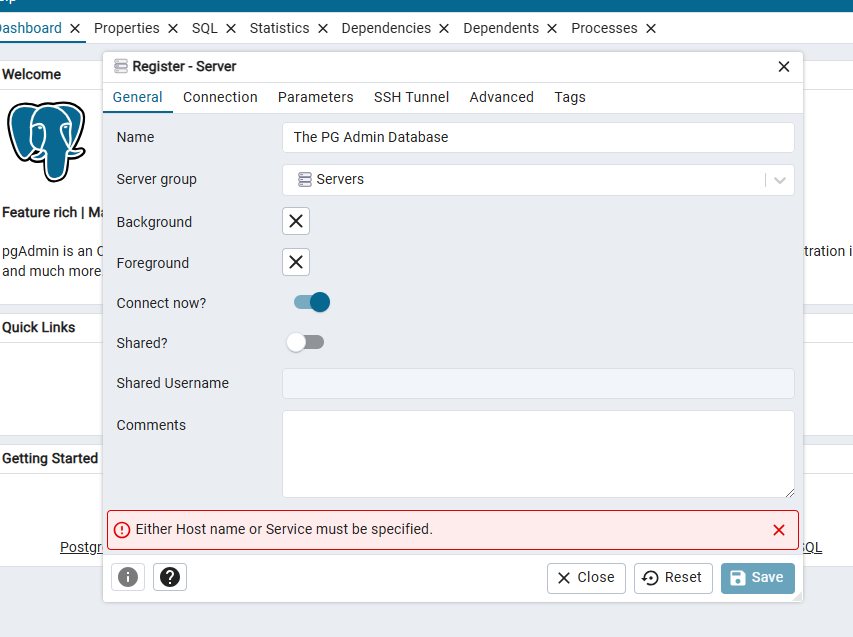
Enter whatever you want for the name.
Then click over to the connections tab:
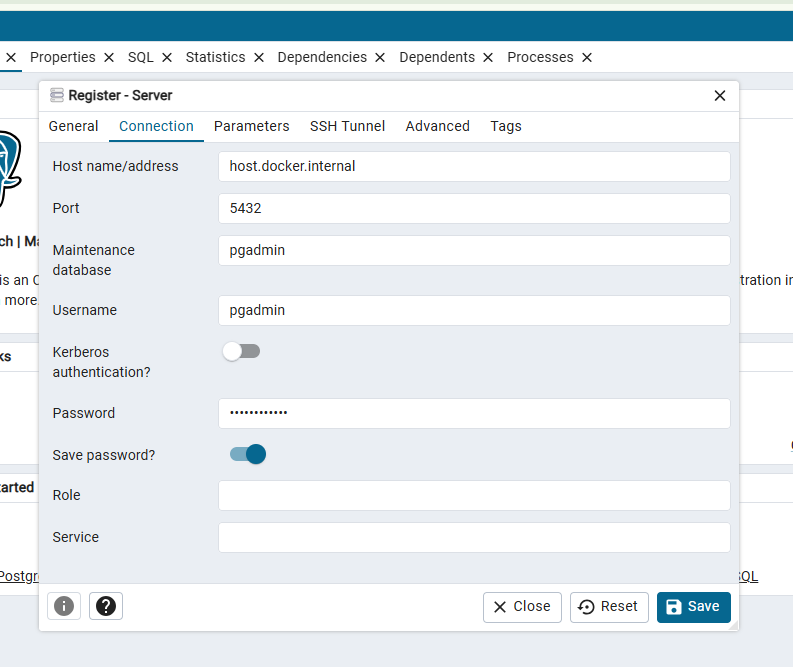
Enter data into the fields like above.
If everything worked as it should, you should see something like this:

Congratulations!
You just connected a docker container to the PostgreSQL server hosted natively on the OS.
-
PostgreSQL, Virtualmin, & phpPgAdmin
Time to load PostgreSQL.
For those paying attention, when we installed Virtualmin loaded the “LAMP” stack.
That means we got: Linux, Apache, MySQL, and PHP.
So many newer (cooler) applications no longer use MySQL but PostgreSQL instead. So now is the time to get PostgreSQL loaded onto our Virtualmin server.
Naturally, there are several ways to do this. This is just “my way.”
Start by going to System Settings – – Features and Plugins:

Click the checkbox next to PostgreSQL database. Then click the “Save” button.
Virtualmin will take you to an error page, telling you that PostgreSQL is not installed. On that page (I forgot to get a screenshot) are the instructions to go to the Virtualmin PostgreSQL module. From there Virtualmin will ask you if you want to install PostgreSQL. Yes, yes you do.
Go ahead and click on the install button.
When done, you should be looking at the Virtualmin module for the PostgreSQL database server.
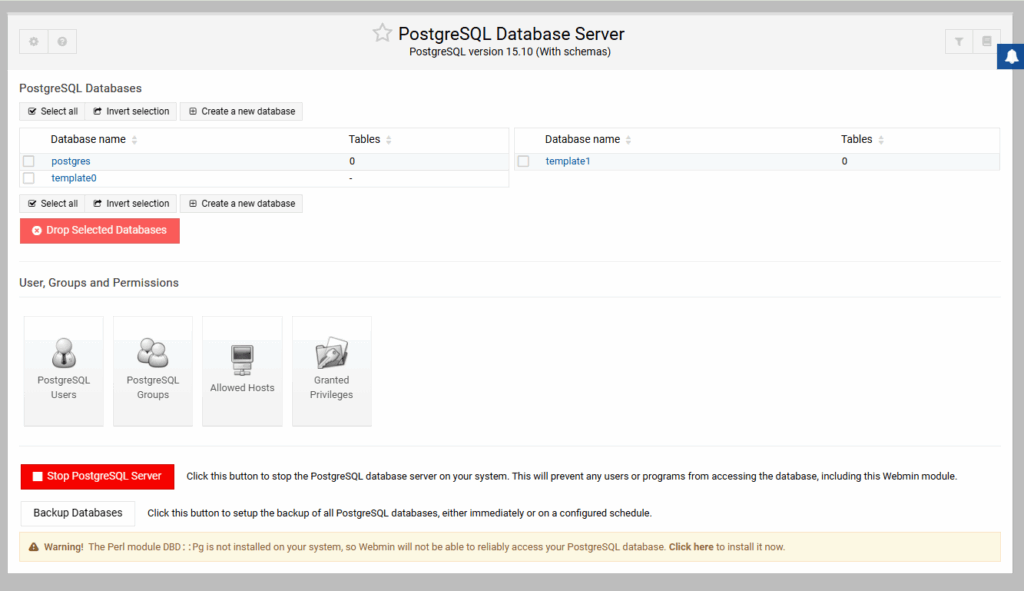
Notice that line at the bottom.
Go ahead and click on the “click here” in order to install the necessary Perl module.
Awesome! Now your Virtualmin server is running PostgreSQL and has all the tools for you to avoid the command line (for the most part.)
Installing phpPgAdmin2
Let’s start by creating a new virtual server.

Naturally, if Virtualmin is not handling your DNS records then create those first.
Just like adding any other domain name to the system, we need to enter the FQDM and make any other desired changes/additions.
- I am using Virtualmin’s DNS on the server, so that box remains checked.
- We are going to need Apache as the web server.
- And we want to have access to the PostgreSQL database.
So those are the only three checkboxes needed. SAVE THE PASSWORD. Go ahead and click the Create Server button.
Now here’s the thing, up until a few months ago – or until your preferred Linux distribution upgraded to PHP 8 – we would install phpPgAdmin as one of the Virtualmin included web applications. But the original version of phpPgAdmin does not support PHP 8. Thankfully an updated version is available. And also thankfully, installation is pretty simple.
So let’s install phpPgAdmin 2.
NOTE: I have the original version of phpPgAdmin loaded via the “web app” process (that’s how I discovered it doesn’t work.)
So in order to keep that version alive while testing another I created a subdirectory off the main directory. You don’t need to do that. But my process goes like this:
Create a new directory off of the /home/pgphp/public_html/ directory.
cd /home/pgphp/public_html
mkdir git
cd git
Then we’re going to download the application directly from Git.
git clone https://github.com/ReimuHakurei/phpPgAdmin.gitIf you don’t want to create the “git” directory, you can go ahead and run the above command directly in the /home/pgphp/public_html directory.
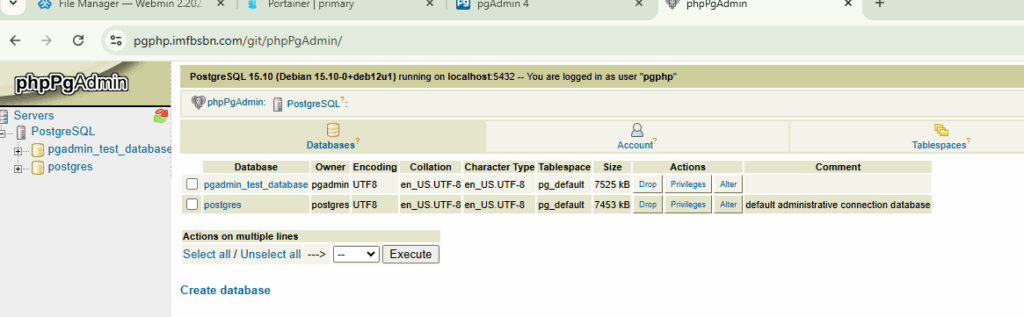
Now we can direct our favorite web browser to: https://pgphp.imfbsbn.com/git/phpPgAdmin/ (remove “git/” from the URL as appropriate.)
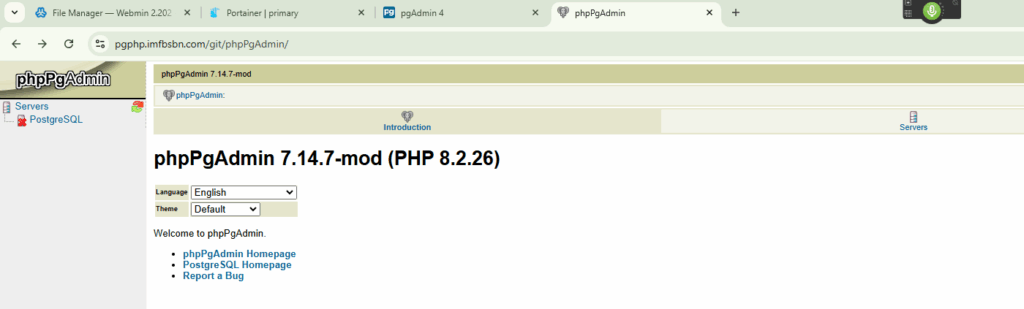
If you click on the “Servers” icon near the top right you should get this:
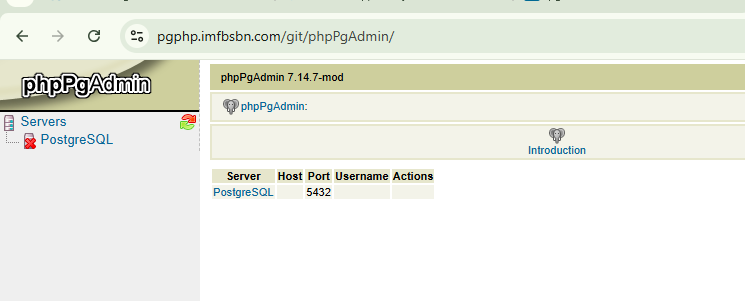
If you click on the PostgreSQL in the middle there, you will be taken to a login screen:
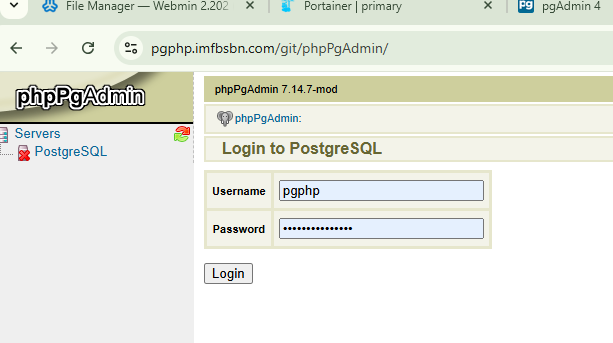
The username is the administrative username for the domain in Virtualmin.
The password is the password when you created the domain in Virtualmin.
When you click login you should get something like this (I’ve been creating and dropping databases all day so your screen will look a little different):
That’s it!
Now you have loaded PostgreSQL and installed an updated version of phpPgAdmin.
In the next post I’ll show you how to connect to the PostgreSQL server from a docker container.
-
Virtualmin at Server Cheap
Don’t know why but the other day I searched for “cheap VPS server hosting”. Didn’t know what I expected to find; if anything. However, as luck would have it I stumbled into servercheap.com. Just so were clear, this is literally what happened. I had never heard of these guys and do not have a relationship with them. They have not offered anything to be included here, nor have I asked.
Anyway, I was blown away by their pricing. If you follow, then you know that I have built Virtualmin servers at Linode/Akamai, Digital Ocean, and Name Cheap. There is no doubt that the first two provide high-quality, high-value hosting. Name Cheap is, well, cheaper. And the servers seem to reflect that.
These guys claim (I haven’t checked) to have their server farm in Dallas which is more centrally located than Name Cheap’s Phoenix.
Frankly, the pricing seems unbelievable.
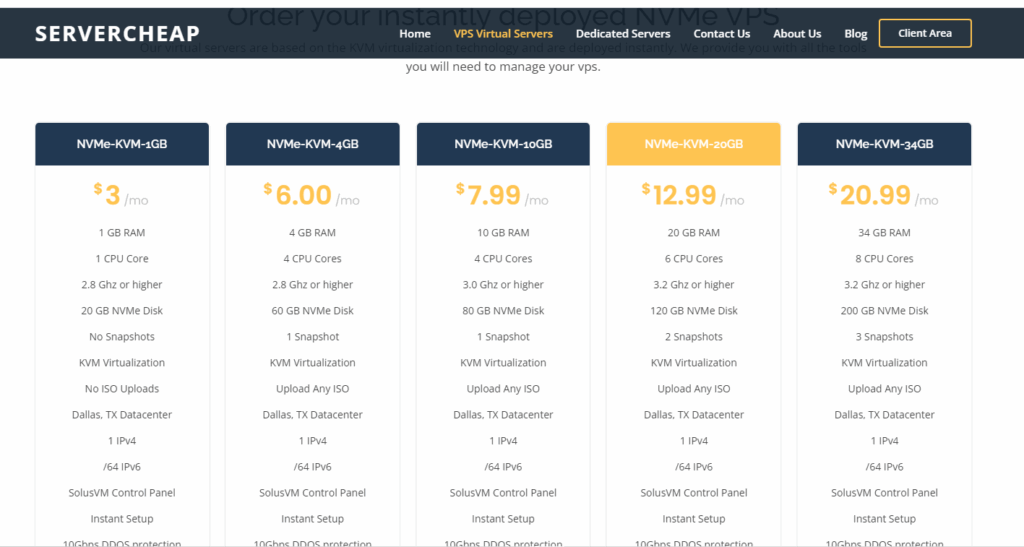
It almost seemed too good to be true, but I decided to take an $8 flyer.
The server has been up and running for about a week and so far so good. But there were a few hiccups in the process; things I discovered along the way that should help your setup go more smoothly if you choose to host a VPS there.
First off: the online ordering process is a little clunky. I don’t know if this business is just brand-new or needs to hire a more experienced GUI engineer. Either way, there is no doubt about it you’re not dealing with AWS here. (But, you’re not paying AWS costs either.)
Here’s a snapshot of their server setup page.
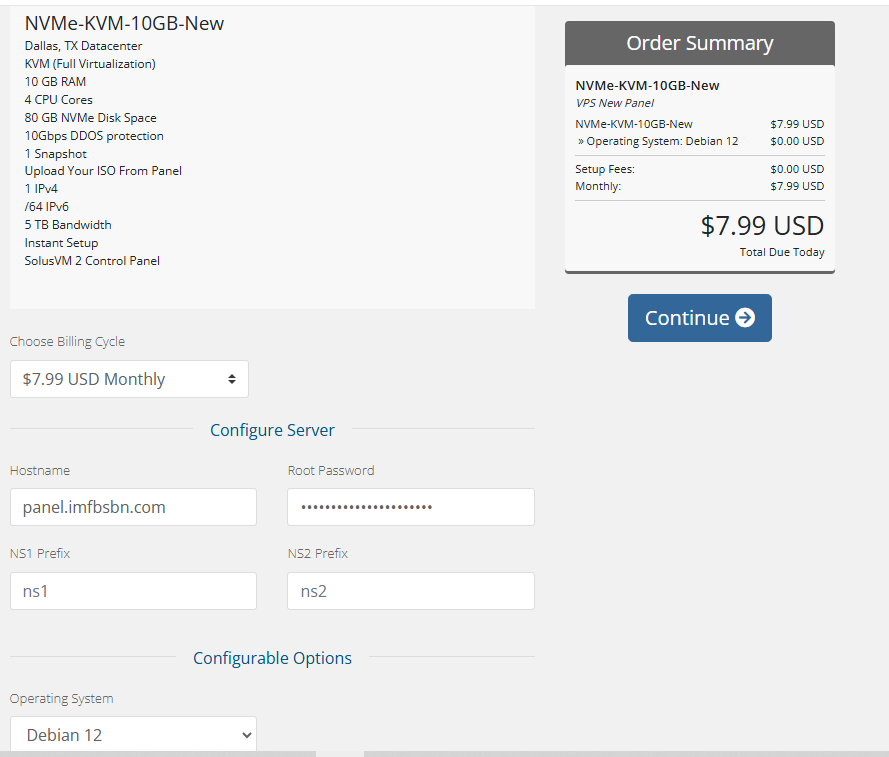
As it turns out:
- They will only pass the first word of the “hostname” field to the actual server.
- Whatever you put in for password is irrelevant. They will send you the server’s root password via email.
- I have no idea why they ask for the NS prefixes. I don’t think they use them at all.
You see what I mean? Clunky.
Because the way the backend deals with the hostname, when you load Virtualmin, the installation script wrongfully believes the machine has a FQDM as a hostname. Therefore, the script does not ask for one.
The easiest solution is to set the hostname before installing Virtualmin.
PRO TIP: don’t forget to set up DNS for your hostname BEFORE you load Virtualmin.
Here’s the commands I ran once logged in:
apt update
apt upgrade
hostnamectl set-hostname host.imfbsbn.com
nano /etc/hosts
reboot
curl -o /home/virtualmin-install.sh https://software.virtualmin.com/gpl/scripts/virtualmin-install.sh
cd /home
sh virtualmin-install.sh
reboot
Do I need to explain each command?
- apt update | always a good idea to update the package repository first.
- apt upgrade | then it’s always a good idea to upgrade all of the packages.
- hostnamectl set-hostname host.imfbsbn.com | this is the command that sets the system’s hostname has desired.
- nano /etc/hosts | I didn’t need to make any changes in this file. But I was looking for any remaining remnants of the old hostname. (Had I found any, I would have deleted them.)
- reboot | someone smarter than I will have to explain why this is necessary. But it was. If I didn’t reboot the system before trying to install Virtualmin, the wrong hostname was always used by the install script.
- curl -o /home… | this command downloads the install script into the /home directory without running it.
- cd /home | change directory to /home.
- sh virtualmin-install.sh | this command actually “runs” the installation script.
- reboot | the Virtualmin installation script gave a warning that the quota system would not work until the system was rebooted.
Once rebooted I was able to log into the Virtualmin web portal and everything worked fine.
Congrats on your new VPS at Server Cheap.
[/et_pb_text][/et_pb_column][/et_pb_row][/et_pb_section]
-
Upgrading Portainer
Real quick. I was getting ready to write the next post about building a Matrix/Synapse & Element server and I realized I had a server where Portainer was out of date.
This happens. I want to show you how easy it is to upgrade when necessary.
This is how you know an upgrade is available:
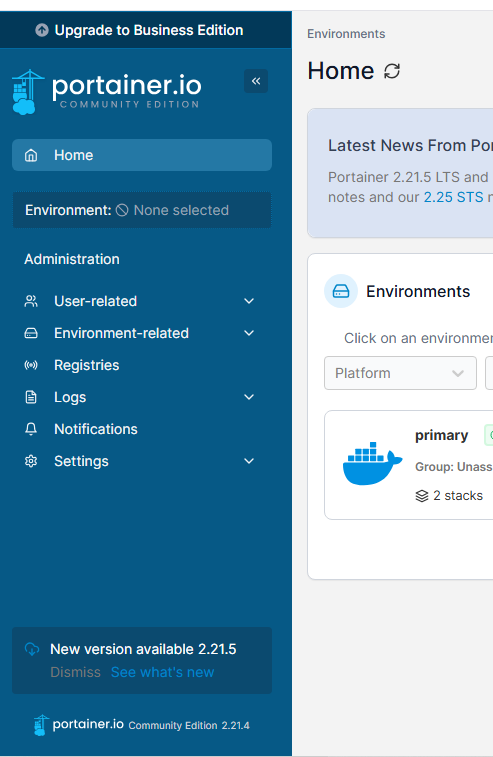
Worry not! The process to take care of this is super easy.
First – login to the server as root (or as a user with sudo rights.)
Next – navigate to the directory where you have the Portainer docker compose file.
- If you’re following with the Ubuntu server I created at Digital Ocean that will be the /home/portuser directory.
- On this particular server it happens to be the /home/admin.2 directory.
Run the following three commands:
docker compose down
docker compose pull
docker compose up -d
That’s it. Seriously.
In this particular server it looks like this:

If you reload the Portainer page you will see it has been updated to the most recent version.
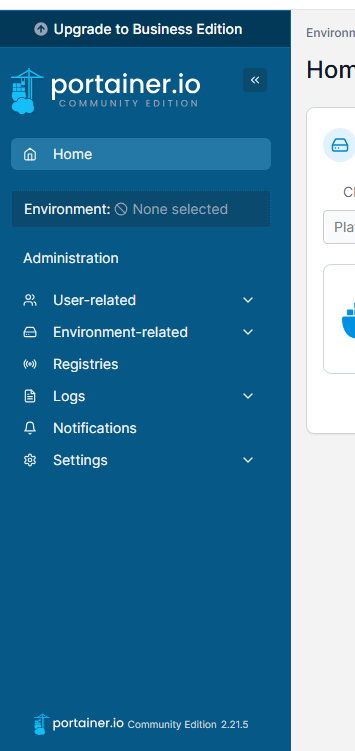
That’s it. Nice work.